Advertisement
Available languages
Available languages
Quick Links
Advertisement

Related Manuals for plottiX iXpress

Summary of Contents for plottiX iXpress
- Page 1 Version 03/2021 V2 English 1-11 Deutsch 15-25...
- Page 2 Check the power plug and power cord for any damage or attrition The optimum recommended ambient temperature when using the before using the device. Roll off the power cord completely before iXpress Transfer Press is between 15 and 50° C with a relative humidity Operating Instructions 7-10 of up to 70%.
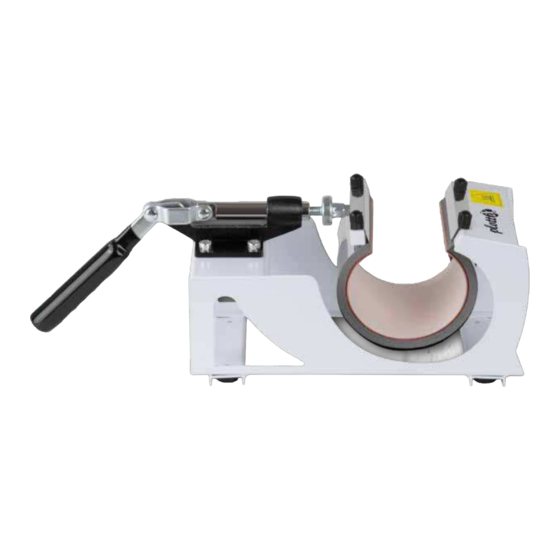
- Page 3 1 x User Manual Adjust the pressure by turning the Mug Press Port Setscrew. Connect your Mug Press to your iXpress Transfer Press via the connection for Mug Presses (iXpress Transfer Press is not inclu- Screws ded in the delivery).
- Page 4 Transfer Press Display Heat indicator ON/OFF Power Button TIMING Button To switch on and switch off iXpress Transfer Press. After 1. Press TIMING button for the timer countdown to start. Celsius switching on the device will directly turn into temperature The countdown is shown on the display.
- Page 5 Operating Instructions Operating Instructions Connect your Mug Press to the iXpress Transfer Before using the Mug Press, make sure your Set the desired temperature (TEMP Button) Place the sublimation paper with your motif mug is firmly placed in the press. Place the...
- Page 6 Tip: When inserting a new attachment, make Pull the lever forward and close the press. signal tone will occur. Press the TIMING Button nect the iXpress Transfer Press from the sure that you mount it with both to stop the countdown and switch off the screws on the left side first.
- Page 7 Troubleshooting Notes Q: I follow the instructions, but material transfer does not work properly. What Q: Do you offer warranty for Mug Press? can I do? A: Yes, we do offer a two year warranty for the Mug Press. If you have any questi- A: There are several reasons why the transfer may not work properly: ons related to our products, please contact your specialist retailer.
- Page 9 Entsorgen Sie dieses Gerät bitte umweltgerecht bei einer Sammelstelle Legen Sie niemals flüssige Gegenstände in die Tassenpresse und ver- Sie das Netzkabel komplett auf, bevor Sie das Gerät mit der iXpress Ihrer Stadt oder Gemeinde. wenden Sie nur ungefüllte Tassen. Falls das Gerät doch mit Flüssigkei- Transferpresse verbinden.
- Page 10 Anschluss für Tassenpresse Schraube reindrehen (für mehr Druck) Schließen Sie Ihre Tassenpresse über oder rausdrehen (für weniger Druck). den Anschluss für Tassenpressen an Ihre iXpress Transferpresse an (iXpress Transfer- Schrauben presse nicht im Lieferumfang enthalten). Zum Wechseln des Aufsatzes. Heizfläche Transferpressen-An- Für trockene und gleichmäßige Wärme.
- Page 11 Digitale Anzeige Bedienelemente iXpress Transferpresse (Auszug aus der Anleitung der iXpress Transferpresse) Bedienelemente der iXpress Transferpresse (Auszug aus der Anleitung der iXpress Transferpresse) Temperaturanzeige 2. Verwenden Sie die Tasten „+“ und „-“, um die ge- Ein-/Ausschalter wünschte Druckzeit für Ihre Übertragung auszuwählen.
- Page 12 Bedienungsanleitung Bedienungsanleitung Prüfen Sie vor Verwendung der Tassenpresse, Schließen Sie Ihre Tassenpresse an die iXpress Stellen Sie bei der iXpress Transferpresse die Legen Sie das Sublimationspapier mit Ihrem gewünschte Temperatur (TEMP-Taste) und Motiv auf Ihre Tasse und befestigen Sie es Transferpresse an.
- Page 13 Tipp: Achten Sie beim Einsetzen eines neuen wiederholender Signalton. Drücken Sie die Aufsatzes darauf, diesen zuerst mit beiden Sie die Presse. Sie die iXpress Transferpresse vom Strom TIMING-Taste, um den Countdown Schrauben auf der linken Seite zu montieren. und trennen das Kabel der Tassenpresse Beachten Sie, dass die Temperatur schwankt, zu stoppen und den Signalton auszuschalten.
- Page 14 Q: Gibt es auf die Presse Garantie? 3. Stellen Sie sicher, dass Sie die empfohlene Pressdauer eingehalten haben. A: Ja, wir bieten eine zweijährige Garantie auf die plottiX Tassenpresse. 4. Stellen Sie sicher, dass die Presse auf die Größe Ihrer Tasse eingestellt ist.
Need help?
Do you have a question about the iXpress and is the answer not in the manual?
Questions and answers