Table of Contents
Advertisement
Quick Links
Instruction Manual
Sonic Monitor
This device is not a measuring
instrument. You can use this device to
control sound pressure as a relative
value.
● Please read this instruction manual carefully before using to ensure
correct and safe use of this product.
● After reading this manual, please keep it in a safe place where you can
read it at any time.
Advertisement
Table of Contents

Summary of Contents for Honda Electronics HUS-3
- Page 1 Instruction Manual Sonic Monitor This device is not a measuring instrument. You can use this device to control sound pressure as a relative value. ● Please read this instruction manual carefully before using to ensure correct and safe use of this product. ●...
- Page 2 Foreword Thank you very much for using the Sonic Monitor HUS-3. To fully understand each function of this device and to use it more effectively, please read the instruction manual carefully before use. ■ This manual has been compiled to ensure the correct and safe use of this device by all users.
-
Page 3: Table Of Contents
c Contents 1. Safety Precautions (Please read carefully) ···································· 1 2. Features and applications ·························································· 6 3. Specifications, components, and optional components ····················· 6 4. Dimensions ············································································ 8 5. Connection diagram ································································· 8 6. Part names ············································································· 9 7. How to use and precautions ······················································· 9 8. -
Page 4: Safety Precautions (Please Read Carefully)
1. Safety Precautions (Please read carefully) The "Safety Precautions" section describes the important precautions to follow to prevent harm to the user, harm to others using the product, or property damage. Symbols and meanings Danger Failure to follow the instructions can lead to accidents resulting in death or serious injury. - Page 5 Safety precautions Danger ● Protect the device from moisture by not placing it in locations where it will be exposed to water. Failure to do so may result in a malfunction or, in some cases, a serious accident such as electric shock. Warning ●...
- Page 6 Battery handling precautions Danger ● Do not subject the battery to strong shocks, e.g., striking with a hammer, stepping on it, throwing it, or dropping it. ● Do not puncture the battery with a nail or any other means. ● Do not disassemble or modify the battery. ●...
- Page 7 Caution ● Do not use the battery except for the HUS-3. ● Do not charge the battery except for the HUS-3 itself and the dedicated charger (charging stand). ● Do not charge or leave the battery near a fire, stove, in the sun, in a hot car, or in any other place where the temperature will exceed 60°C.
- Page 8 Caution ● When disposing of batteries, insulate the (+) and (-) terminals with tape, etc., and dispose of them according to the method specified by the local government, or place them in the recycling bins available at participating rechargeable battery recycling stores. ●...
-
Page 9: Features And Applications
Frequency characteristics 10kHz~5MHz Signal Input Specified probe Measurement range 10mV / 50mV / 100mV / 500mV Voltage of probe detected (mV) rms: relative Meter indicated value HUS-3 value Main Power Dedicated lithium-ion battery: HBP-001 unit Consumption current 100mA or less 179(W)×132(D)×55(H) - Page 10 ● Components Probe HUS-3 main unit (Quartz glass or SUS316L) The probe shape can be either the straight type or the L- shaped type. Case Instruction manual Belt Battery AC adapter for charging (Lithium-ion battery) * The battery is not fully charged at the time of purchase.
-
Page 11: Dimensions
4. Dimensions Main unit Probe (Straight type) Probe (L-shape type) Unit: mm 5. Connection diagram [To charge] Connect the AC adapter. * When the AC adapter is connected, the device cannot measure the voltage. AC adapter Probe [To measure] Connect the probe... -
Page 12: Part Names
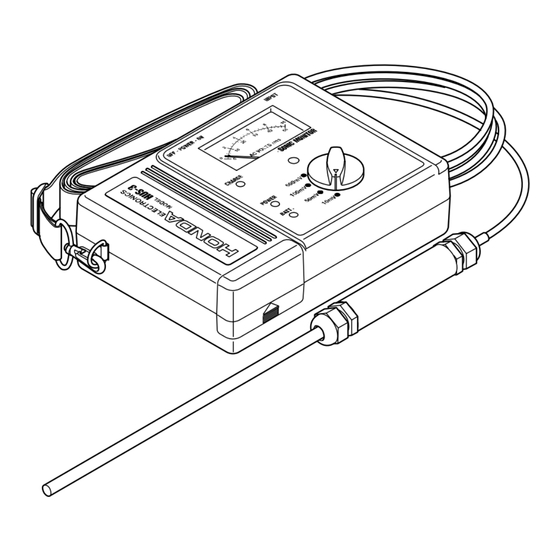
6. Part names Probe AC adapter terminal Power switch for charging Probe terminal Hook for belt Battery lid Meter CHARGE indicator POWER indicator AC adapter BATTERY Battery warning indicator Range selector knob 0-point adjustment 7. How to use and precautions ■... -
Page 13: Operations And Measurement Method
2. Handling the probe ● The probe is a precision instrument. Do not subject the probe to strong shocks. Doing so may cause a malfunction not only in its appearance but also inside the probe. ● Please handle the quartz glass probe with care to avoid injury from breakage. - Page 14 Place the probe in the tank of the ultrasonic cleaner (or under running water). This device indicates the ultrasonic vibration generated in the cleaner as a voltage detected by the probe. If the ultrasonic vibration is large, the voltage detected by the probe will be large;...
- Page 15 Measure from a large range (500 mV) to prevent the meter from swinging over. Switch the range so that the meter swings. Select a range so as not to let the meter swing out of the limit. Upper scale Max: 10mV Read the value indicated on the meter (upper scale) Max: 100mV...
- Page 16 When the power switch is turned off, the POWER (Green LED) will turn off. Be sure to turn off the power switch when the measurement is finished to prevent the battery from being depleted.
-
Page 17: How To Install The Battery
9. How to install the battery Remove the lid by sliding it upward while holding Be careful not to damage the lid. Insert the battery with the electrode side facing inside the hole. Be careful not to insert the battery in the wrong direction. -
Page 18: How To Change The Battery
10. How to charge the battery Turn off the power switch. Charging the battery while the power switch is on may cause a malfunction Connect the terminal of the supplied AC adapter to the charging terminal. You cannot measure the voltage when the AC adapter is connected. -
Page 19: How To Use The Optional Components
11. How to use the optional components 11-1. How to use the charging stand (optional) Plug the AC adapter's terminal into the jack on the front of the charging stand. Insert the battery into the charging stand. Be careful not to damage or bend the hooks and electrodes of the charging stand. -
Page 20: How To Use The Point Sensing Cover (Optional)
11-2. How to use the point sensing cover (optional) This cover is used to limit the location for confirmation. (For straight type only) You can limit the measurement point to the area indicated by the arrow. Install the point sensing cover to the straight type probe. Please take special care not to rotate the mounting rod, as this may cause the wire to break inside the device. -
Page 21: Precautions For Use
12. Precautions for use 12-1. How to attach the belt The belt should be attached as shown in the figure. Wear the belt around the neck during measurement. Use the belt to carry the * When using the device for device. -
Page 22: Troubleshooting
13. Troubleshooting ● If you suspect that the device is not functioning properly, please check the following points before calling for repair. Symptom Items to be checked Countermeasure Disconnect the AC adapter. If the AC adapter is connected, Is the AC adapter still plugged in? the device will not operate even if The device does the power switch is turned on. - Page 24 When the after service such as the repair is required, please contact the seller of product with the detailed information about the malfunction. Do not copy HUS-3 Industrial Equipment Division 20 Oyamazuka, Oiwa-cho, Toyohashi, Aichi 441-3193, Japan TEL : +81-532-41-2774 FAX : +81-532-41-2923 Web site: https://www.honda-el.co.jp/en/...
Need help?
Do you have a question about the HUS-3 and is the answer not in the manual?
Questions and answers