Table of Contents
Advertisement
Quick Links
Advertisement
Table of Contents

Summary of Contents for DINTEK DLP-010
- Page 1 DLP-010 Operating the DLP-010 Thermal Transfer Printer User Manual...
-
Page 2: Table Of Contents
Table of contents For your safety ......................2 Designating the warning instructions............2 User qualification ..................2 Field of application ...................3 Safety notes .....................3 Starting up the printer ....................4 Checking the scope of supply ..............4 Overview of the device................5 Connecting the power supply..............6 Inserting the material cartridge..............7 Operating elements ....................8 Display ....................10... -
Page 3: For Your Safety
1 For your safety Read this user manual carefully and keep it to hand for future reference. Designating the warning instructions This is the safety alert symbol. It is used to alert you to potential personal injury hazards. There are three key words for the severity of the potential injuries. DANGER Indicates a hazard with a high degree of risk. -
Page 4: Field Of Application
– Pay attention to the correct polarity when inserting the batteries. – Only charge the battery in the DLP-010 or in the designated charger. Do not use any other chargers, e.g., cigarette lighter socket in the car. –... -
Page 5: Starting Up The Printer
2 Starting up the printer Checking the scope of supply DINTEK – Printer – Brief instructions DLP-010 SET – Printer – Battery (Lithium) – Wide range power supply unit with four adapters for different sockets – USB cable – Two material cartridges –... -
Page 6: Overview Of The Device
2.2 Overview of the device Figure 2-1 Overview Socket for USB connection Socket for power supply unit Cutter for continuous media Compartment for material cartridge Battery compartment... -
Page 7: Connecting The Power Supply
AC wide-range power supply unit (Adapter) – Battery (Lithium) If the DLP-010 is connected to the power supply via the power supply unit, the battery in the DLP-010 is automatically charged. The battery can also be charged using an external charger (CHARGER). -
Page 8: Inserting The Material Cartridge
2.4 Inserting the material cartridge Figure 2-3 Replacing the material cartridge • Keeping the material cartridge straight, insert it into the compartment from above so that it engages with a click. Make sure that the material end is in the output tray. •... -
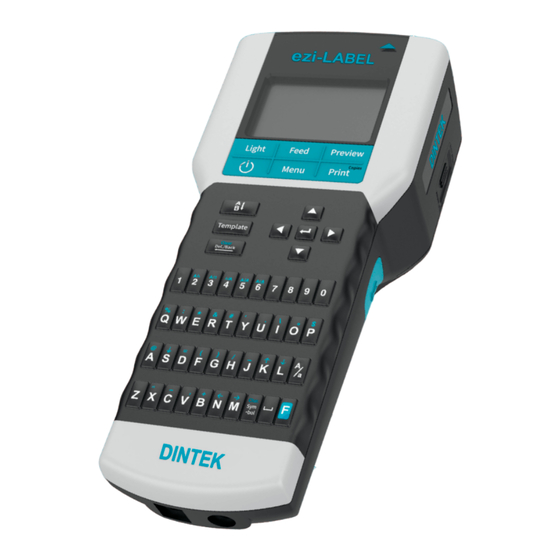
Page 9: Operating Elements
Operating Elements Figure 3-1 Operating Elements Operating elements Green keys On/Off switch ON/OFF Function key; uses the assignment labeled green when pressing a key (e.g., @ instead of A) Black keys Function key pressed g i l – Light – Feed Preview of the print result –... - Page 10 Operating elements Turquoise keys Function key pressed – Tem- plate – Changes the text alignment (horizontal/verti- cal) – Confirm entry, new line (up to six lines are possible) In the menu: back to the previous level On the input screen: delete en- Clear Del./Back tire contents...
-
Page 11: Display
Display The first line in the display shows the settings selected. Example of the first line in the display “F” indicates that the green function key has been pressed. The function key is used to switch to the assignment labeled green when pressing a key (e.g., @ instead of A). -
Page 12: Menu
Menu Use the arrow keys to navigate through the menu. Press the key to select an entry to go back. Clear Del./Back Changing the language The menu is set to English by default. To change the language, proceed as follows: •... - Page 13 Table 3-1 Menu [...] Level 1 Level 2 Level 3 Level 4 Description 3. Symbol Punctuation Punctuation marks ! " # General symbols General symbols § © ® Units Units $ £ ¢ Electr. General Electrical symbols Electr. Comp. Electrical components Home Electrics Home electrics Safety Signs...
- Page 14 Table 3-1 Menu [...] Level 1 Level 2 Level 3 Level 4 Description 6. Frame 1. No Frame No frame 2. Dotted Frame, dashed line 3. Thin Frame, thin line 4. Medium Frame, standard line 5. Thick Frame, thick line 1 mm 7.
- Page 15 Table 3-1 Menu [...] Level 1 Level 2 Level 3 Level 4 Description 9. Template 1. Normal Empty template 2. Barcode Barcode Code 39, You can implement Micro-QR- Type Code 128, Code, DataMatrix and PDF417 via Interleaved CLIP PROJECT 2/5, Codabar, EAN-8, EAN-13,...
- Page 16 Table 3-1 Menu [...] Level 1 Level 2 Level 3 Level 4 Description 9. Template 3. Sequence Pitch StaVal Start value of a sequence of num- bers (2 = 2, 3 ...) IncVal Increment of a sequence of num- bers (2 = 2, 4, 6...) EndVal Final value of a sequence of num- bers (5 = ...
- Page 17 Table 3-1 Menu [...] Level 1 Level 2 Level 3 Level 4 Description 9. Template 6. Cable Flag Orient. Hor., Ver. Text alignment of the cable flag Wrap Diameter Diameter of the cable Length (4 mm ... 100 mm) Cross sec- Cross section of the cable tion (0.25 mm²/AWG 22 ...
- Page 18 Table 3-1 Menu [...] Level 1 Level 2 Level 3 Level 4 Description A. Setup 2. Unit mm, inch Units in millimeters or inches 3. Feed Length Cur. Feed length. Default: 10 mm Max. Maximum 400 mm Min. Minimum 4 mm 4.
- Page 19 Table 3-1 Menu [...] Level 1 Level 2 Level 3 Level 4 Description A. Setup 7. Date Year Specify the current date Month Date Format Format: day (dd), month (mm), and year (yyyy) Example: dd/mm/yyyy 23/06/1977 yyyy-mm-dd 1977-06-23 8. Time Hour Specify the current time Minute...
-
Page 20: Creating The Marking
Creating the marking Creating the marking on the display 4.1.1 Entering and formatting text Example 1 Figure 4-1 Switching between upper case and lower case letters Example 2 Figure 4-2 Using the alternative key assignment Example 3 -W1 . 3 -W1 . - Page 21 Example 4 -W1 . 3 -W1 . 3 -W1 . 3 -W1 . 3 Copies Print Figure 4-4 Changing font size Example 5 Menu -W1 . 3 -W1 . 3 -W1 . 3 -W1 . 3 6. Frame 3. Thin Clear Del./Back -W1 .
- Page 22 4.1.2 Inserting symbols • Press the turquoise key. Char. Symbol • Select a category using the arrow keys. Punctuation marks General symbols Units Electrical general Electrical components Home electrics Safety symbols Superscript characters Subscript characters Arrows Greek upper case letters Greek lower case letters Mathematical symbols •...
- Page 23 4.1.3 Inserting barcode You can arrange for labels to be marked with a barcode. Move the cursor to the po- sition at which the sequence is to be located. If you select this template, the entered marking will be deleted. First create the template and th n enter the marking.
- Page 24 4.1.4 Numbering labels automatically You can arrange for labels to be marked with continuous numbers or letters. Move the cursor to the position at which the sequence is to be located. • Press the turquoise key. Tem- plate • Select “3. Sequence” . Press the key.
- Page 25 4.1.5 Creating label modules with a fixed width To label electronic modules, such as terminal blocks or fuses, one label can be printed for all modules. A width (“Pitch”) can be determined for each module. If you select this template, the entered marking will be deleted. First create the template and then enter the marking.
- Page 26 Selection Possible entry Example Total Number of modules [1 ... 64] one line, 12 = 12 modules [1 ... 32] two lines next to each other Pitch Width for each mod- [4 ... 1000.0 in steps 10.1 = 10.1 mm wide of 0.1 mm, mm or modules inches]...
- Page 27 4.1.6 Creating cable marking When marking cables or conductors, it may be useful to attach a marking that is readable around the cable. Figure 4-6 Cable marking If you select this template, the entered marking will be deleted. First create the template and then enter the marking.
- Page 28 4.1.7 Creating cable flags For large-area marking of cables, cable flags can be used. To do so, enter the marking for the front side. The back side is printed automatically with the same marking. -W1.3 -W1.3 -W1.3 Figure 4-7 Example of a cable flag If you select this template, the entered marking will be deleted.
-
Page 29: Printing
Printing Copies • Press the key, to print the marking once. Print • To print multiple copies, press the Copies key and the green function key Print simultaneously. • If you choose multiple copy, select whether to cut now or later. If you choose to cut later, the printer can add a line at the cutting position. -
Page 30: Maintenance And Troubleshooting
Maintenance and troubleshooting Troubleshooting Table 5-1 Troubleshooting Problem Possible cause Remedy Print image is blurred or Print head or print roller is Clean the print head and missing in places dirty print roller (see The tension of the ink ribbon To increase the tension of is too low the material, turn the ink rib-... - Page 31 Table 5-1 Troubleshooting Problem Possible cause Remedy The printer cannot be Batteries are empty Change batteries switched on Batteries are inserted incor- Insert batteries correctly rectly Rechargeable battery is Recharge battery empty Rechargeable battery is in- Insert rechargeable battery serted incorrectly correctly No power supply Connect the power supply...
-
Page 32: Error Messages
Error messages Table 5-2 Error messages Error message Possible cause Remedy “Cutter Error” Cutter was used while printer was Press any key (except ON/OFF printing. Printing is interrupted. Light “End of Tape” Material cartridge is empty Insert new material cartridge “Input Too Long”... -
Page 33: Appendix
Appendix Technical data Technical data t u l Print mode Thermal transfer Print length 4 mm ... 2200 mm Interfaces ' 5 . Voltage 100 V AC ... 240 V AC, 50/60 Hz Temperature Operation +5°C ... +40°C Storage -18°C ... +60°C Transport -25°C ... -
Page 34: Overview Of The Symbols
Overview of the symbols Table 6-1 Overview of the symbols Category Symbols Punctua- tion General symbols Units Electr. Gen- eral Electr. Comp. Home Elec- trics... - Page 35 Table 6-1 Overview of the symbols Category Symbols Safety Signs Superscript Subscript Arrows...
- Page 36 Table 6-1 Overview of the symbols Category Symbols Greek Upper Case Greek Lower Case Mathemati-...
- Page 37 How to contact us Internet Up-to-date information on DINTEK products and our Terms and Conditions can be found on the Internet at: www.dintek.com.tw Make sure you always use the latest documentation. It can be downloaded at: www.dintek.com.tw Subsidiaries If there are any problems that cannot be solved using the documentation, please contact your DINTEK distributor.
- Page 38 DINTEK Electronic Ltd...
Need help?
Do you have a question about the DLP-010 and is the answer not in the manual?
Questions and answers