
Summary of Contents for SachsenRad R8 Flex III
- Page 1 Operating instructions With e-bike pass and maintenance booklet SachsenRad E-Racing Bike R8 Flex III Product number: BB12281/82...
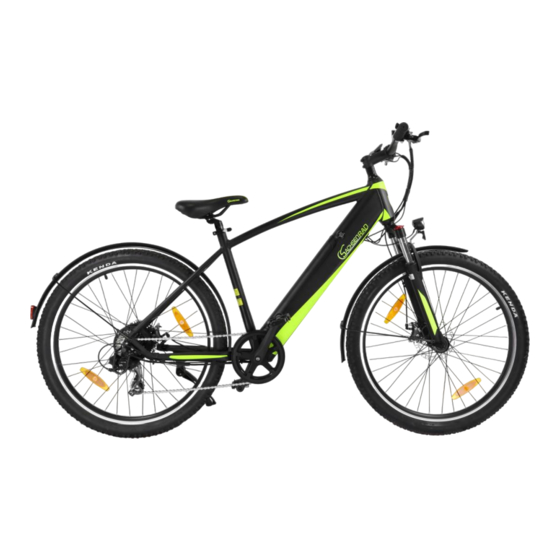
- Page 2 Congratulations on the purchase of your new e-bike! This e-bike is a powerful combination of a high-end bike, a powerful motor and a high-quality lithium battery. Faster and further with more fun: it is the ideal companion for your fitness programme, in your leisure time and on your everyday routes.
-
Page 3: Table Of Contents
Table of contents 1. unpacking and assembly instructions ........................... 42 2. STRUCTURE ..................................44 2.1 Before installation ............................... 44 2.2 Fitting the front wheel ............................44 2.3 Fitting handlebars ............................... 45 2.4 Aligning the steering head bearing and stem ...................... 46 2.5 Installing the pedals ............................ - Page 4 E-BIKE PASS / BIKE PASS PLEASE COMPLETE THE FOLLOWING E-BIKE PASS, IN MINIMAL FORM, CAREFULLY IN YOUR OWN INTEREST! FRAME NO.* MODEL TYPE E-RACING BIKE BATTERY SERIAL NO. ENGINE (REAR/CENTRE) ENGINE SERIAL NO. (IF AVAILABLE) SIZE (IN INCHES) COLOUR FRAME/FORK/RIM DERAILLEUR GEARS TYPE/NUMBER OF GEARS SPECIAL...
-
Page 5: Unpacking And Assembly Instructions
DETAILS on SERIES and FRAME NUMBER Your e-bike has a unique frame number. Make a note of this on the warranty certificate or in conjunction with your invoice and keep the certificate in case of theft. In this case, the passport contains all the relevant information for the police or your insurance company. To maximise the protection of your e-bike against theft, you should purchase a high-quality U-lock or chain lock. - Page 6 Carefully open the packaging box (please wear gloves to avoid injury). Carefully remove the bike from the box, preferably in pairs. Place the bike on a blanket to avoid scratching the floor and the bike. Remove all parts from the large box, including the accessory box. Carefully cut the various cable ties to avoid accidentally damaging the bike, paintwork or tyres or losing accessories.
-
Page 7: Structure
2. STRUCTURE 2.1 Before installation WARNING: Incorrect assembly of your e-bike can cause considerable material damage and even personal injury. If you are not sure whether your assembly is correct, please contact your dealer. WARNING: The motor, controls, sensors, battery and various cables on your bike must not be used for any other purpose. -
Page 8: Fitting Handlebars
3. mount the front wheel on the fork. Ensure that the fork is attached to the axle and make sure that the disc is in the center of the brake. 4. insert the quick-release axle into the spring and tighten the screw (the quick-release nut must be on the same side as the brake). -
Page 9: Aligning The Steering Head Bearing And Stem
Now you need to fit the handlebars and then readjust the steering head bearing. Firstly, loosen the four bolts on the stem (Fig. 1). NOTE: The stem is designed differently on some versions of the R8. Now place the handlebars in the shell of the stem (please note the direction and routing of the cables and Bowden cables) and screw the stem back on as shown in Fig. -
Page 10: Installing The Pedals
picture the final alignment of the assembly. When everything is correctly aligned, tighten the single head bolt (C) until the steering head bearing no longer has any play but can still be moved easily. You can then tighten the two horizontal bolts of the handlebar stem once from the left (A) and once from the right (B) until everything forms a unit. -
Page 11: Adjusting The Saddle Height
Picture A Picture B Picture C Tip: Please adjust the nut on the opposite side of the lever to set the tightening force of the lever. WARNING: Do not pull the seat post out further than the minimum insertion depth mark. The marking must not be visible! Risk of breakage and accident! No warranty if disregarded! 2.7 Adjusting the saddle height 1. -
Page 12: Lighting
Not after the first few rides, but after a certain period of use, the chain may be worn due to the transmission strength and can be correctly adjusted using a tensioning screw that holds the chain in place. The chain should be adjusted to the smallest sprocket of the flywheel. -
Page 13: Removing And Inserting The Battery
2.10 Removing and inserting the battery Removing the battery Inserting the battery Removing the battery To remove the battery, insert the supplied key into the lock and turn it slightly to the right. The battery should now come a little way out of the locking mechanism. You can then remove the battery from the battery compartment. -
Page 14: Operation And Functions
On the other side of the suspension fork you have the option of adjusting the spring a little softer or firmer, please refer to the labelling on the grey lever (B). Turn it to the right to adjust the fork a little harder (+), turn it to the left to adjust it a little softer (-). - Page 15 Specifications - 24V / 36V / 48V power supply - Rated current: 10mA - Maximum operating current: 30mA - Quiescent current when switched off: <1 µA - Working temperature: -20 to 60 °C. Control display dimensions (in mm) Functions of the control display / function layout - Intelligent battery indicator - Motor power output - Display of the assistance level...
- Page 16 Installation instructions The control display is mounted on the left-hand side of the handlebars. Adjust the angle for a good picture screen view. Switch off the power beforehand. General operation Switching the e-bike control display on and off To switch on the control display, press and hold the menu button for 2 seconds. When you press the menu button button again for 2 seconds, the E-Bike system is switched off.
- Page 17 Error code display The components of the E-Bike system are continuously and automatically monitored. As soon as an error is detected, the control display shows you an error code (see error code list). If an error code is displayed, have the display checked and repaired if necessary. Please contact the manufacturer or a cycle dealer in your area.
-
Page 18: Your E-Bike Battery
Warning 1. use the display with care. Please do not open the housing when the control display is switched on. 2. avoid objects hitting the display. 3. contact the manufacturer if the display is not working properly. 4 These instructions are a universal version for Display KD21C. The specification may differ with regard to the software. -
Page 19: Battery - Charge Level Indicator
4.1 Battery - charge level indicator Press and hold the button on the battery charge level indicator and the current charge level of your e-bike will be displayed. Illumination of the LEDs: Blue Fully loaded Green Average state of charge Low state of charge Flashing Battery must be charged, no operation possible... -
Page 20: After Use
WARNING: Never intentionally short-circuit a battery. This can result in an explosion, fire and therefore a serious risk to your health. 4.3 After use Switch off the control display or the main battery switch before dismounting in order to be able to lower the kickstand safely. -
Page 21: Factors Influencing The Reach
Tip: You can recharge your battery at any time. If you do not charge the battery in time when it is empty, it will gradually lose its performance and service life. With proper use and maintenance, your battery can retain more than 80% capacity after more than 500 charging cycles, but the decrease in total capacity is inevitable. -
Page 22: Maintenance
Please check the braking distance and braking force before each journey. Please note that the right brake corresponds to the rear brake and the left brake corresponds to the front brake. Your e-bike is equipped with normal brake pad specifications. Please check the brake pads every time and ask your dealer about the brake pads. - Page 23 You can voluntarily use this maintenance table and the service table to carry out inspections and repairs. to be properly carried out and registered by your mechanics. You are not obliged to in addition. In the event of a subsequent warranty claim on your e-bike, this can help us in our assessment and possibly confirm or even increase the chances of goodwill.
-
Page 24: Safety Instructions
Impellers The front and rear wheels of the vehicle should be in the centre of the fork or frame. The tension of each spoke on the wheel rim should be similar and the rim should form a regular circle without dents. If spokes are missing or broken, the rim will lose stability. Please ask your dealer or professional technician for repair and troubleshooting. - Page 25 Please be especially In wet weather, your electric bike brakes many times slower than normal. Please careful in bad reduce your speed, brake in advance and ride carefully through bends. Make sure that weather! you are seen by other road users. If you are riding on dark roads or at night, please wear clothing with reflective stripes or fluorescent paint as a warning.
-
Page 26: 9Th F.a.q. - Frequently Asked Questions And Their Solutions
Signature/ Stamp Signature/ Stamp Signature/ Stamp Signature/ Stamp Specialist workshop Specialist workshop Specialist workshop Specialist workshop 5th inspection 6th inspection 7th inspection 8. inspection Carried out on: Carried out on: Carried out on: Carried out on: Signature/ Stamp Signature/ Stamp Signature/ Stamp Signature/ Stamp Specialist workshop... - Page 27 Problem Possible cause Solution approach Control display does not 6. Battery empty 5. Fully charge the battery respond 7. Battery is not seated correctly in the 6. Return the battery slide to its - Attempt to switch on battery sled original position and tighten the without result 8.
-
Page 28: Data Sheet
development 6. Gear shift must be readjusted 6. Readjust gear shift* 7. Chain is too tight 7. Re-tension the chain* 8. Pedal crank has come loose 8. Retighten crank arms* 5. steering head bearing has too much 5. retighten steering head bearing play Braking effect decreases, 3. -
Page 29: Declaration Of Conformity
Input voltage AC 100/240 V, 50/60 Hz Output voltage 42 V Output current Mechanical specifications Brake type Oil brake Finger paddle right 9-speed Statement on the sound pressure level: The A-weighted emission sound pressure level that can be heard by the driver is less than 70 dB(A). 11. -
Page 30: Imprint
Pb = battery contains more than 0.004 per cent lead by mass Cd = battery contains more than 0.002 per cent cadmium by mass Hg = battery contains more than 0.0005 per cent mercury by mass. Please follow the instructions above. 13. - Page 31 8. the warranty or guarantee period is neither renewed nor extended by an executed warranty or guarantee. The assertion of claims after expiry of the period is excluded. 9. warranty and guarantee provisions other than those listed above are only valid if if they are confirmed in writing by Leicke GmbH / SachsenRad.
- Page 32 10. should a technical problem occur with the e-bike you have purchased, please contact us. with the support hotline of Leicke GmbH / SachsenRad ( Tel: 03412196181). Contact: info@sachsenrad.de LEICKE GmbH, Stöhrerstrasse 17, 04347 Leipzig...
-
Page 33: Return Voucher
15.RETURN VOUCHER If you have any questions about your e-bike, please contact our customer service team: info@sachsenrad.de Please complete this form carefully. All information is voluntary. Failure to complete the form will not affect your consumer rights, but will complicate and delay the processing of your return. - Page 34 If you have already sent us the receipt by e-mail, it is sufficient to state the reference number. 4. stick the return label on the parcel If you do not yet have a return label, then simply contact our customer service. 5.
- Page 36 We wish you Have a good journey with your SachsenRad E-Racing Bike R8 Flex III...
Need help?
Do you have a question about the R8 Flex III and is the answer not in the manual?
Questions and answers