
Related Manuals for HOME PILOT 12481001

Summary of Contents for HOME PILOT 12481001
- Page 1 Smart remote control 6 groups - Instruction manual ....................33 Item no.: 12481001 UM D101-2...
-
Page 2: Table Of Contents
Table of contents This manual...............35 Deleting all settings (reset) ..........58 Hazard symbols ..............35 Technical specifications ............59 Symbols and depictions used ..........36 Battery replacement ............60 Safety instructions .............37 Simplified EU declaration of conformity ......62 Intended use ..............38 General view / operating buttons........39 Rear side of device .............40 Brief description of the Smart Remote Control 6 Groups Standard ................41... -
Page 3: This Manual
This manual... describes how to use the Smart remote control 6 groups. ◆ Please read this manual through completely and follow all the safety instructions. ◆ This manual is part of the product. Please store it in an easily accessible place. ◆... -
Page 4: Symbols And Depictions Used
Symbols and depictions used Depiction Description Procedures Itemisation ◆ 1) or a) List Useful information Please read the respective manual... -
Page 5: Safety Instructions
Safety instructions Incorrect use leads to an increased risk of injury. ◆ Never use defective or damaged devices. ◆ Check the Smart remote control 6 groups is intact. Consult our service department in the event that you discover damage. ◆ Children must not play with the Smart remote control 6 groups. ◆... -
Page 6: Intended Use
Intended use Only use the Smart remote control 6 groups for the remote control of roller shutters and electrical appliances (e.g. lighting). Operating conditions Only use the Smart remote control 6 groups in dry rooms. Radio systems that transmit on the same frequency can cause interference. Dangers in the case of improper use Using the Smart remote control 6 groups for any other purpose than previously mentioned is not permissible. -
Page 7: General View / Operating Buttons
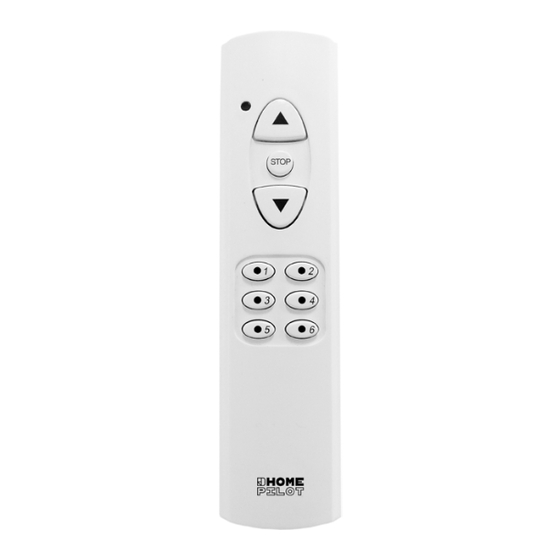
General view / operating buttons Status LED (green / red) UP (on/off) STOP (off)* DOWN (off/on) * Switch jog mode on/off Item no.: 12481001 39 39... -
Page 8: Rear Side Of Device
Rear side of device Space for notes Type plate (example) Fixing screw for item no. 12481001 Connect Disconnect button button Log-on mode Log-off mode Reversal of rotation direction End point setting Purge function Hold for 5 s Hold for 5 s... -
Page 9: Standard
Brief description of the Smart remote control 6 groups The DuoFern radio system enables, bidirectional data exchange between the various participants of a radio network. All control commands from a DuoFern transmitter are confirmed by the DuoFern receivers. You can use the Smart remote control 6 groups to manually remote control various HOMEPILOT devices (e.g.: RolloTron smart flush-mounted belt winder premium or HOMEPILOT Smart light receiver for lighting). -
Page 10: Brief Description Of The Smart Remote Control 6 Groups
Brief description of the Smart remote control 6 groups Connect button You can perform the following functions with the "Connect” button: ◆ Log-on mode Log DuoFern end units on to the manual transmitter. ◆ Reversal of rotation direction Change the rotation direction of the tubular motor or switch between the device and lighting function. -
Page 11: Initial Commissioning
Initial commissioning The battery is factory-fitted in the battery compartment together with a separating film. Pull the separating film out to the right with some force as shown. It is not necessary to loosen the screw on the back of the housing first. - Page 12 Logging on DuoFern end units In order to operate a DuoFern end unit with the Smart remote control 6 groups, this must be logged on to the respective DuoFern end unit. Use a thin object that is not too sharp to press the "Connect” button. Switch the desired DuoFern end unit or HOMEPILOT Smart light receiver to log-on mode.
- Page 13 Logging on DuoFern end units . . . Press the desired device button that you subse- quently want to use to select the device..Observe the status LED Green: Log-on was successful. Red: The button is already fully allocated. 1.
- Page 15 47 47...
-
Page 16: Logging Off Duofern End Units
Logging off DuoFern end units Switch the desired DuoFern end unit to log-off mode. (See the corresponding operating manual) Switch the Smart remote control 6 groups to log-off mode. In order to do so, briefly press the “Disconnect button”. When the log-off has been successfully completed, the status LED turns green. -
Page 17: Activating The "Purge" Function
Activating the “Purge” function This function logs off all of the logged-on DuoFern end units that no longer react. This could be necessary, for example, with a faulty device that can no longer be logged off as described above. Press and hold the “Connect button” for approx. 5 seconds until the status LED flashes red. -
Page 18: End Point Setting
End point setting You can use this function to subsequently set or correct the end points of HOMEPILOT electronic tubular motors. Conditions for the end point setting: ◆ The end point setting can only be performed if only one device (actuator) is logged on to the selected group. If more than one participant is logged on to the selected group, the function is blocked. - Page 19 End point setting The status LED flashes green (approx. 2 x per second) on successful activation. Set the upper end point. Keep the button pressed until the desired end point is reached. Release the button as soon as the upper end point is reached.
-
Page 20: Reversal Of Rotation Direction
Reversal of rotation direction You can use this function to subsequently set or correct the rotation direction of connected tubular motors. Alternative use of the reversal of rotation direction: Switch between the lighting and device function In the case of universal actuators for lighting or devices, reversing the rotation direction switches between the lighting and device function. - Page 21 Reversal of rotation direction . . . Select the desired DuoFern end unit..2 x / second Activate the “Reversal of rotation direction” function. In order to do so, press the “Connect button” twice in short succession within one second. If successfully activated, the tubular motor con- nected to the actuator confirms this by starting up for a short time.
-
Page 22: Manual Operation Of Actuators With Several Channels
Manual operation of actuators with several channels Press the desired device or group . . . button (where applicable)..Open the roller shutter or switch the appliance on/off Stop the roller shutter or switch off the appliance Close the roller shutter or switch the appliance off/on Observe the status LED... -
Page 23: Controlling Blinds And Dimmers In Jog Mode
Controlling blinds and dimmers in jog mode Function: ◆ If the UP or DOWN button is pressed briefly in jog mode, a jog command is sent. This enables the easy adjustment of Venetian blind slats as the motor only runs briefly. ◆... - Page 24 56 56...
- Page 25 57 57...
-
Page 26: Deleting All Settings (Reset)
Deleting all settings (reset) Press and hold the “Disconnect button” for approx. 5 seconds 5 seconds until the status LED flashes red. The status LED flashes red. Release the “Disconnect button” as soon as the status LED lights up red continuously. All settings in the Smart remote control 6 groups are deleted. -
Page 27: Technical Specifications
Technical specifications Transmission frequency: 434.5 MHz Transmission power: max. 10 mW Range: - Outdoors: approx. 100 m - Indoors: approx. 30 m (depending on the building structure) Supply voltage: Battery type: CR2450 - Service life 1: approx. 2 years with 5 actuations per day - Service life 2: approx. -
Page 28: Battery Replacement
Battery replacement For devices containing one or more button/coin-cell batteries, the following safety instructions must be observed: If the coin-cell battery is swallowed, it can cause severe internal burns and death within just 2 hours. ◆ Children must not replace batteries. ◆... - Page 29 Battery replacement When the battery is almost empty, the status LED flashes red when you operate the Smart remote control 6 groups. The battery compartment is located on the back of the Smart remote control 6 groups. Use a screwdriver to release the back of the housing and lift it up carefully.
-
Page 30: Simplified Eu Declaration Of Conformity
Simplified EU declaration of conformity DELTA DORE RADEMACHER GmbH hereby declares that the Smart remote control 6 groups complies with the Directive 2014/53/ EU (Radio Equipment Directive). The full text of the declaration of conformity is available at the following website: www.homepilot-smarthome.com DELTA DORE RADEMACHER GmbH Buschkamp 7 46414 Rhede (Deutschland) - Page 31 63 63...
- Page 32 DELTA DORE RADEMACHER GmbH Geräte-Elektronik GmbH Buschkamp 7 46414 Rhede (Germany)
Need help?
Do you have a question about the 12481001 and is the answer not in the manual?
Questions and answers