
Related Manuals for RHINO RVS950

Summary of Contents for RHINO RVS950
- Page 1 Thank you for supporting Australian Manufacturing RHINO VAN STORAGE RVS950 Instruction Manual Australian Innovation Patent No: 2021104495...
-
Page 2: Warning/ Safety Information
Failure to follow the instructions correctly may result in serious injury or death. - The RVS950 must not be modified in any way and must be maintained in good working order. - The RVS950 must not be modified in any way and must be maintained in good working order. -
Page 3: Document Contents
DOCUMENT CONTENTS SAFETY INFORMATION COMPONENTS SUPPLIED & TOOLS REQUIRED PRE-INSTALLATION CHECK SHELVING UNIT ASSEMBLY VAN INSTALLATION OVERVIEW VAN INSTALLATION 11-15... - Page 4 COMPONENTS PARTS C - SHELF STOP A - END UPPER PANEL B - END LOWER PANEL Qty: 8 Qty: 2 Qty: 2 D - TOP E - SMALL SHELF F - LARGE SHELF Qty: 1 Qty: 2 Qty: 2 G - MID RAIL BRACE Qty: 1...
-
Page 5: Hardware & Tools
HARDWARE & TOOLS KIT 1 - Top & Side restraint H - TOP RESTRAINT HINGE I - LOAD DISTRIBUTION PLATE Qty: 2 Qty: 3 J - M10 x 20mm BOLT K - M10 WASHERS L - M10 NUT Qty: 6 Qty: 3 Qty: 6 Torque: 44Nm... -
Page 6: Tools Required
HARDWARE & TOOLS KIT 3 - Floor Mount R - UNDER BODY PLATE Qty: 4 S - M10 x 50mm BOLTS K - M10 WASHER L - M10 NUT Qty: 4 Qty: 4 Qty: 4 Torque: 44Nm Torque: 44Nm KIT 4 - Rack Assembly X - M6 NUT V - M6 x 12mm BOLT W - M6 WASHER... -
Page 7: Pre-Installation Check
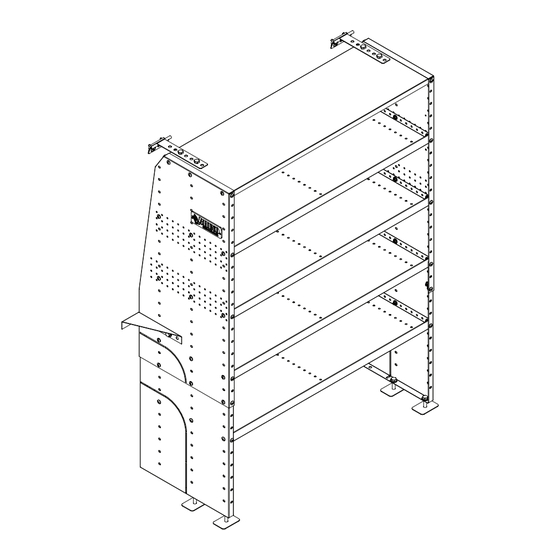
PRE-INSTALLATION CHECK PLEASE READ THROUGH THE ENTIRE INSTRUCTION MANUAL BEFORE COMMENCING THE INSTALLATION Before beginning installation, the following needs to be identified: 1. Upper Bulkhead location (where the vehicle has an inner and outer metal skin with a gap between the two) for the Top Restraint Hinge (H). 2. - Page 8 SHELVING UNIT ASSEMBLY Step 1 Using an End Upper and Lower establish the optimum height of unit. At least 3 rows of holes must be overlapping. END UPPER PANEL 2 total END LOWER PANEL 2 total 2: Adjust and set at correct height of 1: 1: Sleeve parts together Sleeve parts together internal van measurements...
- Page 9 SHELVING UNIT ASSEMBLY Step 2 Fix shelves into place. Fix the Top into place. 1 off M6 Nut 30 total M6 Bolt 30 total M6 Washer 30 total Small Shelf 2 off Large Shelf 2 off 5: 5: Position Position End Panels End Panels (A)(B) (A)(B), Shelves , Shelves (E)(F)
- Page 10 VAN INSTALLATION OVERVIEW Place the shelf assembly in the desired location. Check the shelf is square and level. MOUNTING MOUNTING INFORMATION: INFORMATION: Install Install Top Restraint Hinges Top Restraint Hinges (H) (H) in in desired location so the flange sits flat desired location so the flange sits flat against the against the Upper...
- Page 11 INSTALLING & MARKING FIXTURES Step 3 Note: The Top Restraint Hinge (H) can be installed in both directions to suit the contour of the Upper Bulkhead. Top Restraint Hinge M10 X 20mm 2 off 4 off M10 Nut 4 off Load Distribution Plate - 2 off Mid Rail Brace...
- Page 12 DRILL Step 4 Remove the shelf assembly from the vehicle to gain access to drill the holes for: Top Restraint Hinge (H), Mid Rail Brace (G), End Lower Panel (B) Top Restraint Hinge Top Restraint Hinge 54.00 Using an 22mm hole saw 22mm hole saw , , Using an 8mm 8mm drill bit...
- Page 13 BODY BLOCK ASSEMBLY INSTALL Install three Steel Body Blocks: Top Restraint Hinge (H) x2, Mid Rail Brace (G) x1 18: Slip the Slip the Steel Body Block Steel Body Block (N) 19: Ensure you are using the Ensure you are using the 20: Keeping tension on the Keeping tension on the through the...
- Page 14 FINAL INSTALL Step 6 Re-Install the unit into the vehicle and install hardware for: Top Restraint Hinge (H), Mid Rail Brace (G), End Lower Panel (B) M10 x 50mm Bolt 4 off M10 Washer Steel *ALREADY 4 off Body Block INSTALLED* Vehicle Floor Reference Only...
- Page 15 CUSTOMISE SHELF STOP Step 7 Once the Van Storage Shelf is complete. Customise the Shelf Stops (C) to suit. M6 Bolt 16 total Shelf Stop 8 off M6 Nut 16 total 28: Position Position Shelf Stops Shelf Stops (C) 29: Final Shelf Unit Final Shelf Unit to desired location and attach to desired location and attach...
Need help?
Do you have a question about the RVS950 and is the answer not in the manual?
Questions and answers