Table of Contents
Advertisement
Advertisement
Table of Contents

Related Manuals for DUOTTS F26


Summary of Contents for DUOTTS F26
- Page 3 THANK YOU FOR CHOOSING DUOTTS : Support@duotts.com : @DUOTTS_E : @DUOTTS : @DUOTTS : WWW.DUOTTS.COM...
-
Page 4: Table Of Contents
-------------------------------------------------------------------------------------- WARNING ------------------------------------------------------------------------------------------------------ UNBOXING ---------------------------------------------------------------------------------------------------- WHAT'S IN THE BOX -------------------------------------------------------------------------------------- FRAME NUMBER AND MOTOR NUMBER ------------------------------------------------------------- F26 STRUCTURE INTRODUCTION --------------------------------------------------------------------- INSTALLATION OF IN TEGRAL BODY ------------------------------------------------------------------ REMOVE THE BATTERY ----------------------------------------------------------------------------------- INSTALL THE BATTERY ----------------------------------------------------------------------------------- HOW TO ADJUST THE SUSPENSION FORK... -
Page 5: Warning
If you notice abnormalities in any component on the bike, take it to a licensed mechanic to be repaired or replaced immediately. DUOTTS assumes no liability for harm, injury, or death of the rider. This manual is not intended to function as a detailed service manual. -
Page 6: Unboxing
UNBOXING Congratulations on your purchase of a new DUOTTS F26! Your bike and related accessories are inside your box, and the instructions below are meant to show you all the parts inside the box. Before removing the packing foam, please take out all the parts to confirm if there are any missing parts. -
Page 7: Frame Number And Motor Number
As shown in the picture. Please find the serial numbers stamped on your bike and keep records yourself. The motor number and frame number will be the proof of purchase for DUOTTS to honor the warranty. Also, if an electric bike is stolen, you can provide the frame number for law enforcement. -
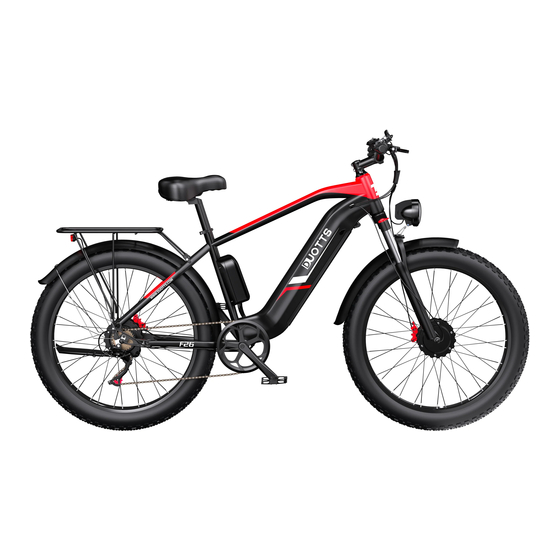
Page 8: F26 Structure Introduction
F26 STRUCTURE INTRODUCTION ------------ ------------ --------- ---------- ---- ------------------------ --------------------- 1. Handlebar 2. Headlight 3. Front fender 4. Brake disc 5. Battery 6. Crank Shaft 7. E-bike Seat 8. Controller box 9. Rear shelf 10. Rear fender 11.Motor -------- 12. Front brake lever 13. -
Page 9: Installation Of Integral Body
INSTALLATION OF INTEGRAL BODY 1. Adjust the Stem to the 2. Attach the handlebar to 3. Remove the front fork front and lock the screws the stem connection, and protective rod and brake with an Allen key. Use an thread in the bolts. protective pad. -
Page 10: Remove The Battery
10. Tighten the rear shelf 11. When installing the foot 12. Use a wrench to tighten screws. pedal, pay attention to the pedal. distinguishing between ''R'' and ''L''. 13. Connect the motor wires and headlight wires. REMOVE THE BATTERY 1. Unlock the battery with the key 2. -
Page 11: How To Adjust The Suspension Fork
If you weigh more than 120 kg, you should lock the suspension fork before riding. Note: do not sit on the bike when you are turning the knob. HOW TO CHARGE DUOTTS provides you with both whole bike charging and external battery charging for your convenience to choose. Whole bike charging mode:... - Page 12 CHARGING SAFETY Do not use a charger other than DUOTTS to charge the E-Bike. When you receive the E-Bike, please charge the battery for the first time in time to ensure that the battery is fully charged when you ride it for the first time.
-
Page 13: Instrument Introduction
INSTRUMENT INTRODUCTION ----------- --------------- --------------- 1. Switch on/off the Long 2. Increase gear 3. Decreasing gear button for 3 seconds to start 4. Multifunctional display area 5. Capacity display 6. Speed display 7. Gear display 8. Total driving distance Caution: The meter tries to avoid unnecessary knocks. -
Page 14: On/Off Lcd Display
ON/OFF LCD DISPLAY Turn on the display Press and hold the'' ''button for more than 3 seconds, and the display and controller start to work. Turn off the Display and power off Press and hold the'' ''button for more than 3 seconds, and the display will be closed. -
Page 15: Operating The Lcd Display
OPERATING THE LCD DISPLAY Increase Pedal Assist Level Short-Press the'' ''button. Decrease Pedal Assist Level Short-Press the'' ''button. Toggle Speed, Odometer, TRIP, Trip Timer, VOL, Average Speed Press and let go of the'' ''button. Max Speed. Keep the throttle still while driving. Press Cruise Control and hold the '' '' key for 5 seconds at the... -
Page 16: Display Setting
DISPLAY SETTING To change display settings, hold the button simultaneously to enter into the advanced settings menu. In this menu, clicking the'' ''button will toggle between each numbered setting. To adjust the value of each setting, click the buttons accordingly. Setting Function Default... -
Page 17: Safety Notes
OPERATING SAFETY Before riding the bike for the first time, ensure that you have read and understood this manual. Make sure you understand how to turn on and activate the pedal assist and throttle. When first riding the bike, take care to start slowly with a low level of pedal assist, Take your first ride in a safe area away from cars, other bikers, pedestrians, or other potentially dangerous obstacles. -
Page 18: Riding At Night
RIDING AT NIGHT Riding at night comes with more risks than riding during the day due to decreased visibility so riders are encouraged to exercise increased caution. Before riding at night, make sure that reflectors are installed on your e-Bike. For increased visibility, also ensure the front headlight and rear tail light are turned on and adjusted such that other people on the road can see them clearly. -
Page 19: Error Codes
Ensure all cables and connectors at the front of the bike are securely connected or certain components may not work including the front light, the motor inhibitor switches, the LCD display, and the throttle. The motor inhibitor switches shut the motor off as soon as the rider hits the brakes. If these switches are not operational it will take longer to slow down which in some riding situations could cause injury or death to the rider. -
Page 20: Warranty
All Bikes should be operated in accordance with the DUOTTS owner's manual provided with the bike. DUOTTS warrants to the original registered purchaser that bikes shall be free from all defects in material and workmanship for a period of 12 months from the date of shipment when used in accordance with the owner's manual and for the purpose intended. -
Page 21: Electric Bike Maintenance
We will replace any parts deemed to have been damaged during shipping. Shipping damage must be reported to DUOTTS within 14 days of shipment arrival. This applies to all products including bikes and accessories. You will NOT be refunded as compensation for your time or efforts in replacing damaged parts. -
Page 22: Lubrication
LUBRICATION In order to keep all the mechanics in working order, you can apply lubrication on the major moving parts such as the chain. You should use a special cleaning solution to clean off the chain before applying a bike lubricant to it. This should ideally be done at least once a week if you use the bike often. -
Page 23: Disclaimer
DUOTTS makes no claims or guarantees that the brakes, battery, frame, motor, motor controller, LCD display, electrical cables, electrical cable housings, fasteners, grips, fork, stem, shifters, headset, seat post, seat post clamp, handlebar stem clamp, saddle, wheel hubs, handlebars, spokes, rims, tires, tubes, derailleur, freewheel, cassette, throttle, kickstand, lights, reflectors, hardware,... - Page 24 Facebook Instagram Twitter YouTube WhatsApp...
Need help?
Do you have a question about the F26 and is the answer not in the manual?
Questions and answers