
Subscribe to Our Youtube Channel
Related Manuals for Tribesigns LITTLE TREE F1880


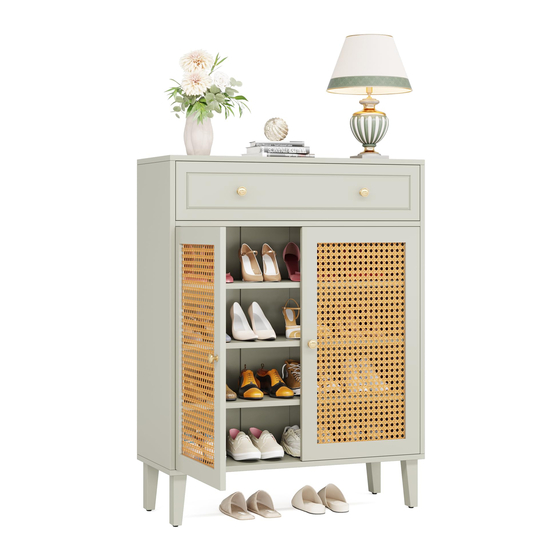
Summary of Contents for Tribesigns LITTLE TREE F1880
- Page 1 DESIGNED FOR LIFE Assembly Instructions Model No. Shoe Cabinet Little Tree by Tribesigns F1880 www.tribesigns.com...
-
Page 2: We're Here To Help You
DESIGNED FOR LIFE DESIGNED FOR LIFE Contact Us We're here to help you. support@tribesigns.com 1-424-220-6888 Contact us anytime except 12:00 AM to 8:00 AM EST. Your satisfaction is our top priority. If you encounter any issues with this product, such as missing or damaged parts, we're here to help. - Page 3 DESIGNED FOR LIFE DESIGNED FOR LIFE We recommend using hand tools for assembly. If an electric screwdriver is used, reduce power and torque to avoid damage to the product. Install the Anti-Tip Kit Using the anti-tip kit can reduce the risk of tipping over, but can not eliminate it. P-02...
- Page 4 DESIGNED FOR LIFE DESIGNED FOR LIFE Caution Make sure all parts are included. Most board parts are labeled or stamped on the raw edge. Contact us for a free replacement if you encounter any damaged or missing parts. P-03...
-
Page 5: Parts List
DESIGNED FOR LIFE DESIGNED FOR LIFE Parts List 1 pc 1 pc 2 pcs 1 pc 1 pc 1 pc 4 pcs 2 pcs 3 pcs 1 pc 1 pc 1 pc 1 pc 1 pc 1 pc 1 pc Hardware List 20 pcs 20 pcs... - Page 6 DESIGNED FOR LIFE DESIGNED FOR LIFE Installation of Cams and Pins 1. Screw the pin into the hole. 2. Insert the pin into another piece. 3. Place the cam into the hole. 4. Use a screwdriver to tighten the cam. Note: To correctly set the cam lock, the cam's arrow should point towards the hole where the pin will be inserted.
- Page 7 DESIGNED FOR LIFE DESIGNED FOR LIFE 4 pcs 4 pcs 6 pcs 4 pcs P-06...
- Page 8 DESIGNED FOR LIFE DESIGNED FOR LIFE 16-1 16-2 16-1 4 pcs 4 pcs P-07...
- Page 9 DESIGNED FOR LIFE DESIGNED FOR LIFE 4 pcs 8 pcs P-08...
- Page 10 DESIGNED FOR LIFE DESIGNED FOR LIFE 4 pcs 2 pcs P-09...
- Page 11 DESIGNED FOR LIFE DESIGNED FOR LIFE 6 pcs 6 pcs P-10...
- Page 12 DESIGNED FOR LIFE DESIGNED FOR LIFE 12 pcs P-11...
- Page 13 DESIGNED FOR LIFE DESIGNED FOR LIFE 16-2 4 pcs 16-2 16-2 & & 4 pcs P-12...
- Page 14 DESIGNED FOR LIFE DESIGNED FOR LIFE 4 pcs 2 pcs 2 pcs 4 pcs 2 pcs 8 pcs 4 pcs 2 pcs P-13...
- Page 15 DESIGNED FOR LIFE DESIGNED FOR LIFE P-14...
- Page 16 DESIGNED FOR LIFE DESIGNED FOR LIFE 16 pcs If misalignment occurs after installation, adjust the screws for optimal condition. P-15...
- Page 17 DESIGNED FOR LIFE DESIGNED FOR LIFE 8 pcs 8 pcs P-16...
-
Page 18: Installation Instructions
DESIGNED FOR LIFE DESIGNED FOR LIFE 1 pc Bolt or nut Wooden stud Installation Instructions 1. Determine where the furniture is to be placed and locate the center line of a wooden stud using a stud finder. 2. Drill a 1/8" hole into the wooden stud. The hole should be about 3" lower than the top of the cabinet. 3. - Page 19 DESIGNED FOR LIFE Thank you for your support! Contact our customer service team 1-424-220-6888 support@tribesigns.com Contact us anytime except www.tribesigns.com 12:00 AM to 8:00 AM EST. Follow Tribesigns Instagram WhatsApp Facebook Pinterest Twitter YouTube TikTok...
Need help?
Do you have a question about the LITTLE TREE F1880 and is the answer not in the manual?
Questions and answers