Table of Contents
Advertisement
Available languages
Available languages
Advertisement
Chapters
Table of Contents

Related Manuals for Omni OP14NRWBA4RCM


Summary of Contents for Omni OP14NRWBA4RCM
- Page 1 3813-088 3813-089 PORTABLE AIR CONDITIONER OP12N3WBA4RCM OP14NRWBA4RCM...
-
Page 2: Table Of Contents
CONTENTS Preparation.............................2 Safety Precautions..........................3 Installation..............................13 Operation..............................16 Maintenance............................21 Troubleshooting ............................22 Design and Compliance Notes......................23 Remote Controller Instructions........................ 2 Smart Features Set Up and Use.......................37 Air Conditioner Limited Warranty......................50... -
Page 3: Preparation
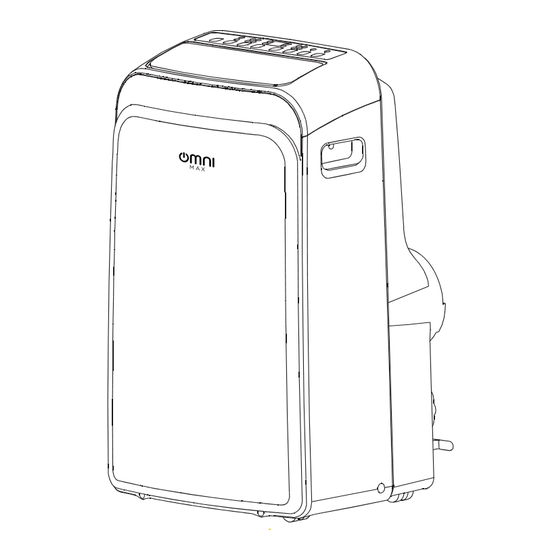
PREPARATION Control panel Horizontal louver blade (swing automatically) Handle (both sides) Caster Front rear... -
Page 4: Safety Precautions
SAFETY PRECAUTIONS Please read through these instructions before you start the installation process. Improper installation can cause damage to the unit, your personal property, and also poses a personal safety hazard. -Installation must be performed according to the installation instructions. Improper installation damage. - Page 5 SAFETY PRECAUTIONS -This appliance can be used by children aged from 8 years and above and persons with reduced physical, sensory, or mental capabilities or lack of experience and knowledge if they have been given supervision or instruction concerning the use of the appliance in a safe way and understand the hazards involved.
- Page 6 SAFETY PRECAUTIONS • The appliance shall be stored in a room without continuously operating ignition sources (for example: open flames, an operating gas appliance) and ignition sources (for example: an operating electric heater) or close to the appliance. The appliance shall be stored in a room without continuously operating ignition sources (for example: open flames, an operating gas appliance or an operating electric heater).
- Page 7 SAFETY PRECAUTIONS Explanation of symbols displayed on the unit(For the unit adopts R32 Refrigerant only): WARNING refrigerant is leaked and exposed to an external ignition source, there is a risk CAUTION This symbol shows that the operation manual should be read carefully. This symbol shows that a service personnel should be handling this CAUTION equipment with reference to the installation manual.
- Page 8 SAFETY PRECAUTIONS WARNINGS (for using R32 refrigerant only) 6)No ignition sources No person carrying out work in relation to a refrigeration system which involves exposing any pipe work that contains or has contained flammable refrigerant shall use any sources of ignition in such a manner that it may lead to the risk of fire or explosion. All possible ingition sources, including cigarette smoking, should be kept sufficiently far away from the site of installation, repairing, removing and disposal, during which flammable refrigerant can possibly be released to the surrounding space.
- Page 9 SAFETY PRECAUTIONS WARNINGS (for using R32 refrigerant only) 2)Particular attention shall be paid to the following to ensure that by working on electrical components, the casing is not altered in such a way that the level of protection is affected. This shall include damage to cables, excessive number of connections, terminals not made to original specification, damage to seals, incorrect fitting of glands, etc.
- Page 10 SAFETY PRECAUTIONS WARNINGS (for using R32 refrigerant only) Removal and evacuation When breaking into the refrigerant circuit to make repairs or for any other purpose conventional procedures shall be used. However, it is important that best practice is followed since flammability is a consideration. Opening of the refrigeration systems shall not be done by brazing.
- Page 11 SAFETY PRECAUTIONS WARNINGS (for using R32 refrigerant only) d) Pump down refrigerant system, if possible. e) If a vacuum is not possible, make a manifold so that refrigerant can be removed from various parts of the system. f) Make sure that cylinder is situated on the scales before recovery takes place. g) Start the recovery machine and operate in accordance with manufacturer's instructions.
- Page 12 SAFETY PRECAUTIONS Design Notice In order to ensure the optimal performance of our products, the design specifications of the unit and remote control are subject to change without prior notice. Ambient Temperature Range For Unit Operating MODE Temperature Range Cool 17-35°C (62-95°F) 13-35°C (55-95°F) Exhaust Hose Installation...
- Page 13 SAFETY PRECAUTIONS How to Stay Cool with a New Portable Air Conditioner(For the models comply with the requirements of Department Of Energy in US) Because of a new federal test procedure for Portable Air Conditioners, you may notice that the models produced prior to 2017.
-
Page 14: Installation
INS TALLATION Tools Needed -Medium Philips screwdriver; -Tape measure or ruler; -Knife or scissors; -Saw (optional to shorten the window adaptor for narrow windows). Accessories 48”) and can be shortened for smaller windows. Window Installation Kit Step 1 : Step 2: Installing the Exhaust Hose Preparing the Exhaust Hose Assembly to the Unit Assembly... - Page 15 INS TALLATION Step 3: Preparing the Adjustable Window Slider 1. Depending on the size of your window, adjust the size of the window slider. 2. If the length of the window requires two window sliders, use the bolt to fasten the window sliders once they are adjusted to the proper length.
- Page 16 INS TALLATION Type 2: Sliding Window Installation Cut the adhesive foam seal Insert the window slider Cut the non-adhesive foam A and B strips to the proper assembly into the window seal C strip to match the lengths and attach them to opening.
-
Page 17: Operation
OPERATION Sleep/Eco Button Swing Button (Optional) Used to initiate the SLEEP/ECO Used to initiate the auto-swing function. feature(for models with the auto swing feature only). When the Up (+) and Down (-) Buttons unit is ON, pressing the SWING button can stop the louver at the Used to adjust (increasing/decreasing) desired angle. - Page 18 OPERATION LED Display Shows the set temperature in °C or °F and the "Auto timer" settings. While on DRY and FAN modes, it shows the room temperature. Shows error and protection codes : E1-Room temperature sensor error. E2-Evaporator temperature sensor error. E3-Condenser temperature sensor error (on some models).
- Page 19 OPERATION AUTO Operation -When setting the air conditioner in AUTO mode, it will automatically select cooling, heating (for models without cooling only), or fan only operation depending on the selected temperature and room temperature. -The air conditioner automatically will control the room temperature a round the temperature point that you set.
- Page 20 OPERATION Other Features I SENSE/TEMP SENSING Feature (Optional) NOTE: This feature can be activated from the remote controller ONLY. The remote controller serves as a remote thermostat allowing for precise temperature control at its location. To activate the "I SENSE/Temp Sensing" feature, point the remote controller towards the unit and press the "I SENSE/Temp Sensing"...
- Page 21 OPERATION -Under heating pump mode, remove the lower drain plug from the back of the unit and install the drain connector (5/8" universal female mender) with a 3/4" hose (locally purchased). For models without a drain connector, simply attach the drain hose to the hole. Place the open end of the hose adaptor directly over the drain area in your basement floor.
-
Page 22: Maintenance
MAINTENANCE Safety Precautions -Always unplug the unit before cleaning or servicing. -DO NOT use flammable liquids or chemicals to clean the unit. -DO NOT wash the unit under running water. This may cause an electrical danger. -DO NOT operate the machine if the power supply was damaged during cleaning. A damaged power cord must be replaced with a new cord from the manufacturer. -
Page 23: Troubleshooting
FAULTS DIAGNOSIS Please check the unit using the following form before asking for maintenance: Problem Possible Cause Troubleshooting The water collection tray is full. Turn off P1 error code. the unit, drain the water from the water The unit does not collection tray, and restart the unit. -
Page 24: Design And Compliance Notes
DESIGN AND COMPLIANCE NOTES Design Notice and remote controller are subject to change without prior notice. Energy Rating Information The energy rating for this unit is based on an installation using an un-extended exhaust duct without adapters A or B (as shown in the Installation section of this manual). Unit Temperature Range Mode Temperature Range... -
Page 25: Remote Controller Instructions
REMOTE CONTROLLER INSTRUCTIONS Remote Control Specifications Model RG57H 4 (B)/BGEF 3.0 V (dry batteries R03/LR03 2) Rated voltage Signal receiving range -5 C~60 C (23 F~140 F) Environment CAUTION: INGESTION HAZARD - Contains small batteries, Keep out of reach of small children. - Page 26 REMOTE CONTROLLER INSTRUCTIONS Function Buttons Before you begin using your new air conditioner, make sure to familiarize yourself with its remote control. The following is a brief introduction to the remote control itself. For instructions on how to operate your air conditioner, refer to the How to Use Basic Functions section of this manual. SHORT CUT ON/OFF Sets and activates your...
- Page 27 REMOTE CONTROLLER INSTRUCTIONS Handling The Remote Control TIPS FOR USING REMOTE CONTROL The remote control must be used within 8 NOT SURE WHAT A FUNCTION DOES? meters of the unit. Refer to the How to Use Basic Functions and How to Use Advanced Functions sections The unit will beep when remote signal is of this manual for a detailed description of received.
- Page 28 REMOTE CONTROLLER INSTRUCTIONS Remote LED Screen Indicators Transmission Indicator Lights up when remote sends signal to unit ON/OFF display MODE display Appears when the unit is turned on, Displays the current and disappears when it is turned off mode, including: TIMER OFF display TIMER ON display AUTO...
- Page 29 REMOTE CONTROLLER INSTRUCTIONS How To Use The Basic Functions SETTING TEMPERATURE The operating temperature range for units is 17-30 C(62 F-86 F). You can increase or decrease the set temperature in 1 C(1 F) increments. AUTO operation In AUTO mode, the unit will automatically select the COOL, FAN, HEAT or DRY mode based on the set temperature.
- Page 30 REMOTE CONTROLLER INSTRUCTIONS How To Use The Basic Functions DRY operation(dehumidifying) 1. Press the MODE button to select DRY mode. 2. Set your desired temperature using the Temp or Temp button. 3. Press the ON/OFF button to start the unit. NOTE: FAN SPEED can t be changed in DRY mode.
- Page 31 REMOTE CONTROLLER INSTRUCTIONS How To Use The Basic Functions HEAT operation 1. Press the MODE button to select HEAT mode. 2. Set your desired temperature using the Temp or Temp button. 3. Press the FAN button to select the fan speed: AUTO, LOW, MED,or HIGH. 4.
- Page 32 REMOTE CONTROLLER INSTRUCTIONS Setting the TIMER function our air conditioning unit has two timer-related functions: TIMER ON- sets the amount of timer after which the unit will automatically turn on. TIMER ON TIMER ON TIMER OFF- sets the amount of time after which the unit will automatically turn off.
- Page 33 REMOTE CONTROLLER INSTRUCTIONS TIMER OFF function The TIMER OFF function allows you to NOTE: When setting the TIMER ON or set a period of time after which the unit TIMER OFF functions, up to 10 hours, will automatically turn off, such as when the time will increase in 30 minute you wake up.
- Page 34 REMOTE CONTROLLER INSTRUCTIONS Setting both TIMER ON and TIMER OFF at the same time Keep in mind that the time periods you set for both functions refer to hours after the current time. For e ample, say that the current time is 1:00 PM, and you want the unit to turn on automatically at 7:00 PM.
- Page 35 REMOTE CONTROLLER INSTRUCTIONS Example: Setting the unit to turn on after 6 hours, operate for 2 hours, then turn off (see the figure below) Your remote display Timer on Timer is set to turn ON 6 hours from current time Timer off Timer is set to turn OFF 8 hours from current time...
- Page 36 REMOTE CONTROLLER INSTRUCTIONS How To Use The Advanced Functions SLEEP Function The SLEEP function is used to decrease energy use while you sleep (and don t need the same temperature settings to stay comfortable). This function can only be activated via remote control. Note: The SLEEP function is not available in FAN or DRY mode.
- Page 37 REMOTE CONTROLLER INSTRUCTIONS NOTE: - Buttons design is based on typical model and might be slightly different from the actual one you purchased, the actual shape shall prevail. - All the functions described are accomplished by the unit, if the unit has no this feature, there is no corresponding operation happened when press the relative button on the remote controller.
-
Page 38: Smart Features Set Up And Use
SMART FEATURES SET UP AND USE SPECIFICATION Unit Model: OP12N3WBA4RCM / OP14NRWBA4RCM Model: EU-OSK105(IOT), US-OSK105(IOT), EU-SK109, US-SK109 Antenna Type: Printed PCB Antenna Frequency Band: 2400-2483.5MHz Operation Temperature:0 ºC~45 ºC/32 ºF~113 ºF Operation Humidity: 10%~85% Power Input: DC 5V/500mA Maximum TX Power: <20dBm... - Page 39 SMART FEATURES SET UP AND USE USER REGISTRATION Please ensure your mobile phone is connect to Wireless router. Also, the Wireless router has already connected to Internet before doing user registration and network configuration. You can log in with your email or mobile account, or log in with a third-party account. It needs to be selected according to the country and region where the air conditioner is located in order to obtain better experience and service.
- Page 40 SMART FEATURES SET UP AND USE Enter a password, format: Enter the verification 8-20 letters and numbers. code, the verification and then click “Complete” is successful and automatically enter the next step NETWORK CONFIGURATION Cautions It is necessary to forget any other around network and make sure the Android or iOS phone must connect to the Wireless network you want to configure.
- Page 41 SMART FEATURES SET UP AND USE Network configuration by Bluetooth scan Note: Make sure the bluetooth of your mobile phone is working. Enter the current page to Press “ + ” enable automatic scanning Choose a network Wait smart devices to find, Select home wireless then click to add it network, enter the...
- Page 42 SMART FEATURES SET UP AND USE Wait connecting to the Configuration Success, you can modify the default network name. Bluetooth network configuration is successful, now you can see the device in the list.
- Page 43 SMART FEATURES SET UP AND USE Network configuration by select appliance type : If the bluetooth network configuration is failure, please select the appliance type. Choose a network Power on the device and wait 5 seconds a.Turn on the device after connecting the power supply. b.Press and hold the “Power On”...
- Page 44 SMART FEATURES SET UP AND USE 9:4 : : Network configuration is successful Configuration Success, you can see the device in the list. NOTE: When finishing network configuration, APP will display success cue words on the screen. Due to different internet environment, it is possible that the device status still display “offline” . If this situation occurs, it is necessary to pull down and refresh the device list on the APP and make sure the device status become “online”...
- Page 45 SMART FEATURES SET UP AND USE HOW TO USE THE APP Please ensure both your mobile phone and air conditioner are connected to the Internet before using app to control the air conditioner via internet, please follow the next steps: 1 Click "...
- Page 46 SMART FEATURES SET UP AND USE SPECIAL FUNCTIONS Share Device Through the shared device function, multiple users can control the device at the same time. 1 Click “Sharing Device” 2 Scan the device sharing code...
- Page 47 SMART FEATURES SET UP AND USE When the number of Swipe left on a member shared members to delete. reaches 20, other users will not be able to scan Now others can add shared Other users must log in devices by clicking the scan to the "Dollin Smart"...
- Page 48 SMART FEATURES SET UP AND USE Firmware Update Through this function, users can manually update the device firmware to ensure that the device firmware is running with the latest version When there is a firmware Click "Firmware Update" upgrade, you can see the firmware upgrade prompt page.
- Page 49 SMART FEATURES SET UP AND USE CAUTIONS: Wireless module models: US-SK109: FCC ID: 2ADQOMDNA23 IC: 12575A-MDNA23 This device complies with Part 15 of the FCC Rules and it contains license-exempt transmitter(s)/ receiver(s) that comply with Innovation, Science and Economic Development Canada’s license- exempt RSS(s).
- Page 50 SMART FEATURES SET UP AND USE NOTE: This equipment has been tested and found to comply with the limits for a Class B digital device, pursuant to part 15 of the FCC Rules. These limits are designed to provide reasonable protection against harmful interference in a residential installation.
-
Page 51: Air Conditioner Limited Warranty
AIR CONDITIONER LIMITED WARRANTY 1-888-365-2230. - Page 52 OMNI CANADA CUSTOMER SERVICE ST. JACOBS, ONTARIO N0B 2N0 1-888-365-2230 © 2023 Home Hardware Stores Limited...
- Page 53 3813-088 3813-089 GUARANTIE...
- Page 54 SOMMAIRE Préparation..............................2 Consignes de sécurité..........................3 Installation...............................13 Fonctionnement............................16 Entretien..............................21 Diagnostic des défaillances........................22 Remarques sur la conception et la conformité ..................23 Illustration de la télécommande ......................Guide De L'utilisateur Du Module Sans Fil Smart..................37 Garantie limitée du climatiseur........................50...
-
Page 55: Préparation
PRÉPARATION Lanneau de commande Lame de l'aérateur à lames horizontal (oscille ment automatique) Poignée (deux côtés) Roulette Avant filtre à air supérieur (derrière la grille) prise d'air supérieure sortie d'évacuation sortie d'air filtre à air inférieur prise d'air inférieure sortie d'évacuation (seulement pour lemode pompe à... -
Page 56: Consignes De Sécurité
CONSIGNES DE SÉCURITÉ Veuillez lire attentivement ces instructions avant de commencer le processus d'installation. Une installation incorrecte peut causer des dommages à l'appareil et à vos biens personnels. Elle représente également un risque pour la sécurité des personnes. - L'installation doit être effectuée conformément aux instructions d'installation. Une installation incorrecte peut provoquer des fuites d'eau, des décharges électriques ou un incendie. - Page 57 CONSIGNES DE SÉCURITÉ - Cet appareil peut être utilisé par les enfants âgés de 8 ans et plus et des personnes aux capacités physiques, sensorielles ou mentales réduites, ou par des personnes manquant d'expérience et de connaissances, si elles sont surveillées ou si des instructions leur ont été fournies afin qu'elles sachent comment faire fonctionner le système de manière sécuritaire et appropriée et qu'elles comprennent les risques encourus.
- Page 58 CONSIGNES DE SÉCURITÉ • L'appareil doit être entreposé dans une pièce sans fonctionnement continu (par exemple : flammes nues, appareil à gaz en marche) et sources d'inflammation ou (par exemple : un radiateur électrique en fonctionnement) à proximité de l'appareil. L'appareil doit être entreposé...
- Page 59 CONSIGNES DE SÉCURITÉ Explication des symboles affichés sur l'appareil (pour que l'unité adopte le réfrigérant R32 uniquement) : Ce symbole indique que cet appareil utilisait un réfrigérant AVERTISSEMENT inflammable. Si le fluide frigorigène fuit et est exposé à une source PRÉCAUTION Ce symbole indique que le manuel d'utilisation doit être lu attentivement.
- Page 60 CONSIGNES DE SÉCURITÉ AVERTISSEMENTS (pour l'utilisation du réfrigérant R32 uniquement) 5) Présence d'extincteur Si un travail à chaud doit être effectué sur l’équipement de réfrigération ou sur toute pièce associée, un équipement d’extinction approprié doit être disponible. Avoir un extincteur à poudre sèche ou à CO2 à proximité de la zone de chargement. 6) Aucune source d'inflammation Aucune personne effectuant des travaux en relation avec un système de réfrigération impliquant l'exposition de tuyauteries contenant ou ayant contenu des frigorigènes...
- Page 61 CONSIGNES DE SÉCURITÉ CONSIGNES D'INSTALLATION • Réparation de composants scellés 1) Pendant les réparations des composants scellés, toutes les alimentations électriques doivent être débranchées de l'équipement sur lequel on travaille avant de retirer les couvercles scellés, etc. S'il est absolument nécessaire de fournir une alimentation électrique à...
- Page 62 CONSIGNES DE SÉCURITÉ CONSIGNES D'INSTALLATION • Enlèvement et évacuation Lors de la pénétration dans le circuit de réfrigérant pour effectuer des réparations ou pour tout autre usage, des procédures conventionnelles doivent être utilisées. Cependant, il est important de suivre les meilleures pratiques car l’inflammabilité est une considération.
- Page 63 CONSIGNES DE SÉCURITÉ CONSIGNES D'INSTALLATION d) Si possible, pomper le système de réfrigération. e) Si le vide n’est pas possible, fabriquez un collecteur de sorte que le fluide frigorigène puisse être retiré de diverses parties du système. f) Assurez-vous que le cylindre est situé sur la balance avant la récupération. g) Démarrer la machine de récupération et opérer conformément aux instructions du fabricant.
- Page 64 CONSIGNES DE SÉCURITÉ Avis de Conception Afin de garantir les performances optimales de nos produits, les spécifications de conception de l'appareil et de la télécommande peuvent être modifiées sans préavis. Plage de Température Ambiante pour l’Opération de l'Appareil MODE Plage de Température Cool 17-35°C (62-95°F) 13-35°C (55-95°F)
- Page 65 CONSIGNES DE SÉCURITÉ Comment rester cool avec un nouveau climatiseur portable(Pour les modèles satisfont aux exigences du ministère de l'énergie aux États-Unis) En raison d'une nouvelle procédure fédérale d'essai pour les climatiseurs portables, vous pouvez remarquer que les réclamations de capacité de refroidissement sur les emballages portables de climatiseurs sont significativement inférieures à...
-
Page 66: Installation
INSTALLATION Outillage nécessaire - Tournevis moyen Philips; - Ruban à mesurer ou règle; -Couteau ou ciseaux; - Scie (facultative, pour réduire la taille de l'adaptateur de fenêtre en cas de fenêtres étroites). Accessoires Votre trousse d'installation pour fenêtre est adaptée aux fenêtres de 67,5 à 123 cm (26,5 à 48 po) et peut être raccourcie pour les fenêtres de petite taille. - Page 67 INSTALLATION Étape 3 : préparation du battant de fenêtre ajustable 1. Selon la taille de votre fenêtre, régler la taille du battant. 2. Si la longueur de la fenêtre requiert deux battants de fenêtre, utiliser le boulon pour fixer les battants de fenêtre une fois que ceux-ci sont ajustés à...
- Page 68 INSTALLATION Type 2 : installation pour fenêtre coulissante Couper les bandes A et B Insérer l'assemblage du Couper la bande C du joint du joint en mousse non battant de fenêtre dans en mousse non adhésif afin adhésif à la longueur l'ouverture de la fenêtre.
-
Page 69: Fonctionnement
FONCTIONNEMENT Bouton «Sleep/Eco » Bouton « Swing » (facultatif) Utilisé pour initialiser le mode SLEEP/ECO. Used to initiate the auto-swing feature (for models with the auto swing feature Bouton d'alimentation only). When the unit is ON, pressing the SWING button can stop the louver Interrupteur d'alimentation (On/Off). - Page 70 FONCTIONNEMENT Panneau d'affichage à DEL Affiche la température réglée en °C ou °F dans les paramètres « Auto-timer ». En mode DRY et FAN, la température ambiante est affichée. et indique les codes d'erreur et de protection : E1-Erreur du capteur de température ambiante. E2-Erreur du capteur de température de l'évaporateur.
- Page 71 FONCTIONNEMENT Fonctionnement AUTO - Lorsque le climatiseur est réglé au mode AUTO, celui-ci sélectionnera automatiquement le mode de refroidissement, de chauffage (seulement pour les modèles sans refroidissement) ou le mode de fonctionnement avec ventilateur seulement, selon la température que vous avez sélectionnée et la température ambiante.
- Page 72 FONCTIONNEMENT Autres fonctions Fonction (facultative) ISENSE/ TEMP SENSING (DÉTECTION DE TEMP.) REMARQUE : Cette fonctionnalité peut être UNIQUEMENT activée par la télécommande. La télécommande sert de thermostat à distance en permettant un contrôle haute précision de la température à son emplacement. Pour activer la fonction «I SENSE » / «...
- Page 73 FONCTIONNEMENT - Si l'appareil fonctionne en mode pompage, retirer le bouchon de vidange inférieur situé à l'arrière de l'appareil, installer le raccord d'évacuation d'eau (trousse de réparation femelle universelle 5/8 po) avec un tuyau de 3/4 po (acheté localement). Pour les modèles sans raccord d'évacuation d'eau, il suffit de fixer le tuyau de vidange dans l'orifice.
-
Page 74: Entretien
ENTRETIEN Consignes de sécurité - Toujours débrancher l'appareil avant le nettoyage ou l'entretien. - NE PAS utiliser de liquides inflammables ou de produits chimiques pour nettoyer l'appareil. - NE PAS laver l'appareil à l'eau courante. Cette manœuvre représente un risque électrique. - NE PAS faire fonctionner l'appareil si le cordon d'alimentation électrique a été... -
Page 75: Diagnostic Des Défaillances
DIAGNOSTIC DES DÉFAILLANCES Veuillez utiliser le formulaire suivant pour vérifier l'appareil avant d'effectuer une demande d'entretien : Problème Cause possible Dépannage Le bac de vidange d'eau est plein. L'appareil ne Code d'erreur P1 Éteignez l'appareil, évacuez l'eau du bac s'allume pas de vidange et redémarrez l'appareil. -
Page 76: Remarques Sur La Conception Et La Conformité
REMARQUES SUR LA CONCEPTION ET LA CONFORMITÉ Avis de conception Afin d'assurer un rendement optimal de nos produits, les caractéristiques de conception de l'appareil et de la télécommande peuvent faire l'objet de modifications sans préavis. Information sur le rendement énergétique Le rendement énergétique de cet appareil est en fonction d' une installation utilisant un tuyau d'évacuation non prolongé... -
Page 77: Illustration De La Télécommande
ILLUSTRATION DE LA TÉLÉCOMMANDE Spécifications de la télécommande Modèle 3.0V (piles sèches R03/LR03 2) Tension Portée de réception du signal Environnement -5 C~60 C(23 F~140 F) AVERTISSEMENT : RISQUE D’INGESTION – Contient de petites piles. Conserver hors de la portée de jeunes enfants. En cas d’ingestion, consulter immédiatement un médecin. - Page 78 ILLUSTRATION DE LA TÉLÉCOMMANDE Fonctionnement des boutons Avant d'utiliser votre nouveau climatiseur, prenez le temps de vous familiariser avec la télécommande. Ce qui suit est une brève introduction à la télécommande. Pour les instructions d'utilisation de votre climatiseur, veuillez vous reporter à la section Utilisation des fonctions de base du présent manuel. ON/OFF (allumer/éteindre) SHORT CUT (raccourci) Pour régler et activer vos...
- Page 79 ILLUSTRATION DE LA TÉLÉCOMMANDE Consultez la description détaillée de votre climatiseur dans les sections de base et avancées du présent manuel. Les conceptions des boutons de votre appareil peuvent légèrement différer de l'exemple illustré. Si l'appareil n'est pas doté d'une fonction précise, le bouton correspondant à...
- Page 80 ILLUSTRATION DE LA TÉLÉCOMMANDE S'allume lorsque la télécommande envoie un signal à l'appareil. Appears when the unit is turned on, Affiche le mode and disappears when it is turned off actuel, y compris : AUTO S'affiche lorsque la fonction COOL S'affiche lorsque la fonction TIMER OFF (minuterie désactivée) TIMER ON (minuterie activée)
- Page 81 ILLUSTRATION DE LA TÉLÉCOMMANDE Utilisation des fonctions de base RÉGLAGE DE LA TEMPÉRATURE La température de fonctionnement de l'appareil se situe entre 17 et 30 °C (62 et 86 °F). La température réglée peut être augmentée ou diminuée en incréments de 1 °C (1 °F). Utilisation du mode AUTO (automatique) L'appareil en mode AUTO (automatique) sélectionnera automatiquement le mode COOL...
- Page 82 ILLUSTRATION DE LA TÉLÉCOMMANDE Utilisation des fonctions de base Utilisation du mode DRY (assèchement) 1. Appuyer sur le bouton MODE pour sélectionner le mode DRY (assèchement). 2. Régler à la température désirée à l'aide du bouton Temp (arrow up) ou Temp (arrow down). 3.
- Page 83 ILLUSTRATION DE LA TÉLÉCOMMANDE Utilisation des fonctions de base Utilisation du mode HEAT (chaleur) 1. Appuyer sur le bouton MODE pour sélectionner le mode HEAT (chaleur). 2. Régler à la température désirée à l'aide du bouton Temp (arrow up) ou Temp (arrow down). 3.
- Page 84 ILLUSTRATION DE LA TÉLÉCOMMANDE Votre climatiseur a deux fonctions de minuterie connexes : La fonction (minuterie activée) fixe la période de temps après laquelle l'appareil s'allumera automatiquement. La fonction (minuterie désactivée) fixe la période de temps après laquelle l'appareil s'éteindra automatiquement. 1sec 2sec La fonction...
- Page 85 ILLUSTRATION DE LA TÉLÉCOMMANDE Fonction TIMER OFF (minuterie désactivée) REMARQUE : Chaque pression des fonctions La fonction TIMER OFF (minuterie désactivée) TIMER ON et TIMER OFF équivaut à 30 vous permet de de fixer une période de temps minutes jusqu'à concurrence de 10 h. Après après laquelle l'appareil s'éteindra 10 h et jusqu'à...
- Page 86 ILLUSTRATION DE LA TÉLÉCOMMANDE Prendre note que les périodes de temps que vous réglez pour les deux fonctions font référence aux heures après l'heure actuelle. Par exemple, s'il est actuellement 13 h, et vous souhaitez que l'appareil s'allume automatiquement à 19 h et qu'il fonctionne pendant 2 heures pour ensuite s'éteindre à...
- Page 87 ILLUSTRATION DE LA TÉLÉCOMMANDE réglage pour que l'appareil s'allume après 6 heures, fonctionne pendant 2 heures, s'éteigne (voir la figure ci-dessous). La minuterie est réglée pour que l'appareil s'allume 6 heures après l'heure actuelle. La minuterie est réglée pour que l'appareil s'éteigne 8 heures après l'heure actuelle.
- Page 88 ILLUSTRATION DE LA TÉLÉCOMMANDE Utilisation des fonctions avancées Fonction SLEEP (veille) La fonction SLEEP permet de réduire la consommation énergétique pendant que vous dormez (la température n'a pas besoin d'être la même pour être confortable). Cette fonction s'active uniquement avec la télécommande. REMARQUE : La fonction SLEEP n'est pas disponible en mode FAN ou DRY.
- Page 89 ILLUSTRATION DE LA TÉLÉCOMMANDE La conception des boutons repose sur le modèle habituel et peut légèrement différer de celle de votre appareil actuel. Le cas échéant, la forme actuelle prévaudra. Toutes les fonctions décrites sont exécutées par l'appareil. Si votre appareil n'est pas doté...
-
Page 90: Guide De L'utilisateur Du Module Sans Fil Smart
GUIDE DE L'UTILISATEUR DU MODULE SANS FIL SMART SPÉCIFICATIONS Unit Model: OP12N3WBA4RCM / OP14NRWBA4RCM Modèle : EU-SK109, US-SK109 Type d'antenne : Antenne PCB imprimée Bande de fréquence : 2400 à 2483,5 MHz Plage de température de fonctionnement : 0 à 45 °C/32 à 113 °F Plage hygrométrique de fonctionnement : 10 % à... - Page 91 GUIDE DE L'UTILISATEUR DU MODULE SANS FIL SMART ENREGISTREMENT DE L'UTILISATEUR Veuillez vous assurer que votre téléphone mobile est connecté au routeur sans fil. De plus, le routeur sans fil doit être connecté à Internet avant de procéder à l'enregistrement de l'utilisateur et à...
- Page 92 GUIDE DE L'UTILISATEUR DU MODULE SANS FIL SMART Saisissez un mot de Saisissez le code de passe, au format de 8 à vérification. Dès que 20 lettres et chiffres. Puis cela réussit, vous cliquez sur Complete. passerez à la prochaine étape automatiquement.
- Page 93 GUIDE DE L'UTILISATEUR DU MODULE SANS FIL SMART Configuration du réseau Bluetooth Remarque : assurez-vous que la fonction Bluetooth de votre téléphone mobile est activée. Saisissez l'image en cours Appuyez sur “ + ” pour activer le balayage automatique. Choose a network Attendez que les appareils Sélectionnez le réseau intelligents soient...
- Page 94 GUIDE DE L'UTILISATEUR DU MODULE SANS FIL SMART Attente de connexion Configuration réussie. Vous pouvez modifier le au réseau nom par défaut. La configuration du réseau Bluetooth est réussie; vous pouvez maintenant voir l'appareil dans la liste.
- Page 95 GUIDE DE L'UTILISATEUR DU MODULE SANS FIL SMART Configuration en sélectionnant le type d'appareil : Si la configuration du réseau Bluetooth échoue, veuillez sélectionner le type d'appareil. Choose a network Allumez l'appareil et attendez 5 secondes. a. Allumez l'appareil après avoir branché l'alimentation électrique. b.
- Page 96 GUIDE DE L'UTILISATEUR DU MODULE SANS FIL SMART 9:4 : : Configuration du réseau réussie Configuration réussie; vous pouvez voir l'appareil dans la liste. REMARQUE : Lorsque la configuration du réseau est terminée, l'application affichera les mots-clés de la réussite à...
- Page 97 GUIDE DE L'UTILISATEUR DU MODULE SANS FIL SMART COMMENT UTILISER L'APPLICATION Veuillez vous assurer que votre téléphone mobile et votre climatiseur sont connectés à Internet avant d'utiliser l'application pour contrôler le climatiseur via Internet, veuillez suivre les étapes suivantes : 1 Cliquez sur Log in.
- Page 98 GUIDE DE L'UTILISATEUR DU MODULE SANS FIL SMART FONCTIONS SPÉCIALES Partage de l'appareil Grâce à la fonction d'appareil partagé, plusieurs utilisateurs peuvent contrôler l'appareil. 1 Cliquez sur Sharing 2 Scannez le code. device.
- Page 99 GUIDE DE L'UTILISATEUR DU MODULE SANS FIL SMART Lorsque le nombre de Balayez à gauche membres atteint 20, les pour supprimer un autres utilisateurs ne membre. peuvent pas scanner le code. D'autres personnes peuvent Les autres utilisateurs maintenant ajouter des doivent d'abord se appareils partagés en connecter à...
- Page 100 GUIDE DE L'UTILISATEUR DU MODULE SANS FIL SMART Mise à jour du micrologiciel Grâce à cette fonction, les utilisateurs peuvent mettre à jour manuellement le micrologiciel de l'appareil pour s'assurer qu'il fonctionne avec la dernière version. Lorsqu'il y a une mise à Cliquez sur Firmware jour du micrologiciel, vous update.
- Page 101 GUIDE DE L'UTILISATEUR DU MODULE SANS FIL SMART AVERTISSEMENTS : Pour les modèles : US-SK109 : FCC ID: 2ADQOMDNA23 IC: 12575A-MDNA23 Cet appareil est conforme à la partie 15 des règles de la FCC et contient un (des) émetteur(s)/ récepteur(s) exempté(s) de licence qui est (sont) conforme(s) au RSS du ministère de l'Innovation, des Sciences et du Développement économique du Canada.
- Page 102 GUIDE DE L'UTILISATEUR DU MODULE SANS FIL SMART REMARQUE : Cet équipement a été testé et déclaré conforme aux limites imposées aux appareils numériques de classe B, conformément à la partie 15 des règles de la FCC. Ces limites sont conçues pour fournir une protection raisonnable contre les interférences nuisibles dans une installation résidentielle.
-
Page 103: Garantie Limitée Du Climatiseur
GARANTIE LIMITÉE POUR CLIMATISEUR 1-888-365-2230. - Page 104 OMNI CANADA SERVICE À LA CLIENTÈLE ST. JACOBS, ONTARIO N0B 2N0 1-888-365-2230 © 2023 Home Hardware Stores Limited...
Need help?
Do you have a question about the OP14NRWBA4RCM and is the answer not in the manual?
Questions and answers