Advertisement
Quick Links
Advertisement

Summary of Contents for Kogan KAPOOLCLNRB
- Page 1 KOGAN AUTOMATIC SWEEPER POOL CLEANER KAPOOLCLNRB...
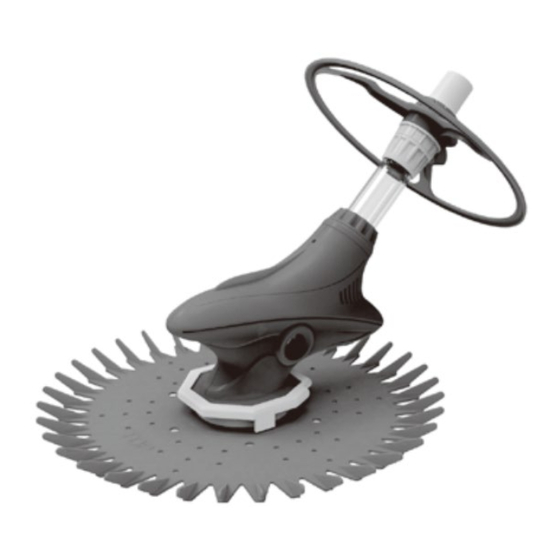
- Page 3 ASSEMBLY H (x2) D (x9) Attach A to B.
- Page 4 Attach C to A, ensuring C can rotate freely. Turn off the pump of your pool. If your pool is equipped with a vacuum plug, follow step 4. Otherwise, follow step 5 on the next page. Connect G into your vacuum plug. Connect I (regulator) into G. Ensure that the arrow under the regulator is pointed towards the vacuum plug.
- Page 5 Remove the top lid and the basket of your wall skimmer. Assemble H (the two elbow connectors) to I. Insert G facing downward and then then I (regulator). Ensure that the arrow under the regulator is pointing towards the skimmer. Connect D and E together.
- Page 6 Place F (weight) at the end of the first tube section and connect the tube assembly to the cleaner. Fill the tube sections with water to eliminate air pockets. 10. If the regulator is connected to a wall skimmer, pass the hose through the front of your skimmer, and connect it to the elbow connector.
- Page 7 Adjust your filtration system to the vacuum setting. A pump of at least 3/4 horsepower (6.5 m³/h) is required. The water flow shouldn’t be larger than 12 m³/h. 12. Turn on the pump to start cleaning. Adjust the cleaner's power by turning the regulator knob (I) as indicated.
- Page 8 Diaphragm Assembly Unscrew the Pull the Pull the diaphragm from the cover pole with diaphragm and inner pole, then push the new the wheel from inner pole from diaphragm onto the inner pole. the body. the body. The snap ring should be fixed on diaphragm.
-
Page 9: Installation
INSTALLATION Hose Length • Rectangular Pools: Ensure the hoses are long enough to reach the farthest point of the pool, adding one or two additional hoses for extra reach. The minimum hose length should be equivalent to the pool's longest side. •... - Page 10 Installing the Cleaner This pool cleaner is adaptable for use in various swimming pool types. It can be installed using either the standard in-skimmer method or the optional vacuum line method. Identify the installation type that best suits your pool's setup and follow these instructions: Power Off: Switch off the pool pump.
- Page 11 Figure 6b Attach Hose This End Elbow Connector Regulator Valve Compression Adaptor Press into the skimmer plate Connect Elbow Connector: Attach the elbow connector to the compression adapter. You may use one or two elbow connectors depending on your skimmer's configuration (refer to Figures 6a and 7a for two, or Figures 6b and 7b for one).
- Page 12 Figure 7a Top of skimmer Female/male hose Attach hose female end Regulator valve Hose protector Elbow connector Hose through Compression adapter skimmer opening To pump Figure 7b Top of skimmer Female/male hose Hose protector Attach hose female end Regulator Hose through valve skimmer opening Elbow...
-
Page 13: Troubleshooting
TROUBLESHOOTING Problem: The cleaner doesn't move at the very beginning, but the hoses are trembling. Solution: • Clean and empty both the pump basket and the skimmer/weir basket. • Ensure the filtration system is thoroughly cleaned. Clean the sand/cartridge filters on your pool pump according to the manufacturer's specifications. - Page 14 • Ensure the cleaner diaphragm is not blocked, damaged, or loosened from the inner pole, and check that the inner pole is not damaged (see Figures 5 and 6). Confirm that the snap ring is properly fixed on the diaphragm. If you need to inspect or service the diaphragm and inner pole, refer to the Diaphragm Assembly section for disassembly instructions.
- Page 15 • Check if air inside the pump is causing reduced suction power. • Inspect the hoses for blockages or leaks. To detect leaks, place your hand on the surface of the hoses in the water while the pump is running; you should feel suction where there is a leak.
- Page 16 Problem: Cleaner gets stuck on steps. Solution: • Adjust the return jets toward the problem area to guide the cleaner away from the steps. • Verify proper hose length. • Ensure the cleaner sits flush with the pool floor. Adjust the position of the hose weight if necessary.
- Page 17 Problem: Cleaner hose is tangling. Solution: • Ensure the wheel on top of the cleaner body is rotating freely and is screwed on securely. • Check that the hose sections are straight; if not, lay the hose in a straight line in the sun to relax the memory.
- Page 18 Problem: Cleaner not sitting flat. Solution: • Ensure there is a valve installed in the skimmer/weir. • Inspect the regulator valve and flush away any debris build-up. • Ensure the wheel on top of the cleaner body is rotating freely and is screwed on securely.
- Page 19 Figure 1 Figure 2 Figure 3 Figure 4a Figure 4b Figure 5 Figure 6 Figure 7 Figure 8 Figure 9 Figure 10...
- Page 20 Need more information? We hope that this user guide has given you the assistance needed for a simple set-up. For the most up-to-date guide for your product, as well as any additional assistance you may require, head online to help.kogan.com...
Need help?
Do you have a question about the KAPOOLCLNRB and is the answer not in the manual?
Questions and answers