
Related Manuals for Delcon Hemotek 2

Summary of Contents for Delcon Hemotek 2
- Page 1 Hemotek 2 Operator and Maintenance Manual Electronic blood bags mixer for blood collection HTEK 2_UM Eng_R4.0_Feb. 2016...
- Page 2 PREFACE This manual is written to provide information about use and maintenance of electronic blood bags mixer for blood collection Hemotek 2. TECHNICAL SUPPORT AND SALES OFFICE Delcon S.r.l. Via Matteucci 25/27 Address Headquarter 20862 Arcore (MB) Italy ...
-
Page 3: Manufacturer's Responsibility
All rights reserved. No part of this document can be reproduced, stored, or transmitted in any form without the prior written permission of Delcon s.r.l.. Despite of every care has being adopted during the preparation of this document, Delcon s.r.l. will not assume any responsibility for atrocities or negligence. - Page 4 Revision History General Description Installation Knowing Hemotek 2 4 How to Use Hemotek 2 5 Error codes and Frequent Questions 6 Maintenance and Calibration 7 Technical Features and Accessories HTEK 2_UM Eng_R4.0_Feb. 2016...
-
Page 5: Special Warnings
For proper cleaning read and follow carefully instruction described in “MAINTENANCE” Section of this manual. Hemotek 2 must only be used for the purposes for which it is designed, as described in this manual. Delcon s.r.l. shall not assume any responsibility in case of wrong actions or changes applied to Hemotek 2 by not authorized or not qualified persons and especially in the following cases: 1. - Page 6 2. Periodically check the integrity of the battery pack and that no leakage occurs. 3. Hemotek 2 is a high-tech equipment so it is very delicate: DO NOT DROP IT and use it with care! 4.
- Page 7 Hemotek 2 can be used in electromagnetic environments as specified on this page. The customer or user of the Hemotek 2 must make sure the equipment is used in this environment. NOTE: Portable and mobile RF communicators could affect Hemotek 2 during its functioning.
- Page 8 ELECTROMAGNETIC EMISSION WARNINGS Guidance and manufacturer’s declaration – Electromagnetic Immunity Hemotek 2 is intended for use in the electromagnetic environment specified below. The costumer or the user of Hemotek 2 should assure that it is used in such an environment.
- Page 9 If the measured field strength in the location in which Hemotek 2 is used exceeds the applicable RF compliance level above, Hemotek 2 should be observed, additional measures may be necessary, such as re-orienting or relocating Hemotek 2.
- Page 10 Hemotek 2 equipment and Hemotek 2 is intended for use in an electromagnetic environment in which radiated RF disturbances are controlled. The customer or the user of Hemotek 2 can help prevent electromagnetic interference by maintaining a minimum distance between portable and mobile RF communications equipment (transmitters) and Hemotek 2 recommended below, according to the maximum output power of the communications equipment.
- Page 11 ENVIROMENT RISKS AND WASTE MANAGEMENT Hemotek 2 contains, in some of its parts, materials that at the end of the life span of the equipment must be wasted following the rules of the local competent Authority. In particular, the equipment contains the following materials and/or components:...
-
Page 12: Warranty
Send always all components of Hemotwk 2 (bag tray, power supply cord, batteries, etc.). 8. Hemotek 2 should be delivered with a letter describing all data of the customer, a person to get in touch with for any question and a short description of the claim. - Page 13 Pay attention! It indicates the symbol is lightened. Pay attention and read relative documentation. Operator Person that uses the equipment Hemotek 2. Mixer or Equipment described in this manual. Hemotek 2 HTEK 2_UM Eng_R4.0_Feb. 2016 Page 13 of 28...
-
Page 14: Machine Data Plate
SYMBOLS MACHINE DATA PLATE DELCON S.R.L. Via Matteucci 25/27 20862 Arcore (MB) Italy Tel.: +39 039 617667 Mod: HEMOTEK 2 REF: HTEK2.DB.00 SN: 10xxxxx 115/230 Vac 50-60 Hz 30 VA 2x315 mA T 250V NiMH 12 Vdc 4500 mA Simbolo... -
Page 15: Revision History
REVISION HISTORY DATE DESCRIPTION OF REVISION HTEK 2_UM Eng_R4.0_Feb. 2016 February 2016 Updated device description HTEK 2_UM Eng_R3.0_March 2013 March 2013 Added point n°1 in Warranty Section. Removed TUV/Accredia logo. HTEK 2_UM Eng_R2.0_Sept. 2012 September 2012 Updating according to IEC 60601 3 HTEK 2_UM Eng_R1.0_July 2012 Change format of revision encoding. -
Page 16: General Description
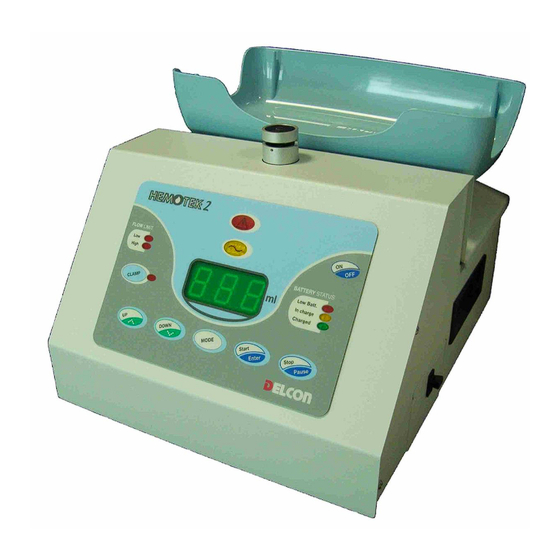
GENERAL DESCRIPTION Introduction Hemotek 2 is a compact and accurate electronic blood bags mixer, to make the blood collection easier. Hemotek 2 mixes continuously the blood with the anticoagulant in some sterile bag, it shows the volume collected, it measures and check the flow to remain inside a pre-set range and that the donation can end within a maximum collection time. -
Page 17: Installation
WARNING: No modification of the equipment is allowed. Where to Install Hemotek 2 For a proper working is important that the Hemotek 2 stand on a plane and uniform surface, to avoid reading imperfections due to vibrations or oscillation while running. In addition, be sure a gradient of 20 - 30 cm is present between the donor’s arm and the mixer to permit a proper flow... - Page 18 ON position (I): the yellow front LED showing the symbol must be lighted. Press the ON/OFF key on the keyboard for few seconds: Hemotek 2 will begin the start up procedure making a zero to the weighting system. Within few seconds the mixer is ready for use.
- Page 19 Be sure the mixer is disconnected from main power (power cord unplugged). Open the small door on right side of HEMOTEK 2 gently pushing down the handle. Insert completely the battery pack into its box as shown on the figure, leaving the cable outside.
- Page 20 SECTION 3 KNOWING HEMOTEK2 Keypad The keypad is made of 7 keys and 8 lighting LEDs: 3.1.1 LEDs and Keys LEDs 1. They show an alarm of low or high flow. 2. It is lighted in case of flow alarm, in case of time out (max donation time) and at donation end.
- Page 21 BEFORE SWITCH ON THE Hemotek 2 PLEASE BE SURE THE VOLTAGE SELECTOR IS PROPERLY SET (see also Section 2.4). Hemotek 2 can works at 230 or 115 VAC with line frequency of 50-60 Hz. To change the power voltage on the selector please follow these instruction: Be sure the main switch is in OFF position and that the power cord is unplugged.
- Page 22 SECTION 4 HOW TO USE HEMOTEK2 Switching ON Hemotek 2 Please see also Section 2.4 to switch on the Hemotek 2. WARNING! When you switch on Hemotek 2, be sure the mixer is standing on a stable surface and with the tray completely empty.
- Page 23 SECTION 4 HOW TO USE HEMOTEK2 NOTE: Hemotek 2 can start the donation even if you leave open the clamp. However, to avoid any entrance of ambient into the tubing and the bag is better to keep the clamp closed until the needle is in the vein: first pinch tubing by pressing CLAMP, second remove needle protection and make the vein puncture and finally press START to begin the collection.
- Page 24 Press STOP/PAUSE to quit program mode. End of Collection Hemotek 2 close automatically the clamp at the end of the donation. To improve the weighing precision, 20 –25 ml before reach the target volume the agitation stop and the reading become instantaneous.
- Page 25 SECTION 5 ERROR CODES AND FREQUENT QUESTIONS Hemotek 2 controls the functioning of the electromechanical system each time the unit is switched on. In cases it finds an error during the start up procedure not solvable by the software, on the display will appear an error code as listed here below.
- Page 26 SECTION 5 ERROR CODES AND FREQUENT QUESTIONS Frequent Questions The collected volume is wrong. Check the tubing is enough long between the clamp and the tray (no traction while moving). Check no improper items are lay down on the tray. Remember the shown volume is the net weight of the collected blood.
-
Page 27: Maintenance And Calibration
SECTION 6 MAINTENANCE AND CALIBRATION The maintenance of Hemotek 2 is very limited and it simply consists to keep the frame and the tray clean and periodically to verify the weighing system. Before any cleaning or maintenance, switch off the unit and disconnect the power source. -
Page 28: Important Notice
SECTION 7 TECHNICAL FEATURES AND ACCESSORIES Technical Features Description: Electronic blood bags mixer for blood collection Trade Name: HEMOTEK 2 Product code: HTEK2.DB.00 Manufacturer: DELCON s.r.l. Via Matteucci 25/27 20862 Arcore (MB) Italy Class of Protection: Type: EU Directives: 93/42/EEC...
Need help?
Do you have a question about the Hemotek 2 and is the answer not in the manual?
Questions and answers