Table of Contents
Advertisement
Quick Links
Advertisement
Table of Contents

Summary of Contents for TIGERFLOW CD Series
- Page 1 CD SERIES VERTICAL MULTISTAGE PUMPS Installation Operation and Maintenance Manual...
-
Page 2: Table Of Contents
CONTENTS TIGERFLOW CD SERIES INSTALLATION OPERATION AND MAINTENANCE MANUAL 0. GENERAL SECURITY CONSIDERATIONS ------------------------------------------------------------------ 01 1. INTRODUCTION AND SECURITY ----------------------------------------------------------------------------- 01 2. PRODUCT DESCRIPTION ------------------------------------------------------------------------------------- 03 3. TECHNICAL ------------------------------------------------------------------------------------------------------ 08 4. INSTALLATION -------------------------------------------------------------------------------------------------- 13 5. START - UP ------------------------------------------------------------------------------------------------------ 38 6. -
Page 3: General Security Considerations
1.2. Disposal of packaging and product This product or parts of it must be disposed of in an environmentally sound manner. 1. Use public or private waste disposal services. 2. If not available, contact Tigerflow. 1.INTRODUCTION AND SECURITY 1.1. Introduction 1.3. -
Page 4: Product Description
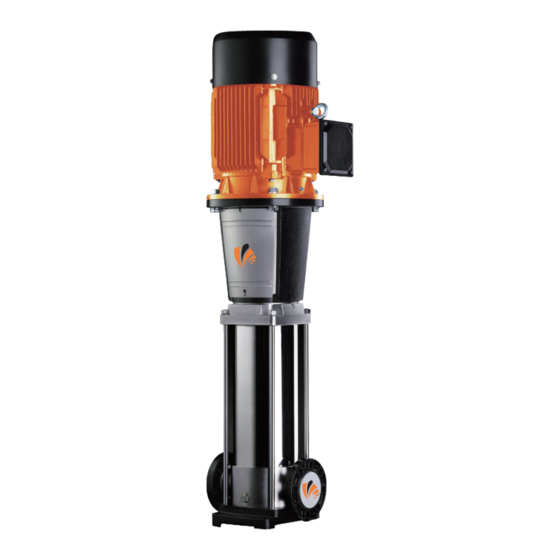
Installation, Operation and Maintenance Manual Installation, Operation and Maintenance Manual 2.PRODUCT DESCRIPTION 2.PRODUCT DESCRIPTION 2.1. Pump design ATTENTION: Contact your distributor in the following cases: This product is a vertical multi-stage pump non self-priming that can be installed with standard ●... - Page 5 Installation, Operation and Maintenance Manual Installation, Operation and Maintenance Manual 2.4. Model Key Wet - end only CD3-20 Wet - end / Motor combination CD3-20 Wet - end only CD32-80...
-
Page 6: Technical
Installation, Operation and Maintenance Manual Installation, Operation and Maintenance Manual 2.4. Model Key 2.5. Specifications Plate Wet - end / Motor combination CD32-85 CD Vertical Multistage Pump Model TIGERFLOW Serial No. ® Temperature 23°C : Figure 1: CD Pump Name Plate 1. - Page 7 Installation, Operation and Maintenance Manual Installation, Operation and Maintenance Manual 3. TECHNICAL 3.2. Minimum suction pressure 3.3. Maximum Pressures Maximum supply pressure and maximum operating pressure can be seen below. However, the actual supply pressure plus the (°F) (FT) (°C) maximum pump pressure (without flow) must always be below the values in Maximum operating pressure.
- Page 8 Installation, Operation and Maintenance Manual Installation, Operation and Maintenance Manual 3. TECHNICAL Maximum suction pressure 3.4. Minimum flow The following formula is valid for Figure 5. Due to risk of overheating, the pump must not be used below the minimum recommende flow ≤...
-
Page 9: Installation
Installation, Operation and Maintenance Manual Installation, Operation and Maintenance Manual 4. INSTALLATION 4.1. Structure 4.1. Structure Drawing 1-A CDF3 Drawing 1-B CD3 Coupling guard-left Drain screw M10 Coupling guard-left Sleeve for support diffuser Drain plug Coupling guard-right Mechanical seal Coupling guard-right Screw, washer O ring 136.5×3.3 Screw, washer... - Page 10 Installation, Operation and Maintenance Manual Installation, Operation and Maintenance Manual 4. INSTALLATION 4.1. Structure 4.1. Structure Drawing 1-C CDF5 Drawing 1-D CD5 Coupling guard-left Y ring Coupling guard-left Y ring Mechanical seal Mechanical seal Coupling guard-right Coupling guard-right Screw, washer Air vent plug Screw, washer Air vent plug...
- Page 11 Installation, Operation and Maintenance Manual Installation, Operation and Maintenance Manual 4. INSTALLATION 4.1. Structure 4.1. Structure Drawing 1-E CDF10 Drawing 1-F CD10 26f. Inlet&outlet Y ring Coupling Coupling guard-left guard-left chamber-oval Coupling guard-right Sleeve for support diffuser flange type Mechanical seal Coupling Screw, washer guard-right...
- Page 12 Installation, Operation and Maintenance Manual Installation, Operation and Maintenance Manual 4. INSTALLATION 4.1. Structure 4.1. Structure Drawing 1-G CDF15, 20 Drawing 1-H CD15, 20 Coupling Drain plug Coupling guard-left Y ring O ring 169×3.3 Sleeve for support diffuser guard-left Coupling guard-right Coupling Y ring Screw, washer...
- Page 13 Installation, Operation and Maintenance Manual Installation, Operation and Maintenance Manual 4. INSTALLATION 4.1. Structure 4.1. Structure Drawing 1-I CDF32, 42, 65, 85 Drawing 1-J CD32, 42, 65, 85 20a. Threaded flange Coupling guard Staybol Coupling guard 26a. Inlet&outlet chamber Screw, washer Retaining ring Screw, washer Staybolt...
- Page 14 Installation, Operation and Maintenance Manual Installation, Operation and Maintenance Manual 4.2. Installation Sketch & Size and Weight 4.2. Installation Sketch & Size and Weight...
- Page 15 Installation, Operation and Maintenance Manual Installation, Operation and Maintenance Manual 4.2. Installation Sketch & Size and Weight 4.2. Installation Sketch & Size and Weight...
- Page 16 Installation, Operation and Maintenance Manual Installation, Operation and Maintenance Manual 4.2. Installation Sketch & Size and Weight 4.2. Installation Sketch & Size and Weight...
- Page 17 Installation, Operation and Maintenance Manual Installation, Operation and Maintenance Manual 4.2. Installation Sketch & Size and Weight 4.2. Installation Sketch & Size and Weight...
- Page 18 Installation, Operation and Maintenance Manual Installation, Operation and Maintenance Manual 4.2. Installation Sketch & Size and Weight DANGER: ● Follow the safety regulations in force. ● Use adequate personal protective equipment. ● Always check local and domestic regulations and legislation in force with regards to choosing the installation site as well as electric and water connec- tions.
- Page 19 Installation, Operation and Maintenance Manual Installation, Operation and Maintenance Manual 4.4. Mechanical Installation 4.5. Foundation ATTENTION: 4.4.5. If the pump is to be used in an open circuit, the suction pipe diameter must be adequate Foundation and installation must be performed according to the instruc- for the installation conditions.
- Page 20 Installation, Operation and Maintenance Manual Installation, Operation and Maintenance Manual 4.5. Foundation 4.6. Vibration Damping For pumps with a ≥ 50HP (37 kW) motor, the length and width of the base plate should always be 60in x 60in (1,5 x 1,5 (Lf x Bf) meters). The weight of the foundation stand must be at least 1.5 times the total weight of the pump.
-
Page 21: Start - Up
Installation, Operation and Maintenance Manual Installation, Operation and Maintenance Manual 4. INSTALLATION 4.8. Hot Surfaces 5.1. Preliminary Check Before starting the pump, check the following points: DANGER: ● The foundation bolts of the pump must be securely fastened. When hot liquid is to be pumped, it must be ensured that people cannot accidentally touch the equipment hot surfaces. -
Page 22: Maintenance
Installation, Operation and Maintenance Manual Installation, Operation and Maintenance Manual 6. MAINTENANCE ATTENTION: 6.2. Replacing the Electrical Motor If a pump has been used for toxic or harmful liquids, it should be labeled as The procedure to couple the electrical motor to the pump is described below: contaminated. -
Page 23: Troubleshooting
Installation, Operation and Maintenance Manual Installation, Operation and Maintenance Manual 6. MAINTENANCE CD 32-85 process: Fault Cause Remedy Observations From model CD 32 and above, the pump is supplied with a fork shaped calibrated separator that facilitates the motor coupling and replacement. a) Supply failure. -
Page 24: Important Notice
Installation, Operation and Maintenance Manual Installation, Operation and Maintenance Manual 7. TROUBLESHOOTING Fault Cause Remedy Observations Fault Cause Remedy Observations a) Motor-protective circuit breaker does not a) Check and repair the suction a) Replace the motor- protec- a) Leakage in the suction pipe. 4.
Need help?
Do you have a question about the CD Series and is the answer not in the manual?
Questions and answers