Advertisement
GETTING TO KNOW YOUR NEW OVEN
Main Component
- Main Unit
(attached power cord not show)
![]()
- Fry Basket
Install when using the air fry function. Hand-wash recommended.
![]()
- Wire Rack
Use on its own or place on the pan top. Hand-wash recommended.
![]()
- Food Tray (Bake Pan)
Use on its own or place under Wire Rack or Air Fry Basket to collect drips. Hand-wash recommended.
![]()
- Crumb Tray
Use on its own, place on the bottom Hand-wash only.
![]()


Place crumb tray below lower heating elements. DO NOT slide into any rack positions.

Using The Cooking Functions With Rack Levels
The oven has two available rack positions where your accessories can slide into the unit (see image above). When you select a function, refer to the correspond rack which showing on the door to install accordingly.
Before Using Your Oven
Before using your Air Fryer Toaster Oven for the first time, be sure to:
- Read all of the instruction included in this manual.
- Wash the air fry basket, bake pan, wire rack, and removable crumb tray in warm, soapy water, then rinse and dry thoroughy. Do not put accessories in the dishwasher, finishes may degrade. Never submerse the main unit in water.
- Wash all accessoriesand clean the oven' s interior. Dry and place accessories back in oven.
Test Run
A test run will help you become familiar with your oven, make sure it's working correctly, and clean it of possible residues.
- Make sure there is no food or packaging in the oven and plug it in.
- Rotate knob to select the AIR FRYand set temperature to 450ºF, time 10 minutes.
- Press START/PAUSE
![]() to begin heating., the timer counting down.
to begin heating., the timer counting down. - The oven will stop heating and beep several times when finished.
 to begin heating., the timer counting down.
NOTE: The oven may produce some white smoke or steam during test run. This is normal.

To avoid risk of injury or burns, do not touch hot surfaces when oven is in use. Always take extreme care when removing bake tray, wire rack or any hot container from a hot oven, always use oven mitt.
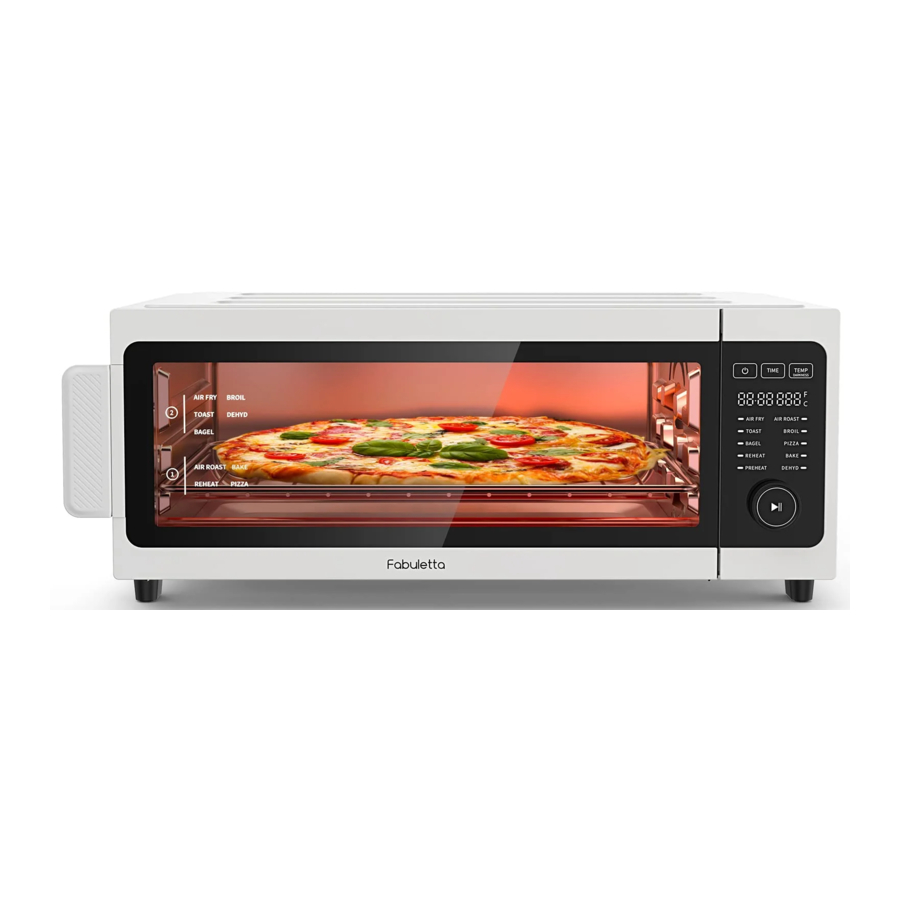
USING THE CONTROL PANEL
Control Panel

Note:
- Time will adjust in increments of +/-lminute.
- Time adjust by increments of 30 minutes only for dehydrate.
- Temperature will adjust increments of +/- 5F.
- F/Cunit change, pressand hold TEMPbutton two secondsto switch units between Fahrenheit and Celsius.
- Press and hold TIME with TEMP button three seconds to turn off/on beep sound.
Cooking Operating
- Place food on the Fry Basket or Food Tray or Wire Rack. Then insert to oven rack position and close the door.
- Turn the knob
![]() to select function what you want, which it will blink on the panel after selected.
to select function what you want, which it will blink on the panel after selected. - Optionally, customize the temperature and time. You can do this anytime during cooking:
- Press
![]() , the time digit will start blinking then turn the knob to adjust time.
, the time digit will start blinking then turn the knob to adjust time. - Press
![]() , the temperature digit will start blinking then turn the knob to adjust temperature.
, the temperature digit will start blinking then turn the knob to adjust temperature. - The digit will blink three times after stop turning, the time and temperature will automatically confirm.
- Press
- Press START/PA USE knob
![]() tostart cooking. Only t he working function will light up, and the display will show the timer counting down.
tostart cooking. Only t he working function will light up, and the display will show the timer counting down. - The oven will stop heating, display will show End and beep several times when finished.
 , the time digit will start blinking then turn the knob to adjust time.
 , the temperature digit will start blinking then turn the knob to adjust temperature.
OVEN FUNCTIONS
| Name | Use | Accessory and Rack Level | Range |
| AIR FRY |
| Fry Basket at top position Note: When cooking greasyfoods (such as chicken), insert the food tray underneath the fry basket to catch oil drippings. | 200-450º F/ 93-232ºC 1 min-60mins |
| TOAST |
| Wire Rack, at top position | Darkness Level Time and Temperature is automatic |
| BAGEL |
| Wire Rack, at top position | Darkness Level 1-7 Temperature is automatic |
| REHEAT | Heat leftovers without over cooking | Food tray, or Wire rack, at low position | 200-450ºF / 93-232ºC 1 min-60mins |
| PREHEAT | Rapidly preheating Oven | Without food | 200-450ºF / 93-232ºC Time is automatic |
| AIR ROAST |
| Food Tray, at low position | 200-450ºF / 93-232ºC 1 min-60mins |
| BROIL | Evenly broil meats, fish and brown the tops of casseroles and gratins | Food Tray, at top position | 200-450ºF / 93-232ºC 1 min-60mins |
| PIZZA | Melt and brown cheese and toppings while crisping crust | Wire rack, at low position | 200-450ºF / 93-232ºC 1 min-60mins |
| BAKE | Good for baking cakes, muffins and pastries. | Wire rack, at low position | 200-450ºF / 93-232ºC 1 min-60mins |
| DEHYD |
| Wire rack, or Airfry basket all rack position | 100-180F, time up to 24 hours |
NOTE:The oven's technology leads to faster cooking. Always monitor food to prevent overcooking. Adjust cook time and temperature according to the portion size and your favorite flavor.
The outer surface of the oven, including the oven door is hot during and after operation. Always use protective hot pads or insulated oven mitts when inserting, removing or handling items from the oven.
Tips of use accessories
When cooking with oil food or air frying greasyfood such as beef, chicken, or pork, place the Fry Basket or Wire Rack onto the Food Tray to prevent oil from dripping on the heating elements. You can use the Fry Basket without the food tray when air frying food with little to no oil or grease, such as vegetables or fruit.

CARE & MAINTENANCE
- This oven contains no user-serviceable parts. Any repairs should be performed by an authorized service representative.
- Clean oven accessories (including trays, etc.) and oven interior after every use.
- Do not use abrasive cleaners, metal scouring pads or metal utensils on any part of the oven, including trays and other accessories. These will scratch or damage their su rfaces.
Cleaning the Oven
- Before cleaning, turn off and unplug the oven, and allow it to cool completely. Open the door for faster cooling.
- Empty crumb tray by sliding it out of the oven.
- Apply non-abrasive liquid cleanser or a mild spray solution to a soft, damp cloth or sponge (not the oven surface) and wipe all parts of the oven. Do not use a dry cloth on the display screen, or it may be scratched.
- To clean the glass door, use a glass cleaner or mild detergent and a soft, damp sponge or soft, plastic scouring pad.
- Let all surfaces dry completely before plugging in or turning on the oven.
Cleaning the Accessories
Note: After each use, slide out the crumb tray and discard crumbs.

- Apply non-abrasive liquid cleanser or a mild spray solution to a soft, damp sponge or soft, plastic scouring pad (not the accessory surface). Wipe accessories and soak in warm, soapy water if necessary.
- For stubborn grease:
- In a small bowl, mix 2 UStbsp / 30 mL of baking soda with 1 UStbsp / 15 mL of water to form a spreadable paste.
- Use a sponge to spread the paste on the trays and scrub. Let the trays sit for 15 minutes before rinsing.
- Wash trays with soap and water.
- Dry thoroughly.
- Replacethe crumb tray into the oven before plugging in or turning on the oven.
STORAGE & TROUBLESHOOTING
Storage
- Clean and dry the oven and all accessories.
- Insert the crumb tray into the oven before insert all the accessories and close door.
- Store the oven in an upright position. Do not store anything on top
Troubleshooting
| PROBLEM | POSSIBLE SOLUTION |
The Oven will not turn on | Make sure the oven is plugged in. |
Foods are not completely cooked | Increase the cooking temperature or time. |
Foods are over cooked or burned | Decrease the cooking temperature or time. Make sure food items are not too large and are not touching the heating elements. |
Food cooked uneven | Preheat the oven manually by using the preheat function. Makesure food items are not too closely packed into a tray, rack, or other container. |
| White smoke or steam is coming out of the oven | The oven may produce some white smoke or steam during cooking. This is normal. |
Dark Smoke is coming out of the oven | Immediately press Power button stop cooking and unplug your oven. Food is burning. Wait for smoke to clear before opening the oven door. |
Oil flow to crumb tray during cooking chicken | Put Food tray in the Low Rack position for collecting drippings. |
| A thermometer shows that the oven temperature is different from the oven setting | Commonly used thermometers usually have low sensitivity and take over 10 minutes to measure the correct temperatu re. This will not affect cooking. |
Display shows Error code" E1" | There is a open circuit in the temperature monitor. Contact Customer Support. |
Display shows Error code" E2" | There is a short circuit in the temperature monitor. Contact Customer Support. |
IMPORTANT SAFEGUARDS
When using your Oven, basic safety precautions should always be followed, including the following:
- Read all instructions, product labels and warnings before using oven.
- Do not touch hot surfaces. Always use oven mitts when handling hot materials and allow parts to cool down before cleaning. Always use the oven handles when moving the unit.
- When the unit is not in use and before cleaning, pressthe Power Button off and remove the oven from the outlet. Allow the unit to cool thoroughly before putting on or taking off parts.
- To protect against risk of electrical shock, do not immerse the cord, plug, or appliance in water or any other liquid.
- Close supervision is always necessary when this or any appliance is used near children. This appliance is not for use by children.
- Do not operate this or any appliance with a frayed or damaged cord or plug or after the appliance malfunctions or is dropped or has been damaged in any manner. Return the oven to the nearest authorized service facility for examination, repair or adjustment.
- Do not use attachments not recommended by the manufacturer; they may cause fire, electric shock or personal injury.
- Do not use outdoors.
- Do not use this appliance for other than its intended use.
- Do not let the cord hang over the edge of a table or counter or touch hot surfaces.
- Do not place the appliance on or near a hot gas or electric burner or in a heated oven.
- Extremecaution should be used when using containers constructed of material other than metal or glass.
- A fire may occur if the oven is covered or touching flammable materials, including curtains, draperies, walls, etc., when in operation. Do not store any items on top of the appliance when in operation.
- Do not store any materials other than manufacturer' s recommended accessories in the oven when not in use.
- Do not place any of the following materials in the oven: cardboard, plastic, paper, or anything materials that may catch fire or melt.
- Do not cover the oven tray or rack with metal foil. This will cause overheating of the appliance.
- Oversized foods or metal utensils must not be inserted in the appliance as they may create a fire or risk of electrical shock.
- Do not clean with metal scouring pads. Pieces can break off the pad and touch electrical parts involving a risk of electrical shock.
- Use extreme caution when removing the tray, racks or disposing of hot grease or other hot liquids.
- Always wear protective, insulated oven gloves or use a special handle when inserting or removing items from the hot oven.
- Children should be supervised to ensure that they do not play with the appliance.
- The temperature of accessible surfaces may be high when the appliance is operating.
- The appliance shall not be placed against a wall while working.
- If the supply cord is damaged, it must be replaced by the manufacturer, Its service agent or similarly qualified persons in order to avoid a hazard.
- The appliances are not intended to be operated by means of an external timer or separate remote-control system.
- NEVER leave the oven unattended while in use.
- The bread may burn, therefore do not use the appliance near or below combustible material, such as curtains.
- Regardingthe instructions for cleaning surfaces in contact with food please refer to the below paragraph "cleaning" in manual.
Plug & Cord
Your oven has a polarized plug (one prong is wider than the other), which fits into a polarized outlet only one way. If the plug does not fit, reverse the plug. If it still does not fit, do not use the plug in that outlet. Do not alter the plug in any way.
Note: This oven uses a short power supply cord to reduce the risk of entangling or tripping. Useextension cords with care. The marked electrical rating of the extension cord must be as great as the rating of the oven.
FOR HOUSEHOLD USE ONLY SAVE THESE INSTRUCTIONS
We' re Here to Help!
If you have any questions about our products, please contact our customer support team.
support.us@fabuletta.com

www.Fabuletta.com
*Please have your invoice and order ID ready before contacting Customer Support.
Documents / Resources
References

Download manual
Here you can download full pdf version of manual, it may contain additional safety instructions, warranty information, FCC rules, etc.
Advertisement


Need help?
Do you have a question about the FAO002 and is the answer not in the manual?
Questions and answers