
Summary of Contents for System Q excelPTZ PTZ700
- Page 1 excelPTZ range Installation and Operation Manual Speed Dome Camera Controller MODEL PTZ700 Version 1.0 For updates to these instructions visit www.excelPTZ.com...
-
Page 2: Table Of Contents
CONTENTS Page 1. Summary 2. Keyboard Functions 3. The Keyboard Panel 4. Rear Keyboard Connections and Dip Switches 5. Setting the Dip Switches 6. Installation and Connection 7. Keyboard Operation – Camera Address - Presets Patrols/Tours Auto Pan/Scan - Record Pattern 8. -
Page 3: Summary
1. Summary The PTZ700 keyboard controller is used with terminal receivers such as the excelPTZ range of intelligent Speed Domes. The RS485 interface between the keyboard and the receiver, allows one keyboard to control as many as 32 intelligent speed domes with a maximum communication distance of up to 1.2 km. The keyboard is very easy to operate and control the Speed Dome Camera including functions to control pan, tilt, lens etc. -
Page 4: The Keyboard Panel
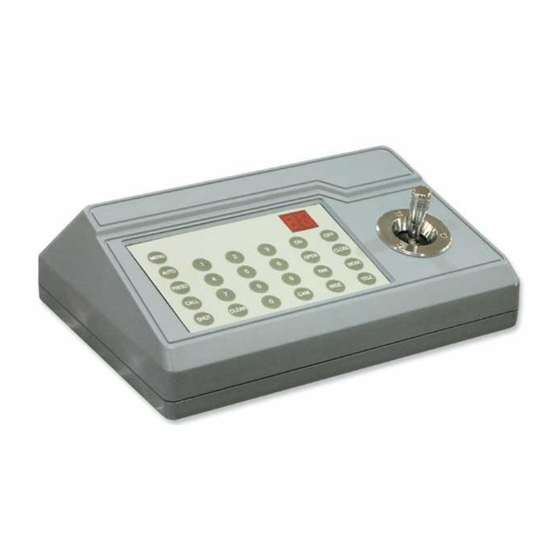
3. The keyboard Panel Description of Buttons (Figure 1) The keyboard has a speed joystick, press buttons and an illuminated display on the front panel. The display is used to show the address of the speed dome as well as the number inputted. The joystick controls the upward, downward, and sideways movement of the speed dome. -
Page 5: Rear Keyboard Connections And Dip Switches
4. Rear keyboard connections and dip switches Rear Panel (Figure 2) D C12V O U T G N D R S485 A. Power input connector: input DC12V power. B. DC12V Output. C. Communication connector RS485: D. ID-Code switch: Used to set the protocol in use and the baud rate of communications. 5. - Page 6 The following shows the default dip switch settings for use with the excelPTZ range of domes. The excelPTZ range all use PELCO-D at 2400 Baud Rate. Figure 3 a) The protocol and baud rate of communication of the keyboard are set by the ID-Code in Figure 4.
- Page 7 B01/ 9600Bps 1 2 3 4 5 6 7 8 c) Some examples of dip switch settings: N EO N / 9600Bps 1 2 3 4 5 6 7 8 Figure 6 PELCO - D / 2400Bps 1 2 3 4 5 6 7 8 PELCO - P/ 4800Bps 1 2 3 4 5 6 7 8 PELC O - P/ 9600Bps...
-
Page 8: Installation And Connection
6. Installation and Connection Please read the keyboard and speed dome manuals carefully before connecting wires. Any incorrect connections can cause permanent damage to the equipment. When connecting wires, always switch off the power supply first. The PTZ700 keyboard must not be exposed to damp or wet conditions that may short circuit the unit or cause electric shock. - Page 9 It is advisable to use CAT5 cable to connect the RS485 data cable from the dome to the keypad. You could use any pair out of the CAT5 cable but they must be two cores from the same pair. Why not use for example the orange pair so that the colours tie together a little? If you use cores from two different pairs in the CAT5 cable you will not get the benefit of the shielding effect of the cable twists and the dome will function erratically.
-
Page 10: Keyboard Operation - Camera Address - Presets
7. Keyboard Operation Camera Address. In order to control the dome you will need to uniquely address it. The dome will usually have dip switches to set the address. When the address is set you will need to use this address to access the specific dome. Enter the numeric dome address using the numeric keypad. -
Page 11: Patrols/Tours
To test if the preset is stored correctly in the dome, use the joystick to move the camera to point in a new location. Now press xx CALL (where xx is the preset you wish the camera to go to). In this example if you press 01 CALL the dome should go straight to the PRESET 01 location. -
Page 12: Auto Pan/Scan - Record Pattern
An example four preset mini-tour Setting the presets using the keypad STEP 1- Using the keypad joystick, move to where you wish to start the tour and then press 01 PRESET STEP 2- Now move to the next location and press 02 PRESET STEP 3- Now move to the third location and press 03 PRESET STEP 4- Finally move to where you wish to end the tour and press 04 PRESET Setting up a Tour/Patrol... - Page 13 Setting up a Record Pattern/Self Learning Scan Refer to your instructions on the dome. This will detail how the Record Pattern is set up and initiated via the dome menu. In order to access the dome menu press 64 CALL. You can select items in the menu by using the joystick UP/DOWN movement and changing and selecting items using the joystick LEFT/RIGHT movement.
-
Page 14: Ptz700 Keyboard Function Chart
8. PTZ700 Keyboard Function Chart Task Keyboard Operation Comments Selects the address of the camera to be Select Camera Address [n]+[CAM] controlled. [n] = No. of camera address 0 ~ 64 Stores a preset position. Set a Preset [n]+[PRESET] [n ]= No. of preset position 1 ~ 64 Moves camera to preset position. -
Page 15: Auxiliary Control Of The Camera
function on or off. 9. Auxiliary Control of the camera This keyboard can set certain functions in the dome camera. The functions will vary according to the type of camera fitted. These instructions should be used in conjunction with the camera instructions supplied. -
Page 16: Technical Specifications
10. Technical Specifications Communication between dome camera & PTZ700 Port to multi-port and half duplex function Communication connector RS485 Communication Baud Rate 2400bps, 4800bps, 9600bps and 19200bps Maximum communication distance 1200 metres maximum Power Supply 12v DC 500mA Size 188mm x 97mm x 70mm Weight 0.5Kg Number of domes controlled by keyboard...
Need help?
Do you have a question about the excelPTZ PTZ700 and is the answer not in the manual?
Questions and answers