Table of Contents
Advertisement
Quick Links
Advertisement
Table of Contents

Summary of Contents for Wavenet NESO 2.4
- Page 1 NESO 2.4 DIGITAL AUDIO TRANSMISSION SYSTEM FOR MONITORING USER MANUAL...
- Page 2 January 2024...
- Page 3 0 INDEX 1. DESCRIPTION AND PICTURES ....................3 2. START WORKING WITH NESO 2.4 ..................4 2.1 Start-up 2.2 Audio connection 2.3 Pairing transmitter and receivers 2.4 Start and stop receiving audio 3. EARPIECE RECEIVERS ......................6 3.1 Description 3.2 Battery and power function 3.3 Inserting and removing the speaker...
-
Page 4: Front Panel
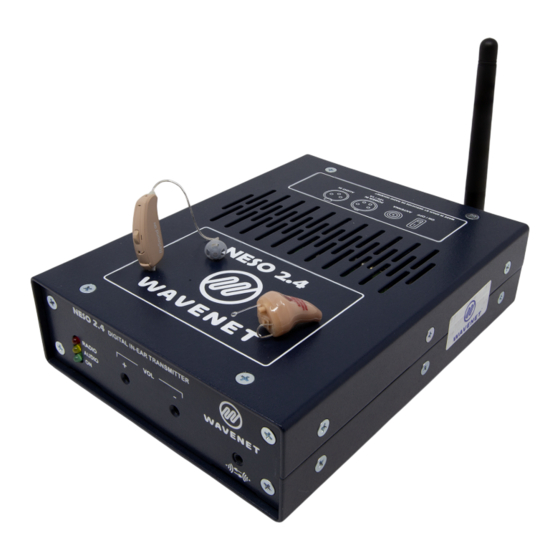
TV productions, theatre, stage management, technicians, etc. NESO 2.4 system consists of a radio frequency base station which works on the 2.4 GHz ISM band, and a complete range of in-ear as well as behind-the-ear receivers. These have been designed to deliver high quality audio transmission/reception for professional applications. -
Page 5: Audio Connection
2 START WORKING WITH NESO 2.4 START UP NESO 2.4 works in the 2.4 GHz band. Walls, metals, and other obstacles such as the human body can obstruct the transmission. The location of the transmitter in relation to such obstacles will make a significant impact on signal quality. Connect the power supply and the antenna (vertical position) supplied to the proper connectors in the NESO 2.4... - Page 6 To pair the NESO 2.4 transmitter to a receiver as #1: Ensure all the receivers near the transmitter are switched off (battery housing open or switched off if rechargeable). Push the pairing button on the transmitter once. The red LED on the front panel will blink once every two seconds to indicate the transmitter is ready to be paired as #1.
- Page 7 3 EARPIECE RECEIVERS 3.1 DESCRIPTION Both in-ear and behind-the-ear receivers are radio frequency systems that fit the ear ergonomically; they are shaped to fit your ears. The receivers are virtually invisible while providing high quality audio. Receivers are designed to be used in either the left or right ear.
- Page 8 3.3 INSERTING AND REMOVING THE SPEAKER Rechargeable receivers (images 1-3): 1. Using the supplied tool, insert it into the hole located on the speaker housing. 2. Insert the supplied tool into the opening on the speaker housing. 3. Gently press down until the plastic tab opens (it will rise up). 4.
-
Page 9: Charge Level
3.4 RECEIVER CHARGING PROCESS Case/ charger: For safety, use only the battery charger supplied by the manufacturer. On the first charge of the case/charger, charge for at least three hours. Be sure that hearing terminals are dry before putting them into the case/charger. 1. -
Page 10: Specifications / Features
5.1 HAZARD WARNINGS • Keep this system out of reach of children under 5 years. • This system must be repaired only by WAVENET RF Engineering. It is FORBIDDEN to change, modify or otherwise engage in internal handling of the system. -
Page 11: Product Safety Information
• Keep IN/OUT connectors clean. • If the system is damaged in any way (including cables/connectors), overheated, or any liquid falls on it, stop use immediately and disconnect it. Contact the WAVENET RF Engineering Technical Service for further instruction. 5.3 CARE AND MAINTENANCE FOR RECEIVERS Receivers require special care in terms of cleaning. -
Page 12: Warranty
8 WARRANTY In compliance with current European Union regulations, Servicios de Radio Wavenet offers a limited 2-year warranty, which is valid from the date of purchase. This warranty covers the repair of any manufacturing defects. The warranty does not cover damage caused by unsuitable system operation, chemical or liquids exposure, nor spare parts.
Need help?
Do you have a question about the NESO 2.4 and is the answer not in the manual?
Questions and answers