Advertisement
Quick Links
1
2
3
18/04/23
04/05/23
07/06/23
SV
MD
SV
EN IMPORTANT - These instructions are for your safety. Please read
through them thoroughly prior to handling the product and retain
them for future reference.
V10623_5059340756547_MAND1_2223
5059340756547_MNL_GB_V04.indd 1
5059340756547_MNL_GB_V04.indd 1
EAN: 5059340756547
4
5
16/06/23
XX/XX/23
Impala Ref: PRJ27918
John
NAME
KNG: KNG-2471-0002
Page Size: A5
EN Side Entry Fill Valve
with Brass Shank
5059340756547
5059340756875
19 Jun 2023 16:12:52
19 Jun 2023 16:12:52
Advertisement

Summary of Contents for Flomasta 5059340756547
- Page 1 EAN: 5059340756547 18/04/23 04/05/23 07/06/23 16/06/23 XX/XX/23 Page Size: A5 Impala Ref: PRJ27918 John NAME KNG: KNG-2471-0002 EN Side Entry Fill Valve with Brass Shank EN IMPORTANT - These instructions are for your safety. Please read through them thoroughly prior to handling the product and retain them for future reference.
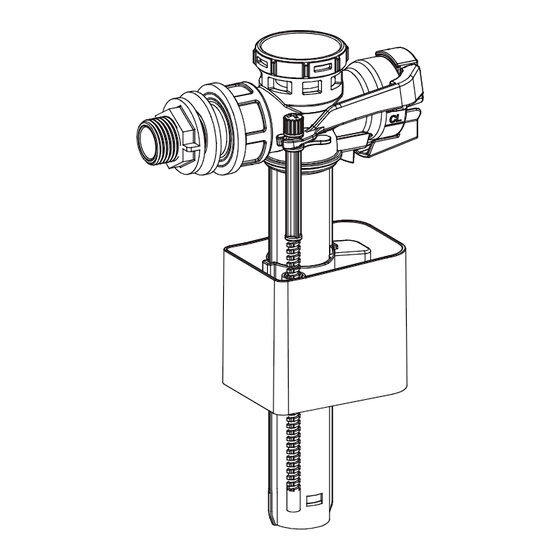
- Page 2 EN Parts 01. x1 02. x1 03. x1 04. x1 EN You will need EN Contents Safety Guarantee Assembly Care & maintenance 5059340756547_MNL_GB_V04.indd 2 5059340756547_MNL_GB_V04.indd 2 19 Jun 2023 16:12:52 19 Jun 2023 16:12:52...
-
Page 3: Before You Start
EN Safety Before you start • Don’t rush, read the instructions first and familiarise yourself with the sequence before you begin. • Make sure you have all of the parts listed. • Failure to follow these instructions may result in personal injury, damage to your property, damage to the product and lose of guarantee. - Page 4 IMPORTANT - RETAIN Guarantee THIS INFORMATION We take special care to select high quality materials and use manufacturing techniques that allow us to FOR FUTURE create products incorporating design and durability. This product has a manufacturer’s guarantee of REFERENCE: 10 years against manufacturing defects, from the date of purchase (if bought in store) or date READ CAREFULLY of delivery (if bought online), at no additional...
- Page 5 EN Assembly 01. x1 02. x1 03. x1 04. x1 1. Fit the valve (1) to the cistern. 2. On the outside of the cistern, fit the washer (3) and the backing nut (4) to the shank. 3. Secure backing nut using a spanner. Remember not to overtighten. 4.
- Page 6 Turn the water supply valve on, check for leaks and that the valve is functioning and shutting off correctly. NOTE: If the valve shuts off early or late you will need to adjust the float height. Follow the steps below to correctly set the water level.
-
Page 7: Valve Removal
EN Care & maintenance To keep your fill valve functioning correctly, it is recommended to clean both the filter and diaphragm every 6 months. Valve removal • Begin by isolating the water supply to the fill valve [1]. • Remove the water supply connection from the fill valve shank [2]. •... - Page 8 Filter and Diaphragm cleaning • Unclip the float arm from the adjustment screw [1]. • Lower the float arm so the diaphragm nut can be removed [2]. • Rotate the diaphragm nut as shown [3]. • Remove the diaphragm and casing [4], then separate them [5]. •...
- Page 9 Manufacturer: EN www.diy.com www.screwfix.com UK Manufacturer: www.screwfix.ie Kingfisher International Products Limited, To view instruction manuals online, 1 Paddington Square, London, W2 1GG, visit www.kingfisher.com/products United Kingdom EU Manufacturer: Kingfisher International Products B.V., Rapenburgerstraat 175E, 1011 VM Amsterdam, The Netherlands 5059340756547_MNL_GB_V04.indd 9 5059340756547_MNL_GB_V04.indd 9 19 Jun 2023 16:12:55 19 Jun 2023 16:12:55...
Need help?
Do you have a question about the 5059340756547 and is the answer not in the manual?
Questions and answers