Table of Contents
Advertisement
Quick Links
1
2
3
06/09/23
15/09/23
XX/XX/23
John
John
NAME
EN ORIGINAL INSTRUCTIONS
IMPORTANT - These instructions are for your safety.
Please read through them thoroughly prior to handling
the product and retain them for future reference.
V10923_5063022023292_MAND1_2223
5063022023292_MNL_EN_V02.indd 1
5063022023292_MNL_EN_V02.indd 1
4
5
XX/XX/23
XX/XX/23
Impala Ref: PRJ28963
NAME
NAME
EAN: 5063022023292
Page Size: A5
KNG: KNG-2971-1
EN 196 cm
Water Pump
3
TT196PWP
5063022023292
15 Sep 2023 09:24:58
15 Sep 2023 09:24:58
Advertisement
Table of Contents

Summary of Contents for Kingfisher TT196PWP
- Page 1 Water Pump EN ORIGINAL INSTRUCTIONS IMPORTANT - These instructions are for your safety. Please read through them thoroughly prior to handling the product and retain them for future reference. TT196PWP 5063022023292 V10923_5063022023292_MAND1_2223 5063022023292_MNL_EN_V02.indd 1 5063022023292_MNL_EN_V02.indd 1 15 Sep 2023 09:24:58...
- Page 2 EN Parts 01. x1 EN You will need EN Parts Product description Safety Technical specifications Before you start Functions & Settings Operation Care and maintenance Guarantee 5063022023292_MNL_EN_V02.indd 2 5063022023292_MNL_EN_V02.indd 2 15 Sep 2023 09:24:59 15 Sep 2023 09:24:59...
- Page 3 EN Product description 5063022023292_MNL_EN_V02.indd 3 5063022023292_MNL_EN_V02.indd 3 15 Sep 2023 09:25:00 15 Sep 2023 09:25:00...
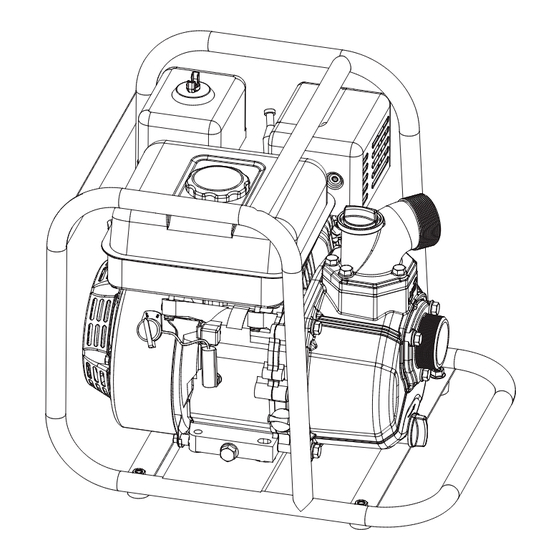
- Page 4 1. Air filter case 2. Muffler 3. Filling plug 4. Outlet 5. Inlet 6. Water drain plug 7. Pump head 8. Engine oil dipstick 9. Engine oil drain screw 10. Ignition switch 11. Fuel tank 12. Throttle lever 13. Recoil starter handle 14.
-
Page 5: Pump Safety Warnings
EN Safety Safety warnings • Product shall not be used by children. Children should be supervised to ensure that they do not play with the product. • This product is not designed to be used by people with reduced physical, sensory or mental capabilities or lack of experience and knowledge, except if they have been given supervision or instruction concerning the use of the product in a safe way and understand the hazards involved. -
Page 6: Operation
Training • Read the instructions carefully. Be familiar with the controls and the proper use of the product. • Never allow children or people unfamiliar with these instructions to use the product. Local regulations can restrict the age of the operator. -
Page 7: Maintenance And Storage
• Never pick up or carry a product while the engine is running. • Stop the engine: • whenever you leave the product, • before refuelling. • Reduce the throttle setting during engine shut down and, if the engine is provided with a fuel lever, turn off the lvere at the conclusion of working. -
Page 8: Fuel Handling
Fuel handling • Always switch the product off and let it cool down, before refuelling it. Petrol is highly flammable. Never smoke when you are refuelling the product. Do not refuel the product, if there is an open fire in the vicinity! •... - Page 9 • Only use the product as intended by its design and these instructions. • Ensure that the product is in good condition and well maintained. • Use correct accessories for the product and ensure they are in good condition. • Keep tight grip on the handle / gripping surfaces. •...
-
Page 10: Residual Risks
Residual risks Even if you are operating this product in accordance with all the safety requirements, potential risks of injury and damage remain. The following dangers can arise in connection with the structure and design of this product: • Health defects resulting from vibration emission if the product is being used over long periods of time or not adequately managed and properly maintained. - Page 11 Symbols On the product, the rating label and within these instructions you will find among others the following symbols and abbreviations. Familiarise yourself with them to reduce hazards like personal injuries and damage to property. Kilowatt Cubic meter per hour Cubic centimetre Millimetre Per minute...
- Page 12 Max. suction height. Objects can be flung and hit the user or persons nearby. Other persons and animals must keep away from the appliance when it is in use. Children must not under any circumstances be permitted near the work area. Indoor use of the product is not permitted.
-
Page 13: You Will Need
> Water temperature max. 40 °C > Max. particle size max. 5 mm > Inlet/Outlet connector diameter 50 mm > Spark plug gap 0.6 - 0.7 mm > Weight approx. 21.5 kg Noise level > Sound pressure level L (at the operator’s position) 88.7 dB(A) >... -
Page 14: Discharge Hose
Assembly WARNING! The product must be fully assembled before operation! Do not use a product that is only partly assembled or assembled with damaged parts! Follow the assembly instructions step-by-step and use the pictures provided as a visual guide to easily assemble the product! Disconnect the spark plug connector (17) from the spark plug! Reconnect it after assembly. -
Page 15: Priming The Pump
Fig. 2 • Attach the clamp (20) on the other side of the suction hose (25) (not provided). Do not fix the clamp at this step (Fig. 3, step 1). • Insert the strainer connector (19a) into the suction hose. Tighten the clamp screw to secure the suction hose (step 2). -
Page 16: Fuel And Engine Oil
Fig. 4 WARNING! Always fill the priming water before use. Never allow the pump to run “dry”. Dry running will damage the mechanical seal quickly. Fuel and engine oil This product is equipped with a 4-stroke engine. Before operation it is necessary to add proper fuel and engine oil separately. -
Page 17: Engine Oil
Maximum fuel level Fig. 5 NOTE: Petrol deteriorates over time. It may be difficult to start the engine if you use petrol which has been kept for more than 30 days. Always empty the fuel tank when storing the product for over 30 days. •... -
Page 18: Operating Controls
EN Use Operating controls Throttle lever Choke lever Fuel lever Recoil starter handle Fuel tank Ignition switch Filling plug Outlet Inlet Water drain plug Engine oil drain screw Engine oil dipstick 5063022023292_MNL_EN_V02.indd 18 5063022023292_MNL_EN_V02.indd 18 15 Sep 2023 09:25:05 15 Sep 2023 09:25:05... -
Page 19: Cold Start
Set up Assemble Priming the pump Add petrol Add engine oil Cold start Choke lever to the Fuel lever to the Ignition switch Throttle lever to the Pull recoil starter left (close) right (open) to ON middle handle Choke lever to the Throttle lever at right (open) required position... -
Page 20: Intended Use
WARNING! This quick start provides only a short overview of how to start and stop the product! For safe use it is essential to read the entire instruction manual before first use! EN Functions & Settings Intended Use The 196 cm / 3.7 kW engine driven water pump is designated for pumping water. -
Page 21: Throttle Lever
Fig. 8 NOTE: The fuel channel must be OPEN when the engine is used. Close the fuel channel when the engine is not used to prevent fuel leakage during storage or transportation. Throttle lever • Move the throttle lever (12) leftward to INCREASE the engine speed. (Fig. 9a). •... -
Page 22: Recoil Starter
Recoil starter • The recoil starter handle (13) is positioned at the rear side of the engine unit. • Pull the recoil starter handle (13) lightly until you feel resistance then pull it rapidly. Do it again until the engine starts (Fig. 10). Fig. - Page 23 • Switch the product off immediately if you are disturbed while working by other people entering the working area. Always let the product come to complete stop before averting. • Do not overwork yourself. Take regular breaks to ensure you can concentrate on the work and have full control over the product.
-
Page 24: After Use
Stopping • Move the throttle lever (12) to LOW speed position. • Set the ignition switch (10) to OFF position. • Move the fuel lever (14) completely to the left (CLOSE) position. After use • Stop the product, disconnect the spark plug connector and let it cool down. •... -
Page 25: Maintenance Table
Maintenance table Inspect and maintain this product regularly based on below maintenance table. Part To do Before / First Every Every Every Every after each month or 3 months 6 months year or 2 years or 5 hours 100 hours 250 hours 25 hours 50 hours... -
Page 26: Spark Plug
Spark plug Inspect the spark plug every 100 hours or prior to long-term storage over 30 days if the use has not been this high. Clean or replace with a new one if necessary. • Disconnect the spark plug connector (17) (Fig. 13). •... - Page 27 Fig. 15 Engine oil NOTE: Check the engine oil level and quality before each use and after every 50 hours of operation to be sure correct engine oil level is maintained. Check • Unscrew and remove the engine oil dipstick (8). •...
- Page 28 Drain water • Loosen and remove the water drain plug (6) to empty the remaining water in the pump head (7) into a suitable container (Fig. 17). Fig. 17 Carburettor • The carburettor is pre-set by the manufacturer. Should it be necessary to make any changes, please contact an authorised service centre or a similarly qualified person.
-
Page 29: Troubleshooting
Troubleshooting Suspected malfunctions are often due to causes that the users can fix themselves. Therefore check the product using this section. In most cases the problem can be solved quickly. WARNING! Only perform the steps described within these instructions! All further inspection, maintenance and repair work must be performed by an authorised service centre or a similarly qualified specialist if you cannot solve the problem yourself! - Page 30 Problem Possible cause Solution Engine operates 4.1. Spark plug is defective 4.1. Replace spark plug erratically 4.2. Spark plug gap is incorrect 4.2. Set gap between electrodes at 0.5 – 0.7 mm 4.3. Air filter is dirty 4.3. Clean air filter Engine idles poorly 5.1.
-
Page 31: Recycling And Disposal
Recycling and disposal Old products are potentially recyclable and do not, therefore, belong in your household rubbish. You are requested to assist us and our contribution to saving resources and protecting the environment by handing in this appliance at an equipped collection centre (if there is one available). -
Page 32: Availability Of Spare Parts
A better way to repair your tools Kingfisher takes special care in creating high-quality garden power tools that are designed to last. But if a fault develops with your garden power tool and you need to claim under the guarantee, the Customer Care and Technical Helpline can support with technical assistance or if required, arrange a free courier collection from your home, assess your garden power tool for fault, repair it, and return it. - Page 33 Nazwa i adres producenta lub jego upoważnionego przedstawiciela: Denumirea și adresa producătorului sau a reprezentantului său autorizat: Nombre y dirección del fabricante o de su representante autorizado: Nome e endereço do fabricante ou do respetivo mandatário: Kingfisher International Products B.V., Rapenburgerstraat 175E, 1011 VM Amsterdam, The Netherlands This declaration of conformity is issued under the sole responsibility of the manufacturer.
- Page 34 2006/42/EC as amended Machinery Directive 2014/30/EU as amended Directive Electromagnetic compatibility 2000/14/EC as amended Outdoor Noise Directive 2016/1628/EU Regulation Gaseous and Particulate Pollutant Emission Limits 2011/65/EU as amended Directive Restriction of the use of certain hazardous substances in electrical and electronic equipment Directive 2006/42/CE relative aux machines 2014/30 / UE telle que modifiée Directive Compatibilité...
- Page 35 și deținător al dosarului tehnic/firmante autorizado y titular del expediente tecnico/ signatário autorizado e detentor da ficha técnica Kingfisher International Products B.V., Rapenburgerstraat 175E, 1011 VM Amsterdam, The Netherlands...
- Page 36 Manufacturer: EU Manufacturer: Kingfisher International Products B.V., UK Manufacturer: Rapenburgerstraat 175E, Kingfisher International Products Limited, 1011 VM Amsterdam, 1 Paddington Square, London, W2 1GG, The Netherlands United Kingdom EN www.diy.com www.screwfix.com www.screwfix.ie To view instruction manuals online, visit www.kingfisher.com/products 5063022023292_MNL_EN_V02.indd 36 5063022023292_MNL_EN_V02.indd 36...
Need help?
Do you have a question about the TT196PWP and is the answer not in the manual?
Questions and answers