Advertisement
Available languages
Available languages
Quick Links
Advertisement

Related Manuals for Bruno BRN-0124


Summary of Contents for Bruno BRN-0124
- Page 1 Καφετιέρα Espresso “3 σε 1” Εγχειρίδιο χρήσης BRN-0124...
- Page 2 Πριν χρησιμοποιήσετε τη συσκευή διαβάστε τις οδηγίες χρήσης και φυλάξτε τις για μελλοντική αναφορά. Οδηγίες ασφαλείας − Πριν συνδέσετε τη συσκευή βεβαιωθείτε ότι η παροχή του ηλεκτρικού ρεύματος συμπίπτει με εκείνη που αναγράφεται στα τεχνικά χαρακτηριστικά της συσκευής. − Η συσκευή προορίζεται μόνο για οικιακή χρήση. Ο κατασκευαστής δεν φέρει καμία ευθύνη για...
- Page 3 αντλούν ηλεκτρικό ρεύμα, ακόμη και όταν ο διακόπτης δεν είναι πατημένος. − Αποσυνδέστε την συσκευή όταν δεν χρησιμοποιείται, πριν την μετακίνηση, τον καθαρισμό και την αποθήκευσή της. − Η συσκευή πρέπει να χρησιμοποιείτε μόνο από ενήλικες − Μην αφήνετε ποτέ τη συσκευή χωρίς επιτήρηση όταν βρίσκεται σε λειτουργία. −...
- Page 4 ΠΡΟΣΟΧΗ! Απαγορεύεται η χρήση της συσκευής με εξαρτήματα που δεν συστήνονται από τον κατασκευαστή και δεν συνοδεύουν την συσκευή. Απαγορεύεται η χρήση της συσκευής με οποιοδήποτε εξωτερικό εξάρτημα, χρονόμετρο ή σύστημα μακρινού ελέγχου. ΠΡΟΣΟΧΗ! Η συσκευή δεν πρέπει να χρησιμοποιείται από άτομα με ειδικές ανάγκες (σωματικές...
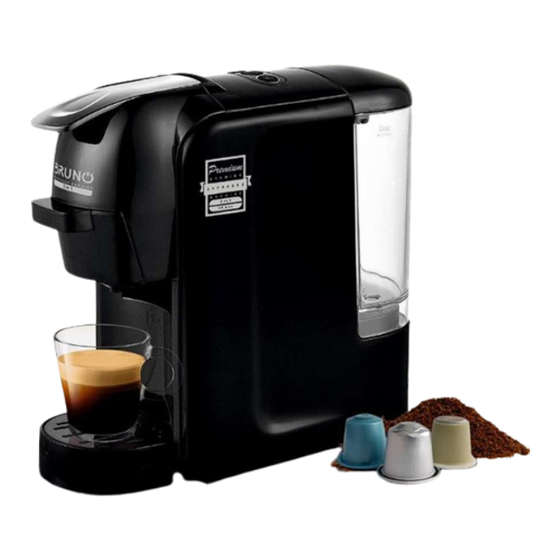
- Page 5 Διάταξη συσκευής 1. Μοχλός 2. Κουμπιά λειτουργιών (On/Off - Short Espresso - Lungo) 3. Καπάκι δεξαμενής νερού 4. Δεξαμενή νερού 5. Αντάπτορας καφέ 6. Σχάρα αποστράγγισης / βάση φλιτζανιών 7. Δίσκος περισυλλογής σταγόνων 8. Χειροκίνητη αντλία συντήρησης...
- Page 6 Πριν τη πρώτη χρήση 1. Αποσυσκευάστε προσεχτικά την συσκευή και βεβαιωθείτε ότι έχετε αφαιρέσει όλα τα υλικά συσκευασίας. Κρατήστε τις πλαστικές σακούλες μακριά από μωρά και παιδιά. 2. Καθαρίστε εξωτερικά το κύριο μέρος της συσκευής με ένα μαλακό, νωπό πανί. 3.
- Page 7 Λειτουργία Γέμισμα δεξαμενής νερού (4) Υπάρχουν 2 τρόποι γεμίσματος της δεξαμενής νερού: a) γεμίζοντας τη δεξαμενή με την χρήση ενός δοχείου χωρίς να την αφαιρέσετε από την συσκευή. b) αφαιρώντας τη δεξαμενή από την συσκευή ) Γέμισμα χωρίς την αφαίρεση της δεξαμενής 1.
- Page 8 Διαδικασία καθαρισμού εσωτερικού υδραυλικού κυκλώματος Πριν από την πρώτη χρήση ή μετά από περιόδους αδράνειας της συσκευής απαιτείται η εκτέλεση των παρακάτω ενεργειών για τον αποτελεσματικό καθαρισμό του εσωτερικού υδραυλικού κυκλώματος. 1. Βεβαιωθείτε ότι η συσκευή δεν είναι συνδεδεμένη στην παροχή ρεύματος. 2.
- Page 9 Διαδικασία παρασκευής καφέ Η καφετιέρα διαθέτει 3 διαφορετικούς αντάπτορες για την παρασκευή καφέ: • Αντάπτορας για κάψουλες Nespresso • Αντάπτορας για κάψουλες Dolce Gusto • Αντάπτορας για αλεσμένο καφέ. Για κάψουλες Nespresso Για κάψουλες Dolce Gusto Για αλεσμένο καφέ...
- Page 10 Διαδικασία παρασκευής καφέ με κάψουλα Nespresso Βεβαιωθείτε ότι η συσκευή δεν είναι συνδεμένη στην παροχή ρεύματος. Τοποθετήστε νερό στη δεξαμενή νερού (4) φροντίζοντας να υπερβείτε την μέγιστη ένδειξη χωρητικότητας “MAX” και βεβαιωθείτε ότι η δεξαμενή νερού (4) είναι τοποθετημένη σωστά. Σηκώστε...
- Page 11 12. Τοποθετήστε ένα φλιτζάνι μεγέθους ανάλογου με τον καφέ που θέλετε να παρασκευάσετε (Short Espresso ή Lungo) επάνω στην σχάρα αποστράγγισης / βάση φλιτζανιών (6) κάτω από το στόμιο εξαγωγής καφέ. 13. Όταν οι λυχνίες σταματήσουν να αναβοσβήνουν και παραμείνουν ενεργοποιημένες πιέστε μια φορά το επιθυμητό...
- Page 12 Διαδικασία παρασκευής καφέ με κάψουλα Dolce Gusto Βεβαιωθείτε ότι η συσκευή δεν είναι συνδεμένη στην παροχή ρεύματος. Τοποθετήστε νερό στη δεξαμενή νερού (4) φροντίζοντας να υπερβείτε την μέγιστη ένδειξη χωρητικότητας “MAX” και βεβαιωθείτε ότι η δεξαμενή νερού (4) είναι τοποθετημένη σωστά. Σηκώστε...
- Page 13 12. Τοποθετήστε ένα φλιτζάνι μεγέθους ανάλογου με τον καφέ που θέλετε να παρασκευάσετε (Short Espresso ή Lungo) επάνω στην σχάρα αποστράγγισης / βάση φλιτζανιών (6) κάτω από το στόμιο εξαγωγής καφέ. 13. Όταν οι λυχνίες σταματήσουν να αναβοσβήνουν και παραμείνουν ενεργοποιημένες πιέστε μια φορά το επιθυμητό...
- Page 14 Παρασκευή καφέ με αλεσμένο καφέ Βεβαιωθείτε ότι η συσκευή δεν είναι συνδεμένη στην παροχή ρεύματος. Τοποθετήστε νερό στη δεξαμενή νερού (4) φροντίζοντας να υπερβείτε την μέγιστη ένδειξη χωρητικότητας “MAX” και βεβαιωθείτε ότι η δεξαμενή νερού (4) είναι τοποθετημένη σωστά. Σηκώστε τον μοχλό (1) προς τα πάνω για να αποδεσμεύσετε...
- Page 15 12. Τοποθετήστε ένα φλιτζάνι μεγέθους ανάλογου με τον καφέ που θέλετε να παρασκευάσετε (Short Espresso ή Lungo) επάνω στην σχάρα αποστράγγισης / βάση φλιτζανιών (6) κάτω από το στόμιο εξαγωγής καφέ. 13. Όταν οι λυχνίες σταματήσουν να αναβοσβήνουν και παραμείνουν ενεργοποιημένες πιέστε μια φορά το επιθυμητό...
- Page 16 Ρύθμιση ποσότητας καφέ Ρύθμιση ποσότητας καφέ short espresso 1. Τοποθετήστε ένα φλιτζάνι επάνω στην σχάρα αποστράγγισης / βάση φλυτζανιών (6). 2. Πιέστε παρατεταμένα το πλήκτρο παρασκευής Short Espresso και αποδεσμεύστε όταν έχετε την επιθυμητή ποσότητα καφέ για να σταματήσει η διαδικασία. (Ελάχιστος...
- Page 17 Επαναφορά εργοστασιακών ρυθμίσεων 1. Κρατήστε πατημένο το πλήκτρο παρασκευής καφέ lungo και ταυτόχρονα συνδέστε την συσκευή στην παροχή ρεύματος. 2. Οι ενδεικτικές λυχνίες θα αναβοσβήσουν 2 φορές υποδεικνύοντας ότι η επαναφορά εργοστασιακών ρυθμίσεων έχει πραγματοποιηθεί επιτυχώς. Καθαρισμός και συντήρηση • Καθαρίζετε τη συσκευή τακτικά και πάντα μετά από κάθε χρήση. •...
- Page 18 Καθαρισμός σωληνώσεων από άλατα 1. Τοποθετήστε ένα δοχείο μεγέθους 250ml και άνω επάνω στην σχάρα αποστράγγισης (6). 2. Προμηθευτείτε έναν ειδικό υγρό αφαλάτωσης, και αραιώστε το σύμφωνα με τις οδηγίες του κατασκευαστή. 3. Γεμίστε την δεξαμενή νερού (4) με το διάλυμα νερού και υγρού αφαλάτωσης, χωρίς να υπερβαίνετε...
-
Page 19: Αντιμετώπιση Προβλημάτων
Αντιμετώπιση προβλημάτων Σύμπτωμα Αιτία Ενέργεια Η συσκευή δεν λειτουργεί Η συσκευή δεν είναι σωστά Συνδέστε σωστά στην καθόλου. τοποθετημένη στην πρίζα. πρίζα. Αν και πάλι δεν λειτουργεί η συσκευή απευθυνθείτε σε εξειδικευμένο τεχνικό. Δεν γίνεται εκχύλιση καφέ. Η δεξαμενή νερού είναι Γεμίστε... - Page 20 Τεχνικά Χαρακτηριστικά Reference number BRN-0124 Χωρητικότητα 0.6L Ισχύς 1450W Εύρος τάσης 220-240V~ Συχνότητα λειτουργίας 50/60Hz Σωστή απόρριψη του προϊόντος Εάν επάνω στο προϊόν ή στη συσκευασία του προϊόντος υπάρχει το σύμβολο απόρριψης τότε δε θα πρέπει να πετάξετε το προϊόν μαζί με τα κοινά οικιακά...
- Page 21 Multi-Capsule Espresso coffee maker “3 in 1” User manual BRN-0124...
- Page 22 Read the instruction manual carefully before operation and keep for future reference. Safety instructions − Before connecting the appliance to the supply mains, check that the voltage of the appliance corresponds to that of the voltage mains in your home. −...
- Page 23 − The appliance in not intended to be used on the following cases which are not covered by warranty: · professional use · staff kitchen areas in shops, offices and other working environments. · farm houses · by clients in hotels, motels and other residential type environments.
- Page 24 WARNING! Do not use any accessories not recommended by the manufacturer. Do not operate with any external timer or remote control system. WARNING! This appliance is not intended for use by children or persons with reduced physical, sensory or mental capabilities or lack of experience and knowledge, unless they are under supervision and they have been given specific instructions concerning the use of the appliance by a person responsible for their safety.
-
Page 25: Device Description
Device description 1. Lever 2. Buttons (for functions: On/Off – Short Espresso - Lungo) 3. Lid for water tank 4. Water tank 5. Coffee Adaptor 6. Drip grid 7. Drip tray 8. Manual pipe... - Page 26 Before first use 1. Carefully unpack the appliance and remove all packaging materials. Keep plastic bags out of the reach of babies and children. 2. Clean the external surface of the appliance, with a soft dump cloth. 3. Clean all the detachable parts of the appliance (water tank lid, water tank, adapters, drip grid, grip tray) with warm soapy water using a soft sponge.
-
Page 27: Operation
Operation Filling the water tank (4) There are 2 ways to fill the water tank: a) By filling directly into the appliance using a container. b) By removing the water tank. ) Filling without removing the water tank 1. Remove the water tank lid (3). 2. - Page 28 Cleaning procedure of the inner hydraulic circuit Before making your first coffee and every time the devise is inactive for a long period, follow the procedure described below to effectively clean the inner hydraulic circuit. 1. Make sure the appliance is not connected to the power supply. 2.
- Page 29 Coffee brewing The appliance has 3 different adapters for coffee brewing: • Adapter for Nespresso capsules • Adapter for Dolce Gusto capsules adapter • Adapter for ground coffee adapter Nespresso Capsules Dolce Gusto capsules Ground coffee...
- Page 30 Coffee brewing with Nespresso capsules Make sure the appliance is not connected to the power supply. Fill the water tank (4) with cold water without exceeding max level indicator and make sure the water tank is installed properly. Lift the lever (1) to release the adapter (5). Pull out the adapter (5) to remove it from the appliance.
- Page 31 12. Place a cup on the drip grid (6) under the dispenser. 13. When the indication lights stop blinking and turn solid press once the desired coffee button for Short Espresso or Lungo. The selected button will blink while the coffee is brewing.
- Page 32 Coffee brewing with Dolce Gusto capsules Make sure the appliance is not connected to the power supply. Fill the water tank (4) with cold water without exceeding max level indicator and make sure the water tank is installed properly. Lift the lever (1) to release the adapter (5). Pull out the adapter (5) to remove it from the appliance.
- Page 33 12. Place a cup on the drip grid (6) under the dispenser. 13. When the indication lights stop blinking and turn solid press once the desired coffee button for Short Espresso or Lungo. The selected button will blink while the coffee is brewing.
- Page 34 Coffee brewing with ground coffee Make sure the appliance is not connected to the power supply. Fill the water tank (4) with cold water without exceeding max level indicator and make sure the water tank is installed properly. Lift the lever (1) to release the adapter (5). Pull out the adapter (5) to remove it from the appliance.
- Page 35 12. Place a cup on the drip grid (6) under the dispenser. 13. When the indication lights stop blinking and turn solid press once the desired coffee button for Short Espresso or Lungo. The selected button will blink while the coffee is brewing. The brewing procedure will automatically stop when reaching the default brewing time (16sec for Short Espresso and 25sec for Lungo cofffee).
- Page 36 Coffee volume setting Short espresso volume setting 1. Place a cup on the drip grid (6) under the dispenser. 2. Keep pressing the Short espresso coffee and release when you get the desired volume of coffee to stop the brewing. (Minimum time 10sec, Maximum time 90sec). Lungo coffee volume setting 1.
- Page 37 Reset to factory settings 1. Keep pressing the Lungo coffee button and in the same time connect the appliance to the power supply. 2. The indication lights of the functions buttons will blink twice indicating that the appliance is set to the factory default settings.
- Page 38 Descaling the appliance 1. Place a 250ml or above container on the drip grid (6). 2. Purchase a liquid descaler and diluted according to the manufacturer‘s instructions. 3. Fill the water tank (4) with the liquid descaler and water solution, without exceed max level indicator.
-
Page 39: Troubleshooting
Troubleshooting Problem Cause Solution The appliance is not The plug is not connected Connect the plug properly working. properly to the power to the power supply. If it still supply. doesn’t work, contact an authorized technician. Coffee is not brewing. The water tank is empty. -
Page 40: Specifications
Specifications Reference number BRN-0124 Capacity 0.6L Power 1450W Rating 220-240V~ Frequency 50/60Hz Safe appliance disposal This symbol on the product and / or accompanying documents means that used electrical and electronic equipment should not be mixed with general household waste. For proper treatment, recovery and recycling, please take this product to designated collection points where it will be accepted free of charge.
Need help?
Do you have a question about the BRN-0124 and is the answer not in the manual?
Questions and answers
Can not open the lever to replace capsule