Table of Contents
Advertisement
Quick Links
Advertisement
Table of Contents

Related Manuals for KeyGree MIG-250

Summary of Contents for KeyGree MIG-250
- Page 1 MIG-250/250S 2021...
- Page 2 MIG-250/250S 2021...
- Page 3 Thanks for your purchase of this series of welder products! This series of products are safe, reliable, firm, durable, convenient to maintain, and capable of greatly raising the welding productivity. This user’s manual contains important information on use, maintenance and safety of the product. See technical parameters of the equipment in technical parameter in this manual.
-
Page 4: Table Of Contents
CONTENTS SAFETY TIPS GENERAL INTRODUCTION ELECTRICAL DIAGRAMS MAIN PARAMETER INSTALLATION I. Power Input Cable II. Power Output Cable III. Installation of Wire Spool OPERATION I. Operation Way II. Setup of the Welding Current III. Welding Parameter List. (For Low-carbon Steel) IV. -
Page 5: Safety Tips
SAFETY TIPS During the welding process, the work may cause some damage to you and other people, so please make some protection. For more details, please kindly read "operator safety manual"accord with accident prevention of manufacturer Worker must receive professional training before operation! Use welding safety products recognized by national safety ministry of supervision. -
Page 6: General Introduction
Moving component will cause some damage to people. Keep away from moving component, such as fan. Keep the panel, back plate, cover and protection equipments fasten on machine Fault-you should look for some help from professional worker when you face some trouble. -
Page 7: Main Parameter
MAIN PARAMETER Page 03... -
Page 8: Installation
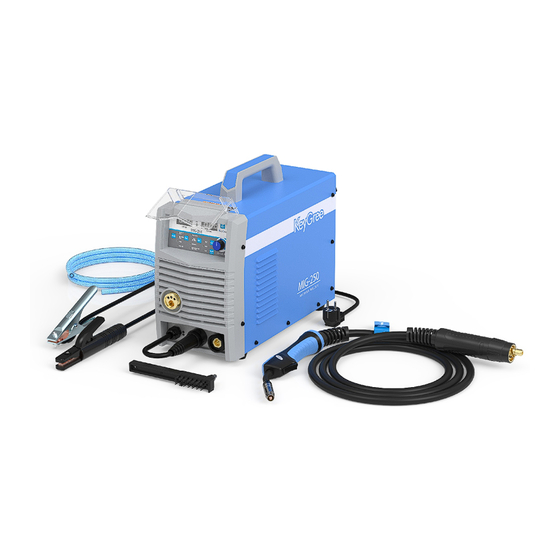
INSTALLATION I. Power Input Cable Each machine is equipped with power input cable. Connect the cable to AC Single phase 110/220V±10% power supply. II. Power Output Cable Connect the CO gas bottle firmly with the CO inlet on the back of the welding machine by gas- carrying hose A gas regulator for the CO gas bottle is needed. - Page 9 GAS FLOW METER THE BACK OF MACHINE EAT WIRE GAS BOTTLE INPUT CABLE WIRE PLATE MIG TORCH WORKPIECE WELDING PERFORMING MMA weldling performing Ø3.2 & Ø4.0mm electrode thickness 5mm flat welding 220V 6mm steel plate angle welding 4mm carbon steel plate angle welding performing IV.
-
Page 10: Operation
OPERATION Speed. Speed. I. Operation Way A. Turn over displays(Welding Current, E. Welding wire select Work piece Thickness, Welding F. Welding method select on CO2/MIG, MAG, Voltage, Inductance) DC stick(MMA) Tig Lift, Gasless Flux Welding. B. Adjusting knob for value G. -
Page 11: Setup Of Welding Speed
IV. Setup of Welding Speed The welding speed affects the welding quality and efficiency. Higher welding speed means less gas- protection, accelerated cooling speed, lower flexibility and forming of welding seam. Lower welding speed is likely to cause burning through of the work piece and a puffy welding seam. In the actual production, please keep the welding speed less than 30m/h. -
Page 12: Maintenance
(3) Voltage Overloading Prohibited For the power supply voltage, please refer to the "Main Parameter Table". Under normal circumstances, the auto-compensation circuit in the machine will help to keep the welding current within permissible range Voltage overload damages the machine, so preventive measures are (4) Earth cable connects to the ground. -
Page 13: Welding Power Supply
I. Welding Power Supply Inspection Key points Location Remark 1. Check the work state and installation of the switch. Fron 2. Check and make sure the power-on indicator works Pane properly. 1.Check whether the fan works properly or there Cooling Checking is needed if abnormal is too much noise. -
Page 14: Wire Feeder
II. Welding Torch Inspection Key Points Location Remark 2.Check the consistence of the welding The unsuitability of them may cause wire diameter and inner diameter of unstable arc. Change it into a contact tube. suitable tub. Cause of bad wire-feeding or 3.Check the bending or extended parts. -
Page 15: Power Output Cable
IV. Power Output Cable Inspection Key points Location Remark 1.Cause of bad wire-feeding. 1. Whether the cable of welding torch is bent 2.Too much wire feeded with too much. Cable of Welding bent cable may cause unstable 2. Check the looseness of the metal Torch arc.
Need help?
Do you have a question about the MIG-250 and is the answer not in the manual?
Questions and answers
Регулировка подачи проволоки , где???
The wire feed adjustment on the KeyGree MIG-250 is likely located near the wire feed roll and wire pressurized roller, where users can check alignment, wire diameter consistency, and pressure settings. It involves adjusting the pressure on the handle and inspecting the wire feed roll for proper function.
This answer is automatically generated