
Related Manuals for Blanco BLANCOCULINA-S II Sensor


Summary of Contents for Blanco BLANCOCULINA-S II Sensor
- Page 1 BLANCOCULINA-S II Sensor BLANCOCULINA-S II Mini Sensor Bedienungsanleitung User manual • Mode d’emploi • Manuale di istruzioni • Manual del usario • cāzuo shuōíng blanco.com...
- Page 2 Deutsch Bedienungsanleitung ___________________________________________ 3 English User manual __________________________________________________ 15 Français Mode d‘emploi ________________________________________________ 26 Español Manual del usario _____________________________________________ 37 cāzuo shuōíng ________________________________________ 51 BLANCO GmbH + Co KG Flehinger Str. 59 75038 Oberderdingen Germany...
-
Page 3: Table Of Contents
Inhalt Kundenservice ___________________________________________________________________ 4 Einführung _______________________________________________________________________ 5 BLANCOCULINA-S II Sensor - BLANCOCULINA-S II Mini Sensor ____________________ 6 Anzeige- und Bedienelemente _______________________________________________________ 6 Batteriebox im Unterschrank ________________________________________________________ 7 Manuelle Bedienung _______________________________________________________________ 8 Sensoren _________________________________________________________________________ 9 Oberflächenreinigung ______________________________________________________________ 12 Ersatzteile _______________________________________________________________________ 12 Entsorgung / Umwelt ______________________________________________________________ 13 Konformität_______________________________________________________________________ 13... -
Page 4: Kundenservice
Wir wünschen Ihnen viel Freude mit unserem System. Unsere Bedienungsanleitung ist so aufgebaut, dass Ihnen die Handhabung der Armatur BLANCOCULINA-S II Sensor bzw. der Armatur BLANCOCULINA-S II Mini Sensor keinerlei Probleme bereiten dürfte. Sollte wider Erwarten doch einmal eine Frage auftauchen, dann setzen Sie sich einfach mit unserem BLANCO Kundendienst in Verbindung. -
Page 5: Einführung
örtlichen Vorgaben und einem konstanten Fließdruck zwischen 1 und 10 bar bei einer Wassertemperatur von 5 °C bis 70 °C angeschlossen werden. Veränderungen in oder an der Armatur oder dem gesamten System sind nur durch BLANCO oder durch BLANCO geschultes Fachpersonal erlaubt. Das System darf nur von geschultem und qualifiziertem Personal geöffnet werden! Achtung: Spannungsführende Teile innerhalb des Systems! -
Page 6: Blancoculina-S Ii Sensor - Blancoculina-S Ii Mini Sensor
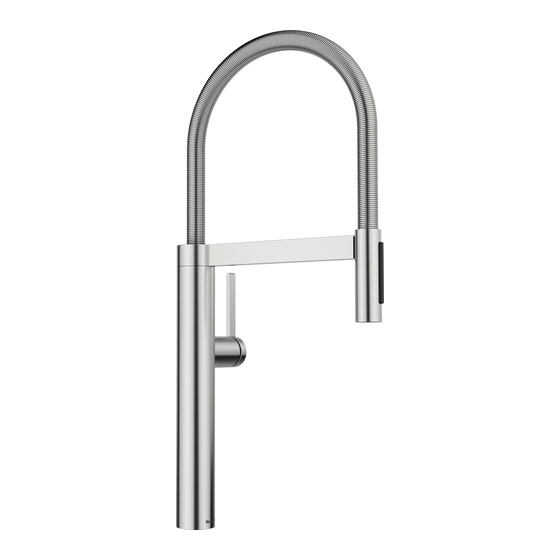
Anzeige- und Bedienelemente 1 Anzeige-LED 2 seitlicher Sensor (An-/Aus-Funktion) 3 Umschaltknopf für Änderung der Strahlart 4 manueller Bedienhebel 5 unterer Sensor (Funktion 'Gefäß füllen') -
Page 7: Batteriebox Im Unterschrank
Batteriebox im Unterschrank Hinweis: Für die Funktion der Armatur müssen die Batte- rien in der Batteriebox über ausreichend Energie verfügen. Dadurch ist sichergestellt, dass die Armatur auch im Falle Anzeige-LED leuchtet eines Stromausfalls bedient werden kann. rot: Batteriezustand kritisch Sollte der Batteriezustand kritisch werden, zeigt die Armatur dies mit einer roten LED an. -
Page 8: Manuelle Bedienung
Manuelle Bedienung Während der Wasserabgabe leuchtet die Anzeige-LED Gewohnte Bedienung blau. an/aus und warm/kalt wie bei vielen Armaturen. Umschaltknopf für Änderung der Strahlart. -
Page 9: Sensoren
Unterer Sensor (Funktion 'Gefäß füllen') Mit Annäherung z.B eines Topfs in den Sensorbereich startet die Abgabe von kaltem Wasser mit 100 % Durchflussmenge - auch wenn der Bedienhebel geschlossen ist! Hinweis: Da der Erfassungsbereich des Sensors einige cm vom Brausekopf entfernt ist, kann es vorkommen, dass Gefäße mit kleinem Durchmesser (z.B. - Page 10 Seitlicher Sensor (Bedienhebel geschlossen) Start-Funktion 1. Stellen Sie am manuellen Bedienhebel die gewünschte Wassertemperatur ein, lassen Sie den Hebel aber geschlossen. 2. Eine kurze Annäherung an den seitlichen Sensor (im Abstand von weniger als 5 cm) startet die Wasserabgabe mit 70 % Durchflussmenge. Es wird die Temperatur ausgegeben, die am Bedienhebel eingestellt ist - auch wenn der Bedienhebel geschlossen ist! 3.
- Page 11 Seitlicher Sensor (Bedienhebel geöffnet) Stopp-Funktion 1. Öffnen Sie den manuellen Bedienhebel. Stellen Sie die gewünschte Wassermenge und Temperatur ein. 2. Eine kurze Annäherung an den seitlichlichen Sensor stoppt die Wasserabgabe. 3. Eine weitere weitere kurze Annäherung an den Sensor startet die Wasserabgabe erneut.
-
Page 12: Oberflächenreinigung
Um bei der Reinigung keine ungewollte Wasserabgabe zu starten, besitzt die Armatur eine Reinigungs- funktion, die die Sensoren deaktiviert. Bitte sehen Sie hier auf Seite 10 nach. Es empfiehlt sich für die Reinigung der Armatur die von BLANCO vorgeschlagenen Reinigungsmittel zu verwenden, welche Sie ebenfalls bequem im BLANCO Webshop bestellen können: Europa: Großbritannien, Nordamerika, China und Australien:... -
Page 13: Entsorgung / Umwelt
Entsorgung abgeben können. Gewerbliche Nutzer wenden sich an ihren Liefe- ranten und gehen nach den Bedingungen des Verkaufsvertrags vor. Dieses System und elektronische Zubehörteile dürfen nicht zusammen mit anderem Gewerbemüll entsorgt werden. Konformität Das System entspricht den Anforderungen der einschlägigen Richtlinien. Konformitätserklärungen können bei BLANCO angefordert werden. - Page 15 Content Customer Service _______________________________________________________________ 16 Introduction ____________________________________________________________________ 17 BLANCOCULINA-S II Sensor - BLANCOCULINA-S II Mini Sensor ___________________ 18 Indicator and control elements ______________________________________________________ 18 Battery box in the base cabinet _____________________________________________________ 19 Manual operation _________________________________________________________________ 20 Sensors _________________________________________________________________________ 21 Surface cleaning __________________________________________________________________ 24...
-
Page 16: Customer Service
Our user manual is designed in such a way that you should not have any problems handling the BLANCOCULINA-S II Sensor or BLANCO CULINA-S II Mini Sensor faucet / mixer tap. If you should have any questions, simply get in touch with our BLANCO Customer Service. BLANCO GmbH + Co KG Tel.: +49 7045 44-81 419... -
Page 17: Introduction
Introduction Dear User, Thank you for deciding to purchase the BLANCOCULINA-S II Sensor or the BLANCOCULINA-S II Mini Sensor faucet / mixer tap - a combination of a classic faucet / mixer tap with an elegant design and semi-professional functionality. The faucet / mixer tap can be operated both manually and contactless with a sophisticated double sensor system in the spray arm and the faucet / mixer tap body for optimized work processes in the kitchen. -
Page 18: Blancoculina-S Ii Sensor - Blancoculina-S Ii Mini Sensor
Indicator and control elements 1 Indicator LED 2 Side sensor (on/off function) 3 Switch button to change jet types 4 Manual control lever 5 Lower sensor (pot-filler function) -
Page 19: Battery Box In The Base Cabinet
Battery box in the base cabinet Note: The batteries in the battery box must have sufficient energy for the faucet / mixer tap to function. This ensures that the faucet / mixer tap can be operated even in the LED lights up red: event of a power failure. -
Page 20: Manual Operation
Manual operation The LED lights up blue while water is being dispensed. Usual operation on/off and hot/cold as with most faucets / mixer taps. Switch button to change jet types . -
Page 21: Sensors
Lower sensor (pot-filler function) When e.g. a pot approaches the sensor area, the delivery of cold water starts at 100 % flow rate - even if the manual control lever is closed! Note: Since the detection range of the sensor is a few centimeters away from the shower head, containers with a small diameter (e.g. - Page 22 Side sensor (manual control lever is closed) Start function 1. Set the desired water temperature using the manual control lever, but leave the lever closed. 2. A short approach to the side sensor (at a distance of less than 5 cm) starts the water dispense at 70 % flow rate.
- Page 23 Side sensor (manual control lever is open) Stop function 1. Open the manual control lever. Adjust the desired flow rate and temperature. 2. A short approach to the side sensor stops the water delivery. 3. Another short approach to the sensor starts the water delivery again. Note: Water delivery also starts when you move the manual control lever.
-
Page 24: Surface Cleaning
Please see page 22. Do not use any abrasive or chlorine-based cleaning agents to clean the surfaces. It is recommended to use the cleaning agents indicated by BLANCO to clean the mixer tap. You can order these conveniently from the BLANCO Shop online:... -
Page 25: Disposal/Environment
You must not dispose of this system or electronic accessories with other commercial waste. Conformity The system complies with the requirements specified in the applicable directives and guidelines. You can request declarations of conformity from BLANCO. - Page 27 Sommaire Service clientèle ________________________________________________________________ 28 Introduction _____________________________________________________________________ 29 BLANCOCULINA-S II Sensor - BLANCOCULINA-S II Mini Sensor ___________________ 30 Éléments d’affichage et de commande _______________________________________________ 30 Boîtier pour les piles dans le meuble sous-évier ________________________________________ 31 Commande manuelle ______________________________________________________________ 32 Capteurs ________________________________________________________________________ 33 Nettoyage des surfaces ____________________________________________________________ 36 Pièces de rechange _______________________________________________________________ 36...
-
Page 28: Service Clientèle
Nous espérons que notre système vous donnera entière satisfaction. Notre mode d'emploi est conçu pour vous permettre de manipuler sans difficulté la robinetterie BLANCOCULINA-S II Sensor ou BLANCOCULINA-S II Mini Sensor. Si vous avez toutefois des questions après la lecture du document, merci de prendre contact avec le service après-vente BLANCO France. -
Page 29: Introduction
Les modifications de la robinetterie ou de l’ensemble du système peuvent uniquement être effectuées par BLANCO ou par un personnel spécialisé formé par BLANCO. Le système peut uniquement être ouvert par un personnel formé et qualifié ! Attention : pièces sous tension dans le système ! Les câbles et tuyaux doivent être disposés de manière à... -
Page 30: Blancoculina-S Ii Sensor - Blancoculina-S Ii Mini Sensor
Éléments d’affichage et de commande 1 Affichage LED 2 Capteur latéral (fonction Marche/Arrêt) 3 Bouton de changement du type de jet 4 Levier de commande manuel 5 Capteur inférieur (fonction « remplir un contenant ») -
Page 31: Boîtier Pour Les Piles Dans Le Meuble Sous-Évier
Boîtier pour les piles dans le meuble sous-évier Indication : le fonctionnement de la robinetterie nécessite que les piles dans le boîtier disposent de suffisamment L’affichage LED d’énergie. Ceci garantit que la robinetterie puisse être s'allume en ROUGE : utilisée même en cas de panne de courant. niveau des piles critique Si le niveau des piles devient critique, la robinetterie le... -
Page 32: Commande Manuelle
Commande manuelle Pendant la distribution Commande habituelle d'eau, l’affichage LED marche/arrêt et chaud/froid s’allume en bleu. comme sur de nombreuses robinetteries. Bouton de changement du type de jet. -
Page 33: Capteurs
Capteur inférieur (fonction « remplir un contenant ») En approchant par exemple une casserole de la zone du capteur, on démarre la distribution d’eau froide avec un débit de 100 % – même si le levier de commande est fermé ! Indication : étant donné... - Page 34 Capteur latéral (levier de commande fermé) Fonction de démarrage 1. Réglez la température d’eau souhaitée sur le levier de commande manuel, mais laissez le levier fermé. 2. En approchant la main du capteur latéral (à moins de 5 cm), on démarre la distribution d’eau avec un débit de 70 %.
- Page 35 Capteur latéral (levier de commande ouvert) Fonction d’arrêt 1. Ouvrez le levier de commande manuel. Réglez le débit d’eau et la température souhaités. 2. En approchant brièvement la main du capteur latéral, on arrête la distribution d’eau. 3. En approchant à nouveau brièvement la main du capteur latéral, on redémarre la distribution d’eau.
-
Page 36: Nettoyage Des Surfaces
Vous trouverez des pièces de rechange dans la boutique en ligne BLANCO à l'adresse www.blanco.com/fr, en saisissant votre référence article. Ce code est indiqué sur le tuyau d’eau froide. Si vous avez toutefois une question, merci de prendre contact avec le service après-vente BLANCO. -
Page 37: Recyclage / Environnement
Ce système et ses accessoires électroniques ne peuvent pas être éliminés avec d'autres déchets industriels. Conformité Le système répond aux exigences des directives applicables. La déclaration de conformité peut être demandée à BLANCO. - Page 39 Contenido Servicio técnico _________________________________________________________________ 40 Introducción ____________________________________________________________________ 41 BLANCOCULINA-S II Sensor - BLANCOCULINA-S II Mini Sensor ___________________ 42 Elementos de manejo y de indicación ________________________________________________ 42 Caja para pilas en el armario de fregadero ____________________________________________ 43 Manejo manual ___________________________________________________________________ 44 Sensores ________________________________________________________________________ 44 Limpieza de superficies ____________________________________________________________ 48...
-
Page 40: Servicio Técnico
Deseamos que disfrute de nuestro sistema. Nuestro manual de instrucciones está estructurado de manera que el manejo de la grifería BLANCOCULINA-S II Sensor o de la grifería BLANCOCULINA-S II Mini Sensor no le presente ningún problema. Si, en contra de lo esperado, le surgiera alguna duda, simplemente póngase en contacto con nuestro servicio técnico de BLANCO. -
Page 41: Introducción
Introducción Estimado usuario: Gracias por decidirse a adquirir el grifo mezclador BLANCOCULINA-S II Sensor o el BLANCOCULINA-S II Mini Sensor: una combinación de un grifo clásico con un diseño elegante y funcionalidad semiprofesional. El grifo puede ser operado tanto de forma manual como sin contacto, gracias a un sofisticado sistema de doble sensor ubicado en el brazo y en el cuerpo del grifo, diseñado... -
Page 42: Blancoculina-S Ii Sensor - Blancoculina-S Ii Mini Sensor
Elementos de manejo y de indicación 1 Indicación LED 2 Sensor lateral (función de conexión/desconexión) 3 Botón de conmutación para la modificación del tipo de chorro 4 Maneta de manejo manual 5 Sensor inferior (función "Llenar recipientes") -
Page 43: Caja Para Pilas En El Armario De Fregadero
Caja para pilas en el armario de fregadero Nota: Las baterías en la caja de baterías deben tener suficiente energía para que el grifo funcione. Esto La indicación LED se garantiza que el grifo pueda ser operado incluso en enciende en rojo: caso de un corte de energía. -
Page 44: Manejo Manual
Manejo manual Durante el suministro de agua, Operación habitual de la indicación LED se enciende encendido/apagado y en azul. selección de agua caliente/fría como con la mayoría Botón de conmutación para la de los grifos. modificación del tipo de chorro. - Page 45 Sensor inferior (función "Llenar recipiente") Si se aproxima, p. ej. una olla, al área del sensor, se iniciará el suministro de agua fría con un 100 % de caudal, incluso si la palanca de manejo está cerrada. Nota: Debido a que área de detección del sensor está alejada unos cm del cabezal rociador, puede ocurrir que los recipientes con un diámetro pequeño (p.
- Page 46 Sensor lateral (maneta cerrada) Función de inicio 1. Ajuste la temperatura del agua deseada en la palanca de manejo manual, pero deje la maneta cerrada. 2. La aproximación breve al sensor lateral (a una distancia inferior a 5 cm) iniciará el suministro de agua con un 70 % de caudal.
- Page 47 Sensor lateral (maneta abierta) Función de parada 1. Abra la palanca de manejo manual. Ajuste la cantidad de agua y la temperatura deseadas. 2. Una aproximación breve al sensor lateral detendrá el suministro de agua. 3. Con otra aproximación breve al sensor se iniciará de nuevo el suministro de agua. Nota: El suministro de agua también se iniciará...
-
Page 48: Limpieza De Superficies
Consulte para ello la página 46. Se recomienda utilizar los productos de limpieza propuestos por BLANCO para la limpieza de la grifería, que también se pueden pedir cómodamente en la tienda online de BLANCO: Europa: Gran Bretaña, Norteamérica, China y Australia:... -
Page 49: Gestión De Residuos / Medio Ambiente
Este sistema y los accesorios no se deben eliminar junto con otros desechos industriales. Conformidad El sistema cumple los requisitos de las directivas aplicables. Se puede solicitar una declaración de conformidad a BLANCO. - Page 52 BLANCO GmbH + Co KG Tel.: +49 7045 44-81 419 service@blanco.com www.blanco.com BLANCO France Sarl Tél. +33 4 13 57 15 15 serviceblancofrance@sfg.fr www.blanco.com/fr BLANCO Aftersales UK Phone: +44 1923 635 200 - Option 1 aftersales@blanco.co.uk BLANCO America Inc. Toll free phone: +1-800-451-5782 service.us@blanco.com...
- Page 64 BLANCO GmbH + Co KG Flehinger Str. 59 75038 Oberderdingen Germany blanco.com...
Need help?
Do you have a question about the BLANCOCULINA-S II Sensor and is the answer not in the manual?
Questions and answers
Is the tap capable of operating only using the battery box or does it need to be hard wired
The BLANCOCULINA-S II Sensor tap has a power plug for operation but also includes an integrated emergency power supply with batteries. This allows it to function in the event of a power failure. However, it is not explicitly stated that the tap can operate solely on batteries as its primary power source.
This answer is automatically generated