Eaton TRIPP LITE Series Installation Instructions Manual
Cat 6pcb type 48-port krone/110
Hide thumbs
Also See for TRIPP LITE Series:
- User manual ,
- Advanced user's manual (221 pages) ,
- Owner's manual (84 pages)
Advertisement
Quick Links
Installation Instructions
Instrucciones de Instalación / Instructions d'installation /
Installationsanleitung / Istruzioni per l'installazione
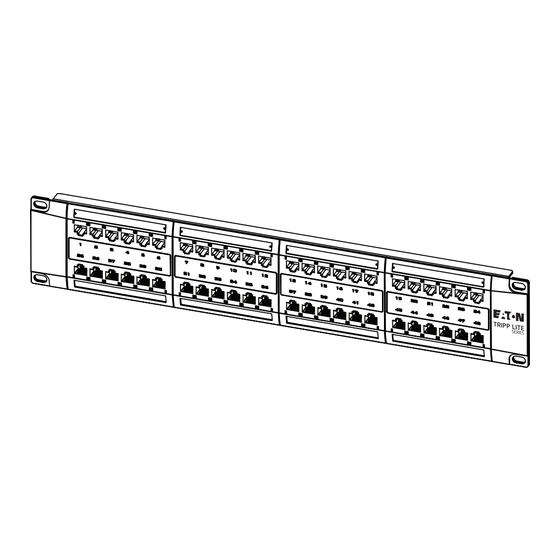
Cat 6PCB Type 48-Port
KRONE/110
PCB Cat 6 de 48 puertos
KRONE/110
Cat 6PCB Type 48 port KRONE/110
Kat. 6PCB-Typ KRONE/110 mit 48
Anschlüssen
Tipo Cat 6PCB 48-Port KRONE/110
09-117-93481A_revA.indd 1
09-117-93481A_revA.indd 1
Purchased product may differ from image.
El producto comprado puede diferir de la imagen.
Le produit acheté peut différer de l'image.
Das gekaufte Produkt kann vom Bild abweichen.
Il prodotto acquistato potrebbe differire dall'immagine.
N252-P48
N252-P48-WH
10/25/2023 11:28:42 AM
10/25/2023 11:28:42 AM
1
Advertisement

Related Manuals for Eaton TRIPP LITE Series


Summary of Contents for Eaton TRIPP LITE Series
- Page 1 Installation Instructions Instrucciones de Instalación / Instructions d'installation / Installationsanleitung / Istruzioni per l'installazione Cat 6PCB Type 48-Port N252-P48 KRONE/110 N252-P48-WH PCB Cat 6 de 48 puertos KRONE/110 Cat 6PCB Type 48 port KRONE/110 Kat. 6PCB-Typ KRONE/110 mit 48 Anschlüssen Tipo Cat 6PCB 48-Port KRONE/110 Purchased product may differ from image.
- Page 2 Step 1 Paso 1 / Étape 1 / Schritt 1 / Fase 1 (Optional) Before wiring, use the provided screws to attach teach corner of the panel onto rack mount. (Opcional) Antes de realizar el cableado, utilice los tornillos proporcionados para fijar la esquina del panel al soporte del bastidor.
- Page 3 Step 2 Paso 2 / Étape 2 / Schritt 2 / Fase 2 09-117-93481A_revA.indd 3 09-117-93481A_revA.indd 3 10/25/2023 11:28:42 AM 10/25/2023 11:28:42 AM...
- Page 4 Step 3 Paso 3 / Étape 3 / Schritt 3 / Fase 3 568B 568B 568B 568A 568A 568A 568B 568B 568B 568A 568A 568A Punch down cables with KRONE or 110 IDC tool according to the TIA568A/B wiring instruction label. Conecte los cables usando la herramienta KRONE o 110 IDC de acuerdo con la etiqueta de instrucciones de cableado TIA568A/B.
- Page 5 Step 4 Paso 4 / Étape 4 / Schritt 4 / Fase 4 Punch down solid cable to each port until termination is completed. Presione hacia abajo el cable sólido en cada puerto hasta que la terminación esté completa. Pointer le câble solide à chaque port jusqu’à ce que la terminaison soit terminée. Festes Kabel zu jedem Anschluss durchstecken, um eine korrekte Verbindung herzustellen.
- Page 6 09-117-93481A_revA.indd 6 09-117-93481A_revA.indd 6 10/25/2023 11:28:43 AM 10/25/2023 11:28:43 AM...
- Page 7 09-117-93481A_revA.indd 7 09-117-93481A_revA.indd 7 10/25/2023 11:28:43 AM 10/25/2023 11:28:43 AM...
- Page 8 Eaton 1000 Eaton Boulevard Cleveland, OH 44122 United States Eaton.com © 2023 Eaton Eaton is a registered All Rights Reserved trademark. Publication No. 23-09-117 / 93-481A_RevA All trademarks are property October 2023 of their respective owners. 09-117-93481A_revA.indd 8 09-117-93481A_revA.indd 8...
Need help?
Do you have a question about the TRIPP LITE Series and is the answer not in the manual?
Questions and answers