Table of Contents
Advertisement
Quick Links
Advertisement
Table of Contents

Summary of Contents for AccuAir AA-3929
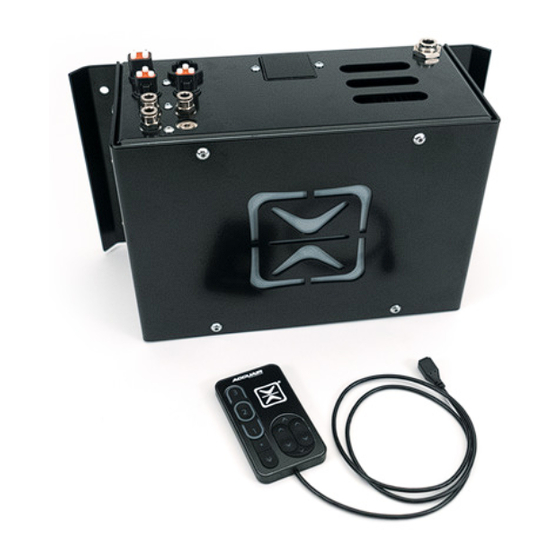
- Page 1 AA-3929 2-CORNER CONTROL MODULE INSTALLATION GUIDE 29-21100...
- Page 2 On-Board-Air (OBA). This addition ensures a convenient and reliable source of compressed air for various Mounting applications, from tire inflation to powering air tools. Embrace innovation and control like never before with the AccuAir 2-Corner Module — where precision, adaptability, and Wiring convenience converge to redefine your on-road experience.
- Page 3 Register your AccuAir Purchase. For questions or claims contact AccuAir Customer Service: 100 Sea Ray Drive, Merritt Island, FL 32953. You will be asked to advise AccuAir in writing of your understanding of all defects and provide AccuAir an opportunity to repair or replace the affected component(s) subject to the terms of this Limited Warranty.
-
Page 4: Included Parts
Jack Stands 3/8" DOT AIR LINE 29-16878 Floor Jack 2 CORNER PRESSURE TEE KIT 20-21024 Wire Brush 2 CORNER TPAD ASSEMBLY 20-21037 Wire Barrel Crimper Wire Stripper Heat Gun Measuring Tape AA-3929 Installation Guide Tech: 888.234.6698 REV 01 | 04/10/2024... - Page 5 Driver Rear Air Line Driver Rear Air Line Driver Rear Sensor Orange to Ignition Source Power Harness Passenger Rear Air Line Passenger Rear Air Line Passenger Rear Sensor Remote Harness Ground Fuse Frame Battery AA-3929 Installation Guide Tech: 888.234.6698 REV 01 | 04/10/2024...
- Page 6 PLUMBING Driver Rear Air Line Passenger Rear Air Line AA-3929 Installation Guide Tech: 888.234.6698 REV 01 | 04/10/2024...
- Page 7 The module can be mounted via the supplied U-bolts and flat brackets, or with self-tapping screws. Ideal mounting is to the side frame rail using U-bolts with all connections facing up. (Figures 1, 2, 3) FIGURE 2 FIGURE 3 FIGURE 1 AA-3929 Installation Guide Tech: 888.234.6698 REV 01 | 04/10/2024...
-
Page 8: Power Wiring
(Figure 9) Crimp a ring terminal to the black wire and ground to the frame. Ensure less than 1 ohm of ground resistance. (Figures 5, 6) FIGURE 9 FIGURE 5 FIGURE 6 AA-3929 Installation Guide Tech: 888.234.6698 REV 01 | 04/10/2024... -
Page 9: Remote Wiring
Connect the harness to the module and route the cable into the cab at the desired location. Connect the harness mini USB to the remote. (Figure 13) FIGURE 10 FIGURE 13 REMOTE WIRING Locate the remote and wire harness. (Figures 11, 12) FIGURE 11 FIGURE 12 AA-3929 Installation Guide Tech: 888.234.6698 REV 01 | 04/10/2024... - Page 10 The Module has a 3/8” intake port. Locate the intake filter, and mount it high in the vehicle, such that it will not suck water during operation. (Figure 17) Driver Driver Passenger Passenger Rear Rear Rear Rear Sensor Sensor Sensor Sensor FIGURE 15 FIGURE 17 AA-3929 Installation Guide Tech: 888.234.6698 REV 01 | 04/10/2024...
- Page 11 1. Inflate rear springs using TouchPad Controller. Ignition must be on. Inflate by tapping the double up arrow. (Figure 19) 3/8” Compressor 3/8” Compressor Intake Port Intake Port FIGURE 18 FIGURE 19 AA-3929 Installation Guide Tech: 888.234.6698 REV 01 | 04/10/2024...
-
Page 12: Operation
Press the Right Rear DOWN “ ” Button to EMPTY the Air Spring. 185 ft-lbs 280 ft-lbs 18MM 170 ft-lbs 240 ft-lbs THE ABOVE SPECIFICATIONS ARE NOT TO BE USED WHEN THE BOLT IS BEING INSTALLED WITH A BUSHING. AA-3929 Installation Guide Tech: 888.234.6698 REV 01 | 04/10/2024... - Page 13 Resaving Preset #1 Press & hold the Preset #1 “ ” Button for 3 seconds. The Preset #1 “ ” Indicator Light will flash, then become solid when saving is complete. AA-3929 Installation Guide Tech: 888.234.6698 REV 01 | 04/10/2024...
- Page 14 150 psi. Once set, you will have a significant volume of air available to you at all times. (Figure 21) Setting Indication White Tank Pressure Mode: 200 psi = White only 150 psi = White & Red alternating 0 psi = Red only FIGURE 21 AA-3929 Installation Guide Tech: 888.234.6698 REV 01 | 04/10/2024...
- Page 15 OPTIONAL TANK 3. AccuAir offers two sizes of ENDO-T tanks: 3-Gallon (AA-3709) and 5-Gallon (AA-3708). See Figure 22 for dimensions 4. Please note that a 200 psi safety/blow-off valve similar to Figure 23 should be added to the lowest 1/8” NPT port on and port sizes/locations.
- Page 16 AA-3929 Installation Guide Tech: 888.234.6698 REV 01 | 04/10/2024...
-
Page 17: Troubleshooting And Technical Support
TROUBLESHOOTING & TECHNICAL SUPPORT MORE INFO? ACCUAIR DOCUMENT LIBRARY www.AccuAir.com 888.234.6698 Monday - Friday 8:00AM - 6:00 PM (EST) 200 Sea Ray Drive, Merritt Island, FL 32953...
Need help?
Do you have a question about the AA-3929 and is the answer not in the manual?
Questions and answers