Table of Contents
Advertisement
Available languages
Available languages
Quick Links
Advertisement
Table of Contents

Subscribe to Our Youtube Channel
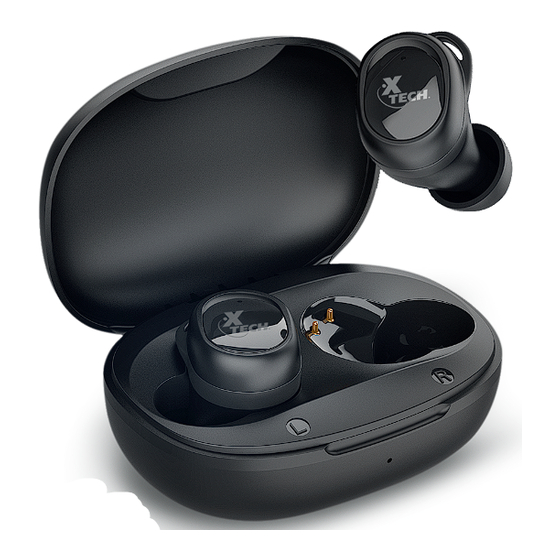
Summary of Contents for Xtech XOUND XTH-701
- Page 1 XOUND True Wireless Stereo (TWS) earbuds XTH-701...
- Page 2 Bluetooth -enabled device ® Thank you for purchasing Xtech’s XTH-701 TWS earphones with **Estimated battery run time depends on usage patterns and volume settings Bluetooth -compatible wireless technology. By pairing it with mobile audio ®...
-
Page 3: Product Overview
3. Product overview 1. Power/Multifunction button: Press the multifunction button to power the earphones on and off, start and pause media playback, move forward and backward through your playlist, answer, hang up or reject incoming calls and activate voice assistants. 2. -
Page 4: Basic Operation
2. Basic operation 2.2 Multifunction button Function Operation 2.1 Paring your earphones 1: Power on/off. Take the earphones out of the charging case and they will turn Auto Pairing on automatically. Take the earphones out of the charging case. The earphones will automatical- Put the earphones back into the charging case and they will turn off automatically. - Page 5 3. Charging the case and the earphones 4. Wearing your earphones Fully charge the case and earphones before using them for the first time. The earphones are intended to fit comfortably in your ears for all day hands-free wearing. 3.1 Charging the case. Select the tip that best fits the size of your ear canal.
-
Page 6: Cleaning The Device
5. Cleaning the device 3. Clean the grooves and the bottom of the charging case. After cleaning, make sure the charging case and earbuds are dry before putting the Use a clean cotton swab slightly moistened with alcohol to: earbuds back into the charging case. 1. -
Page 7: Troubleshooting
6. Troubleshooting 8. Technical specifications Earbuds If you cannot connect the headset to your phone, do as follows: Form factor In-ear Chipset JL 6983D4 •Ensure that the headset is charged, switched on, paired with, and connected to Maximum power output your phone. - Page 8 Precautions Charging case + earbuds 2 hours charging total time • Your headset is powered by a rechargeable battery. The battery can be Earphone only Battery 1 hour charging time charged and discharged hundreds of times, but it will eventually wear out. Charging case only battery 2 hours •...
- Page 9 FCC statement NOTES This equipment has been tested and found to comply with the limits for a Class B digital device, pursuant to part 15 of the FCC Rules. These limits are designed to provide reasonable protection against harmful interference in a residential installation.
-
Page 10: Guía De Usuario
• El estuche de carga puede recargar completamente los audífonos en 1. Introducción aproximadamente 1 hora Gracias por preferir los audífonos estéreo XTH-701 de Xtech con verdadera • Incluye suaves puntas de silicona intercambiables para un ajuste cómodo y conexión inalámbrica compatible con Bluetooth . -
Page 11: Descripción Del Producto
3. Descripción del producto 1. Botón de encendido/multifunción: presione el botón multifunción para encender y apagar los audífonos, iniciar y pausar la reproducción multimedia, avanzar y retroceder en su lista de reproducción, responder, colgar o rechazar llamadas entrantes y activar los asistentes de voz. 2. -
Page 12: Funcionamiento Básico
2. Funcionamiento básico 2.2 Botón multifunción Función Operation 2.1 Emparejar sus audífonos 1.Saque los audífonos del estuche de carga y se encenderán 1: Encender/apagar. automáticamente. Auto emparejamiento Vuelva a colocar los audífonos en el estuche de carga y se Saque los audífonos del estuche de carga. Estos se encenderán automáticamente, apagarán automáticamente. - Page 13 3. Cargar el estuche magnético y los audífonos 4. Cómo usar los audífonos Cargue completamente el estuche y los audífonos antes de usarlos por primera vez. -Los audífonos han sido concebidos para el uso prolongado con manos libres, ya que calzan cómodamente en cualquier oído. 3.1 Carga del estuche.
-
Page 14: Limpieza Del Producto
5. Limpieza del producto 3. Limpiar las ranuras y la parte inferior del estuche de carga. Después de la limpieza, asegúrese de que el estuche y los audífonos estén secos antes de Use un hisopo limpio y humedecido ligeramente con alcohol para lo siguiente: volver a colocar los audífonos en el estuche. -
Page 15: Restablecer Configuración De Fábrica
6. Resolución de problemas 8. Especificaciones técnicas Audífonos Si no puede conectar el audífono con el teléfono, haga lo siguiente: Factor de forma Intraaural Chip JL 6983D4 •Cerciórese de que los audífonos están cargados, encendidos, emparejados y Máxima potencia de salida conectados con el teléfono. - Page 16 Tasa de carga por cable CC 5V 1A Información adicional (En V, A y W) Longitud del cable de carga 30cm Tiempo total de carga del Dimensiones del producto 2 horas 62x46x31mm estuche de carga + audífonos Peso del producto Tiempo de carga de la batería Contenido del empaque 1 hora...
- Page 17 Declaración de la Comisión Federal de Comunicaciones relativa a • Vuelva a orientar o cambie la ubicación de la antena receptora. interferencias • Aumente la distancia que separa el equipo y el aparato receptor. • Conecte el equipo a un tomacorriente situado en un circuito distinto al cual Tras haber sido sometido a todas las pruebas pertinentes, se ha comprobado está...
- Page 18 NOTAS NOTAS...
- Page 19 Any mention of such is intended for identification purposes only, and therefore shall not be construed as a claim to any rights pertaining to, endorsement or sponsorship by, or affiliation with, those brands. Made in China. Xtech es una marca registrada. Todos los derechos reservados. El logograma y la ®...


Need help?
Do you have a question about the XOUND XTH-701 and is the answer not in the manual?
Questions and answers