
Subscribe to Our Youtube Channel
Related Manuals for FRIEDHELM LOH Rittal LCU DX in VX IT


Summary of Contents for FRIEDHELM LOH Rittal LCU DX in VX IT
- Page 1 LCU DX in VX IT LCU DX in VX IT LCU DX dans VX IT 3311490 3311491 3311492 3311493 Montageanleitung Assembly instructions Notice de montage...
-
Page 2: Table Of Contents
Inhaltsverzeichnis Contents Sommaire Seite Page Page Hinweise zur Dokumentation Notes on documentation Remarques relatives à la documentation CE-Kennzeichnung CE labelling Certification CE Verwendete Symbole Symbols used Symboles utilisés Mitgeltende Unterlagen Other applicable documents Autres documents applicables Normative Verweise Normative references Renvois à... -
Page 3: Hinweise Zur Dokumentation
1. Hinweise zur Dokumentation 1. Notes on documentation 1. Remarques relatives à la documentation Die Montageanleitung richtet sich an alle The assembly instructions are aimed at all per- La notice de montage s’adresse à toutes les Personen, die über eine entsprechende sons who have appropriate specialist training personnes qui possèdent les compétences Fachausbildung verfügen, um Schaltschränke... -
Page 4: Sicherheitshinweise
2. Sicherheitshinweise 2. Säkerhetsinstruktioner 2. Safety instructions 2. Istruzioni di sicurezza 2. Consignes de sécurité 2. Instrucciones de seguridad 2. Veiligheidsvoorschriften Waarschwing Warnung vor der Danger dû à Prestare attenzi- Atención, movi- Warning against voor de sluit- Schließbewegung la fermeture Varning för stäng- one alla chiusura miento de cierre... - Page 5 2. Turvallisuusohjeet 2. Wskazówki dotyczące 2. Инструкции за безопасност 2. Sikkerhedsanvisninger 2. Меры безопасности bezpieczeństwa 2. Bezpečnostní pokyny Предупреждение Предупреждение Advarsel mod Uwaga na Varoitus koneen/ за движение от об опасности lukkebevægelse zamykające się laitteen mekaa- Výstraha před затварящи се при...
- Page 6 2. Υποδείξεις ασφαλείας 2. Biztonsági utasítások 2. Drošības norādījumi 2. Instrucțiuni de siguranță 2. Saugos nurodymai 2. Sigurnosne upute 2. Ohutusjuhised Προειδοποίηση Avertizare cu Upozorenje Gép/berende- Įspėjimas dėl Hoiatus masina/ πριν από την κίνηση privire la mișcarea na opasnost zés mechani- mašinos / Uzmanieties seadme meh-...
- Page 7 2. Varnostni napotki 2. Bezpečnostné pokyny 2. Instruções de segurança Dávajte pozor na Cuidado quando Opozorilo pred zatvárací pohyb as partes mecâ- zapiranjem mechanických nicas de uma mehanskih delov častí stroja/zari- máquina/insta- stroja/naprave adenia lação se fecham Opozorilo pred Dávajte pozor na Cuidado com as premikajočimi se pohyblivé...
-
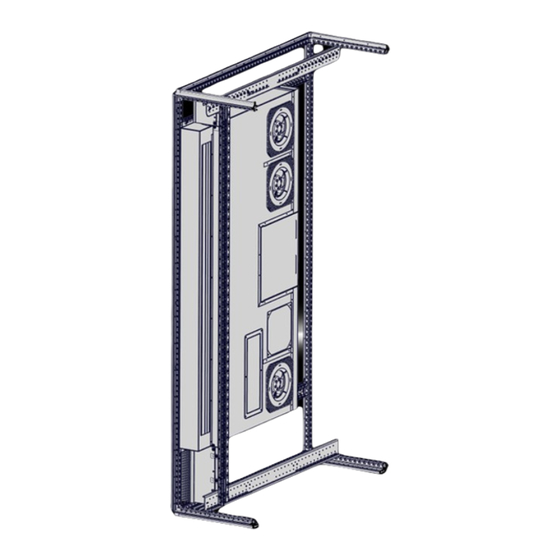
Page 8: Montage Lcu Dx
TX30 3. Montage LCU DX 3. Fitting the LCU DX 3. Montage de la LCU DX 3.1 Versetzen des 19"-Systems 3.1 Offsetting the 482.6 mm (19") sections 3.1 Déplacement des montants 19" = 5 Nm + 50 mm TX30 3. Montage LCU DX 3. - Page 9 TX30 3. Montage LCU DX 3. Fitting the LCU DX 3. Montage de la LCU DX 3.3 Montage der LCU DX 3.3 Fitting the LCU DX 3.3 Montage de la LCU DX ST 5 x 12 = 5 Nm 105,5 ST 5 x 12 = 5 Nm ST 5 x 12...
-
Page 10: Accessoires Requis De L'ue
4. Montage Luftschottung 4. Fitting the air block panel 4. Montage du cloisonnement d'air 4.1 Benötigtes Zubehör aus der VE 4.1 Accessories required from the pack 4.1 Accessoires requis de l'UE Typ / type / type Höhe / height / hauteur 2200 2000 2200... -
Page 11: Montage Du Cloisonnement D'air Type
TX30 4. Montage Luftschottung 4. Fitting the air block panel 4. Montage du cloisonnement d'air 4.2 Montage Luftschottung Typ 1 4.2 Fitting the type 1 air block panel 4.2 Montage du cloisonnement d'air type 1 ST 5 x 12 = 5 Nm 2x ST 5 x 12 = 5 Nm 3x ST 5 x 12... -
Page 12: Montage Du Cloisonnement D'air Type
TX30 4. Montage Luftschottung 4. Fitting the air block panel 4. Montage du cloisonnement d'air 4.3 Montage Luftschottung Typ 2 4.3 Fitting the type 2 air block panel 4.3 Montage du cloisonnement d'air type 2 ST 5 x 12 = 5 Nm 2x ST 5 x 12 = 5 Nm LCU DX - VX IT... -
Page 13: Montage Du Cloisonnement D'air Type
TX30 4. Montage Luftschottung 4. Fitting the air block panel 4. Montage du cloisonnement d'air 4.3 Montage Luftschottung Typ 2 4.3 Fitting the type 2 air block panel 4.3 Montage du cloisonnement d'air type 2 ST 5 x 12 = 5 Nm 2 2.1 3x ST 5 x 12 = 5 Nm... - Page 14 TX30 4. Montage Luftschottung 4. Fitting the air block panel 4. Montage du cloisonnement d'air 4.4 Montage Luftschottung Typ 3 4.4 Fitting the type 3 air block panel 4.4 Montage du cloisonnement d'air type 3 ST 5 x 12 = 5 Nm 2x ST 5 x 12 = 5 Nm LCU DX - VX IT...
- Page 15 TX30 4. Montage Luftschottung 4. Fitting the air block panel 4. Montage du cloisonnement d'air 4.4 Montage Luftschottung Typ 3 4.4 Fitting the type 3 air block panel 4.4 Montage du cloisonnement d'air type 3 2x ST 5 x 12 = 5 Nm 2 2.1 3x ST 5 x 12...
- Page 16 TX30 4. Montage Luftschottung 4. Fitting the air block panel 4. Montage du cloisonnement d'air 4.5 Montage Luftschottung Typ 4 4.5 Fitting the type 4 air block panel 4.5 Montage du cloisonnement d'air type 4 ST 5 x 12 = 5 Nm ST 5 x 12 = 5 Nm LCU DX - VX IT...
- Page 17 TX30 4. Montage Luftschottung 4. Fitting the air block panel 4. Montage du cloisonnement d'air 4.5 Montage Luftschottung Typ 4 4.5 Fitting the type 4 air block panel 4.5 Montage du cloisonnement d'air type 4 1 1.1 2x ST 5 x 12 = 5 Nm 2 2.1 2x ST 5 x 12...
-
Page 18: Insertion De La Brosse Passe-Câbles Latérale
4. Montage Luftschottung 4. Fitting the air block panel 4. Montage du cloisonnement d'air 4.6 Aufstecken der seitlichen Bürstenleiste 4.6 Connecting the side brush strip 4.6 Insertion de la brosse passe-câbles latérale Typ / type / type Höhe / height / hateur 2200 2000 2200... - Page 19 Notizen/Notes...
- Page 20 ◾ Enclosures ◾ Power Distribution ◾ Climate Control ◾ IT Infrastructure ◾ Software & Services You can find the contact details of all Rittal companies throughout the world here. www.rittal.com/contact RITTAL GmbH & Co. KG Auf dem Stuetzelberg · 35745 Herborn · Germany Phone +49 2772 505-0 E-mail: info@rittal.de ·...
Need help?
Do you have a question about the Rittal LCU DX in VX IT and is the answer not in the manual?
Questions and answers