Advertisement
Quick Links
Advertisement

Related Manuals for Sunjoy A102007760


Summary of Contents for Sunjoy A102007760
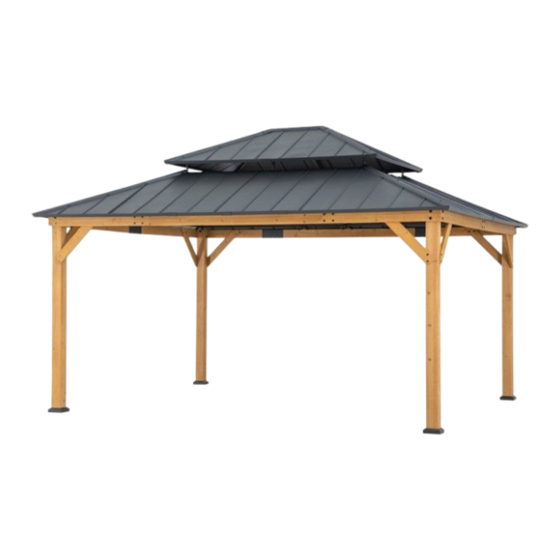
- Page 1 PAVILLONS & PERGOLAS GAZEBO A102007760 www.sunjoyonline.eu helpme@sunjoyonline.eu...
- Page 2 Bitte beachten Sie die unten aufgeführten Sicherheitshinweise und bewahren Sie sie für den späteren Gebrauch auf. Bevor Sie das Produkt zusammenbauen oder benutzen, entfernen Sie das Verpackungsmaterial oder bewahren Sie es auf, um das Produkt über den Winter zu lagern. Dieses Produkt darf nur für nichtgewerbliche Zwecke verwendet werden.
- Page 3 Für Schäden jeglicher Art die aufgrund von Naturgewalten auftreten wird keine Garantie übernommen. 3 | 53...
- Page 4 Temperaturschwankungen und hohe bzw. niedrige Luftfeuchtigkeit führen dazu, dass sich das Holz ausdehnt und zusammenzieht, was zu Verwerfungen und Rissen führen kann. Äste und kleine Oberflächenrisse sind natürlich und beeinträchtigen die Festigkeit des Produkts nicht. Trocken halten: Länger andauernde Feuchtigkeit und hohe oder niedrige Luftfeuchtigkeit können für Holz schädlich sein.
- Page 5 Please follow safety instructions listed below and keep them for later use. Before assembling or using the product, remove the packaging material or keep it to store the product for the winter. This product should only be used in a non-commercial manner. ...
- Page 6 Any kinds of damages due to acts of nature (weather damage) are not covered. 6 | 53...
- Page 7 parts or surfaces. Minor stains or scratches can be lightly buffed with No.0000 steel wool, followed by an application of good quality wood-care oil, wiping in the direction of the grain. Annual sealing: It is advisable to annually maintain the wooden parts with a sealant or outdoor wax/oil to protect and enhance the wood surfaces.
- Page 8 Dodržujte pokyny uvedené v tomto návodu a uschovejte si je pro budoucí použití. Před montáží nebo použitím výrobku odstraňte obalový materiál nebo si jej ponechte pro uložení výrobku na zimu. Tento výrobek by měl být používán pouze nekomerčním způsobem. Z důvodů...
- Page 9 Na škody jakéhokoli druhu způsobené přírodními vlivy se neposkytuje žádná záruka. 9 | 53...
- Page 10 kyseliny ani jiná rozpouštědla. Drobné skvrny nebo škrábance lze lehce vyleštit ocelovou vlnou č. 0000 a následně je potřít kvalitním olejem na dřevo ve směru vláken. Každoroční uzavření dřeva: Doporučuje se dřevěné části každoročně ošetřovat přípravkem na dřevo nebo venkovním voskem/olejem, aby se dřevěné povrchy ochránily a zkvalitnily. Dvakrát ročně po vyčištění naneste na povrchy kvalitní...
- Page 11 Dodržujte pokyny uvedené v tomto návode a uschovajte si ho pre budúce použitie. Pred montážou alebo použitím výrobku odstráňte obalový materiál alebo si ho ponechajte pre uloženie výrobku na zimu. Tento výrobok by mal byť používaný len nekomerčným spôsobom. ...
- Page 12 Na poškodenie akéhokoľvek druhu spôsobené prírodnými vplyvmi sa nevyskytuje žiadna záruka. 12 | 53...
- Page 13 mydlový roztok (zrieďte ¼ šálky jemného tekutého mydla na umývanie riadu s približne 4 litrami teplej vody). Opláchnite vodou a potom povrchy ihneď osušte mäkkou handričkou. Na kovové časti alebo povrchy nepoužívajte bielidlá, kyseliny ani iné rozpúšťadlá. Drobné škvrny alebo škrabance môžete zľahka vyleštiť oceľovou vlnou 0000 a potom pretrieť...
- Page 14 WERKZEUG / TOOLS / NÁŘADÍ / NÁRADIE WICHTIG / IMPORTANT / DŮLEŽITÉ / DÔLEŽITÉ Benötigte Personen für Aufbau / People needed for installation work / Lidé potřební pro instalační práce / Ľudia potrební na montážne práce 14 | 53...
- Page 15 TEILELISTE / PARTS LIST / KUSOVNÍK / ZOZNAM ČASTÍ Label Part Number Part Image P00020088401 P00040146702 P00040146802 P00040159602 P00040172401 P00040172501 P005000200 P005000201 P00610026905 P00010026503 P00050223301 P00050223401 P00050223801 P00220047801 P00220043603 P00050189003 P00050188805 P00050223501 P00060306301 P00060306401 P00060251304 15 | 53...
- Page 16 Label Part Number Part Image P00060251703 P00050223601 P00050223701 P00050188109 P00060306501 P00060306601 P00060306701 P00060306801 P00060306901 P00500090601 P00580015401 P00060307001 P00060307101 P00060307201 P00060307301 P00060307401 P00060307501 P00060307601 P00060307701 P00070119603 16 | 53...
- Page 17 Label Part Number Part Image P00070119703 P00070119803 P00070119903 P00070120003 P00070120103 P00070120203 P00080043403 P00080051701 P00090019305 P00570044001 P00570044101 P00570044201 P00570044301 P00560058301 P00070122605 P00070122705 P00070122406 P00070122506 P00070122208 17 | 53...
- Page 18 Label Part Number Part Image P00070122308 P00070122009 P00070122109 P00120032801 P00130016901 Label Part Number Description Part Image H100010090 M6*15 H100010038 M6*35 H100010101 M6*45 H100040020 M8*30 H100010179 M10*165 H030071111 ST4.8*25 H030050058 ST4.8*30 H030030013 ST8*35 H030010131 ST9.5*65 H990040012 M6*15 18 | 53...
- Page 19 Label Part Number Description Part Image H050080007 H050080008 H040050026 H040090004 M8*8 H090990002 H050050018 H990050001 Ring H070010003 Φ8*180 H090030002 H090030005 H090010015 19 | 53...
- Page 20 20 | 53...
- Page 21 21 | 53...
- Page 22 22 | 53...
- Page 23 23 | 53...
- Page 24 24 | 53...
- Page 25 d1=d2 Rt∠90 25 | 53...
- Page 26 26 | 53...
- Page 27 27 | 53...
- Page 28 28 | 53...
- Page 29 29 | 53...
- Page 30 30 | 53...
- Page 31 31 | 53...
- Page 32 32 | 53...
- Page 33 33 | 53...
- Page 34 34 | 53...
- Page 35 35 | 53...
- Page 36 Attention:In this step,please do not fully tighten Bolt(H1) which attach connector(G2) to middle beam(F2). Achtung: Ziehen Sie in diesem Schritt die Schraube (H1), mit der das Verbindungsstück (G2) am mittleren Träger (F2) befestigt ist, nicht ganz fest. Pozor: V tomto kroku neutahujte plně šroub (H1), který připevňuje konektor (G2) ke středovému nosníku (F2). Pozor: V tomto kroku úplne neutiahnite skrutku (H1), ktorá...
- Page 37 37 | 53...
- Page 38 Attention: Remove Bolt(H1) which attach connector(G2) to middle beam(F4), then put roof panel(P3) on the big roof and fixed by Bolt (H1) . / Achtung: Entfernen Sie die Schraube (H1), mit der das Verbindungsstück (G2) am Mittelträger (F4) befestigt ist, legen Sie dann die Dachplatte (P3) auf das große Dach und befestigen Sie sie mit der Schraube (H1).
- Page 39 39 | 53...
- Page 40 40 | 53...
- Page 41 41 | 53...
- Page 42 42 | 53...
- Page 43 Attention:In this step,please do not fully tighten Bolt(H1) which attach connector(G2) to middle beam(F2). Achtung: Ziehen Sie in diesem Schritt die Schraube (H1), mit der das Verbindungsstück (G2) am mittleren Träger (F2) befestigt ist, nicht ganz fest. Pozor: V tomto kroku neutahujte plně šroub (H1), který připevňuje konektor (G2) ke středovému nosníku (F2). Pozor: V tomto kroku úplne neutiahnite skrutku (H1), ktorá...
- Page 44 44 | 53...
- Page 45 Attention: Remove Bolt(H1) which attach connector(G2) to middle beam(F2), then put roof panel(T1/T2) on the big roof and fixed by Bolt (H1). / Achtung: Entfernen Sie die Schraube (H1), mit der das Verbindungsstück (G2) am Mittelträger (F2) befestigt ist, legenSie dann die Dachplatte (T1/T2) auf das große Dach und befestigen Sie sie mit der Schraube (H1).
- Page 46 46 | 53...
- Page 47 47 | 53...
- Page 48 48 | 53...
- Page 49 49 | 53...
- Page 50 Please do the matching of zippers for different panels as showing the picture./ Bitte machen Sie das Matching von Reißverschlüssen für verschiedene Panels wie das Bild zeigt./ Udělejte prosím shodu zipů pro různé panely, jak ukazuje obrázek./ Prosím, vykonajte zladenie zipsov pre rôzne panely podľa obrázka.
- Page 51 Please do the matching of zippers for different panels as showing the picture./ Bitte machen Sie das Matching von Reißverschlüssen für verschiedene Panels wie das Bild zeigt./ Udělejte prosím shodu zipů pro různé panely, jak ukazuje obrázek./ Prosím, vykonajte zladenie zipsov pre rôzne panely podľa obrázka.
- Page 52 Country of Origin: China Production Number: xxxxxxxxxx 52 | 53...
- Page 53 E-Mail: helpme@sunjoyonline.eu www.sunjoyonline.eu...
Need help?
Do you have a question about the A102007760 and is the answer not in the manual?
Questions and answers