Advertisement
Quick Links
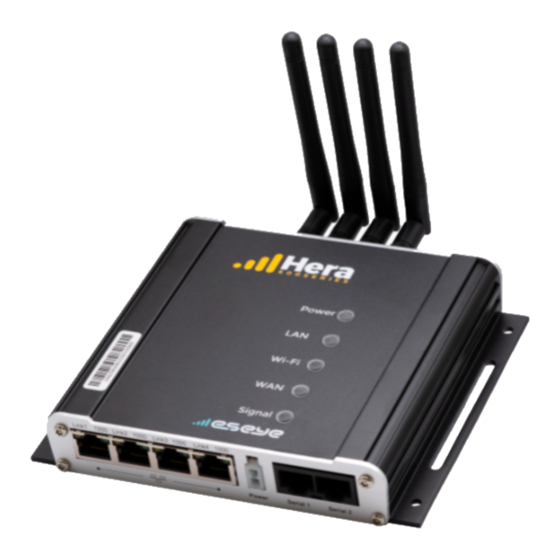
600 Series Router
Quick Start Guide
Document: 8877 v1.0
Declaration of Conformity
We: Eseye Design Limited
20 Nugent Road
Surrey Research Park
Guildford
Surrey
GU2 7AF
United Kingdom
Declare under sole responsibility that the product family
Hera 604 to which this declaration relates, is compliant
with the essential requirements of:
• RoHS Directive 2015/863/EU
• WEEE Directive 2012/19/EU
• Ecodesign Directive 2009/125/EC
• Batteries Directive 2013/56/EU
• Radio Equipment Directive (RED) 2014/53/EU
• The Low Voltage Directive 2014/35/EU
• The EMC Directive 2014/30/EU
Name: Jon Darley
Position: Director of Things
Place and date of issue: Guildford, April 2024
Year of affixing CE Mark: 2024
Getting started
The Hera is designed for wall-mounting.
Choosing a location
Read all warnings before choosing a location for the Hera.
Locate the Hera in a weather-protected, stable, vibration-free
environment.
• Operating temperature: -20°C to +55°C (-4°F to 131°F)
• Relative humidity: 5-95%, non-condensing
Consider cellular signal strength, WiFi strength and signal
interference from other equipment when choosing an
installation location.
Consider if you need to easily see and access any antenna
connectors, cable connection points, and LED indicators on
the top, front, and bottom panels.
Wall-mounting the Hera
Before you begin
You will need:
• To install the security plate –
• Drill –
Security Torx screwdriver
Metric Ø 5mm
(T10 tip)
Imperial Ø ³⁄₁₆"
• Tape measure
• 4 x Plastic wall plugs/anchors –
• Spirit level
Metric Ø 5mm, L30mm
Imperial Ø ³⁄₁₆", L1¼"
• Pencil
• 4 x pan head wood screws –
• Masking tape
Metric Ø 3.5mm, L30mm
• Cross head Pozidriv/Philips
Imperial Ø #6, L1¼"
screwdriver
1. If a SIM card is supplied, ensure it is fully inserted in the Hera.
The socket is a push-to-insert, push-to-release type
socket. When the SIM is properly inserted, it clicks into
place and sits flush with the edge of the SIM slot.
2. If required, fit the SIM security plate (see below).
3. Measure the template overleaf to ensure it is accurate, as the printing
process may distort it.
4. If the template is accurate, fix the page to the wall using the spirit
level and masking tape. Alternatively, use the Hera to mark the drill
holes.
5. Drill holes and prepare them with the wall plugs/anchors.
6. Attach the cellular cables (LTE 1 and LTE 2) and WiFi antennas to
the Hera.
7. Mount the Hera on the wall using the recommended fixings.
8. Position all antennas for optimal performance.
9. Insert the power connector.
10. Plug the mains adaptor into a dedicated socket, then switch on.
11. Ensure all cables and antennas are securely anchored to avoid
intermittent connection problems.
12. Configure the Hera using the supplied web user interface.
For more information, see How to connect to the Hera below.
Fitting the SIM card security plate
• Use a Security Torx screwdriver (T10 tip) to fit the security plate
across the Hera SIM card slots.
How to connect to the Hera
Connect to the Hera with an Ethernet cable or over WiFi.
Eseye may include a unique Configuration Information
Sheet with each Hera Series Router. Use this information to
connect, log into, and configure the Hera. If the sheet is not
included, your service provider or reseller will advise you of
the contents.
Connect using an Ethernet (wired) connection
• Use an Ethernet cable to connect from the Hera Ethernet port Link2
to a PC or laptop, either directly or via an Ethernet switch.
Connect using WiFi
If there is no SSID information supplied, use a wired
connection to the Hera Series Router.
1. Ensure the Hera WiFi LED is illuminated.
2. Search wireless networks on your WiFi-enabled device. Connect to
the network that matches the SSID.
3. At the prompt, type the WiFi username and passphrase exactly as
supplied.
Logging in to the Hera Series Router
1. Using a browser on your device, type the supplied Web Interface IP
into the address bar. For example:
http://192.168.0.1
2. Press return.
3. At the prompt, enter the supplied credentials, then select OK.
The Hera Series Router web interface appears.
Configuring the cellular connection
The Hera is preconfigured to connect to a cellular network using an
Eseye AnyNet SIM.
Warranty
• Use only Eseye-approved mains power adaptors. Using the Hera
with any other mains power adaptor will invalidate the warranty.
• Do NOT open the casing under any circumstances, as it will
invalidate the warranty.
There are no user-serviceable components inside the Hera. If a fault
develops with the product, contact your service provider or reseller.
• Only manufacturer-authorised personnel may replace the Hera
batteries. This ensures fitting of approved parts, and fully complies
with Battery Directive 91/157/EEC and local legislation regarding
responsible recycling and correct disposal. Failure to comply will
invalidate the warranty.
• Take all reasonable precautions when choosing the site and
installing the Hera. Read and understand all warnings and
installation instructions.
Eseye Design are not liable for consequential loss or damage that
occurs because the warnings and installation instructions in this
guide were not followed.
• Do not insert or remove a SIM card when the Hera is powered on.
This will cause problems with the Hera functionality. Always power
off before inserting or removing a SIM card.
Warnings
Keep away from direct sunlight.
Do not place the unit close to a heat source (such as other
electrical equipment).
Do not enclose the unit in unventilated housing, where heat
may accumulate.
The supplied antennas are not for outdoor use. If using an
outdoor antenna, ensure it provides adequate lightning
protection.
Avoid locations exposed to heavy soiling, such as exhaust
from machinery, liquid or airborne particles from industrial
processes, or excessive dust.
Locate the Hera within 1 metre of a mains power outlet.
Use only an approved Limited Power Source (LPS) mains
adaptor compliant with IEC/UL 60950-1 or IEC/UL 62368-1.
Using an unapproved power adaptor will invalidate the
warranty and the Hera regulatory approval, and may damage
the unit.
Do not modify the mains power adaptor.
A falling device can cause injury. Do not mount more than 2
metres above the floor.
The Hera uses radio signals and cellular networks, and is
not guaranteed to connect in all possible conditions. Never
rely solely upon any wireless device for life-critical
communications.
Position cellular antennas at least one metre away from
people in normal operation.
The Hera incorporates a GSM radio module, which receives
and transmits radio frequency (RF) energy when powered
on. Never install your Hera where prohibited, or if it may
cause interference or danger.
When installing in healthcare facilities, observe on site
mobile phone usage restrictions, as some medical
equipment may be sensitive to RF energy. This includes
implanted medical equipment, such as cardiac pacemakers
and hearing aids. We recommend testing for interference
before installing the Hera permanently.
Post a clear, visible warning alongside the Hera to inform
people with medical implants of the potential danger of
radio frequency interference.
RF energy may interfere with TV sets; radios; computers;
and inadequately shielded equipment if the Hera is in close
proximity.
Do not operate GSM equipment, including the Hera, on
aircraft, in order to prevent interference with
communications systems. Offenders may have their cellular
services suspended or banned, and may also face legal
action.
Do not operate the Hera in the presence of flammable gases,
fumes, or potentially explosive atmospheres. Do not operate
the Hera anywhere that blasting operations are taking place.
The Hera contains Lithium coin type batteries. Keep
batteries away from children.
Advertisement

Summary of Contents for ES EYE 600 Series
- Page 1 Before you begin A falling device can cause injury. Do not mount more than 2 You will need: Logging in to the Hera Series Router 600 Series Router metres above the floor. • To install the security plate – • Drill –...
- Page 2 About the front panel indicators About Link indicators State Description Description indication Power Solid red Unit is powered, software is not operating yet No LEDs No connection. Solid green Unit is powered and software is operating normally Solid yellow, The Ethernet cable is attached between the Flashing green in sync with another LED Error on the port that is also flashing solid green...
Need help?
Do you have a question about the 600 Series and is the answer not in the manual?
Questions and answers