Advertisement
The Science of the Perfect Cup
Did you know that a "perfect cup of coffee" is a quantifiable metric? When awarding their Seal of Approval, the European Coffee Brewing Centre (ECBC) uses science-backed guidelines to evaluate how coffee grinders and brewers perform:
| COFFEE GRINDING
|
| COFFEE BREWING
|


Moccamaster grinders and brewers hit these benchmarks every time, consistently producing delicious coffee over a lifetime of use.
To learn more about ECBC certification, visit ecbc.no.
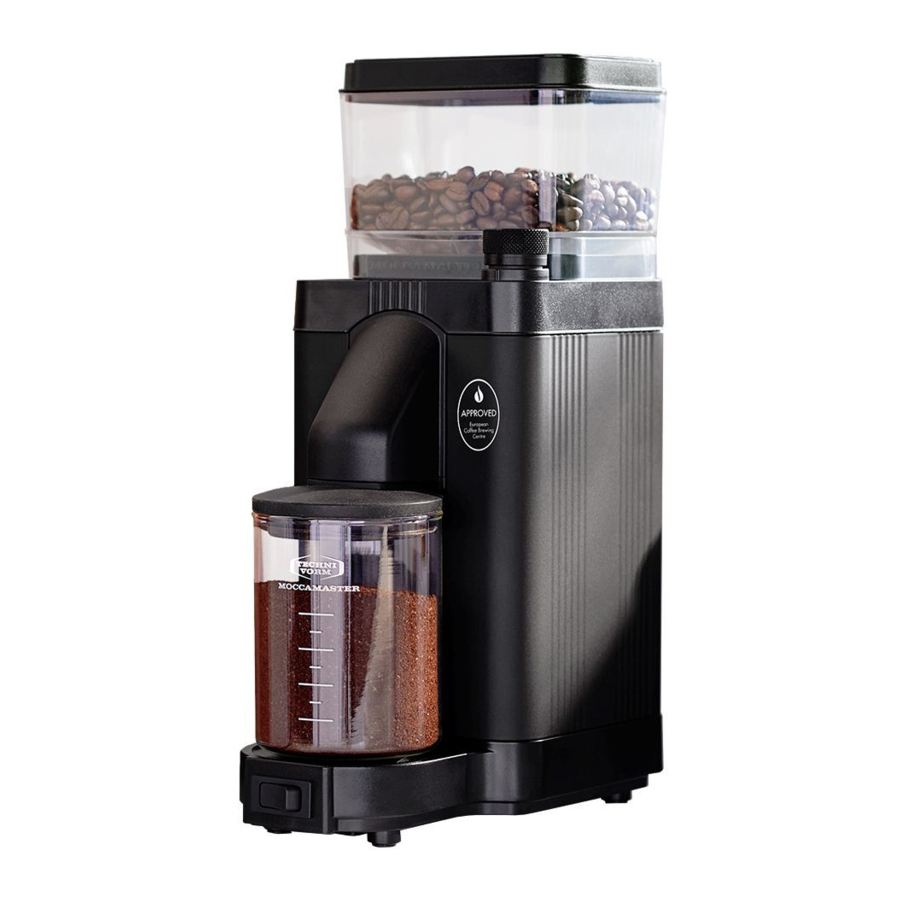
Product Overview
The KM5 Moccamaster Grinder

| Parts Identification |
|
Cleaning Your Grinder
Basic Cleaning
Unplug the grinder before cleaning. Wipe the inside surfaces of the bean hopper with a moist cloth at least once a week to avoid a build-up of the coffee oils, which can cause discoloration. You may also clean the exterior surfaces with a moist cloth as needed, and wipe dry. Do not use any cleaning agents to clean the interior or exterior of the coffee grinder. Do not wash any grinder parts in the dishwasher. Do NOT use rice to clean your grinder.
Maintenance Cleaning
We recommend cleaning the inside of your grinder every 3-6 months, depending on the type of coffee you're using and how frequently you grind. Darker roasts are typically oilier and tend to stick to the inside of the grinder more easily. If you do not clean your grinder regularly, you may find that it negatively impacts the flavor of your ground coffee.
The inside of your grinder can either be cleaned manually or automatically by using a dedicated coffee grinder cleaning product.
Manual Cleaning
Refer to our Burr Replacement instructions on our website to learn how to disassemble your grinder.
For best results, use a soft brush and a vacuum cleaner to clean the grinding chamber.
Automatic Cleaning
A grinder cleaning product will remove coffee oils and particles stuck inside the grinder without disassembly. Be sure to choose one that is suitable for burr grinders, such as Biocaf Coffee Grinder Cleaning Tablets by Urnex, and follow the manufacturer's directions on the packaging.
FIND MORE ONLINE
To learn more about your grinder, including how to replace your burrs and dial in your grind setting, scan the QR code to the right or visit us at www.moccamaster.com.

Best Practices for Best Results
Use Fresh Beans

The fresher the grind, the better. We recommend grinding your coffee beans right before you brew, and grinding just the amount you need. If you do grind more, you can store the grounds in your grinder's glass grounds container with storage lid.
Dial In Your Grind

Coffee grounds that are too fine can produce an overextracted cup of coffee. Too coarse, and your coffee may be weak or flavorless. We recommend medium-coarse when brewing on a Moccamaster. Use our chart below to find your brewing method, and experiment with small adjustments to find the grind that's perfect for your palate.
Keep It Clean

If you don't use your grinder daily, you may want to clear out old grounds before grinding a fresh batch. Pre-grind a small amount of coffee first and discard.
Consider Your Water

If it tastes good to drink, it will make good coffee. We recommend fresh tap, filtered, or bottled water. We do not recommend using reverse osmosis filtered water or distilled water, as it can damage the brewer's boiling element and lacks minerals necessary for making great coffee.
Find Your Flavor

The coffee-to-water ratio we recommend is the approved industry standard, but your taste preferences may vary. If your coffee is too strong, add hot water to your finished cup. If it's too weak, DO NOT add more coffee – instead, try a different coffee roast or growing region.
REPLACEMENT PARTS
Replacement parts are available through many retailers, online at www.moccamaster.com, or through Consumer Relations at 855.662.2200.
Adjusting Your Grind Settings
Grind Setting Details
The adjustment knob on the KM5 Coffee Grinder allows you to produce coffee grounds that range from fine (1) to coarse (9). When grinding for a Moccamaster coffee brewer, we recommend starting at the ECBCapproved setting of 5. We suggest not grinding below 4 for your Moccamaster as a finer grind size may negatively affect the flavor of your brew and the performance of your machine.

The Importance of Grind Size
Your grind size and your water-to-coffee ratio are the first steps to perfect coffee. They affect your final extraction – the amount of flavor-filled coffee solubles in your cup. To find your ideal grind, make minor adjustments to the grind setting and taste how it changes the flavor of your coffee. Your grind size will affect your final extraction - the amount of coffee solubles in your cup. Learn more about how to dial in your perfect grind online at www.moccamaster.com.
Recommended Coffee-to-Water Ratio
The industry standard for optimal flavor is 2 tbsp. of ground coffee to every 6 oz. of water – or 55 grams of ground coffee per liter.

Getting Started
For first use, set the adjustment knob to 5. On subsequent use, always activate the power switch before adjusting the grind setting. This allows the burrs to clear any partially ground beans that may be present from previous use. If bean remnants are trapped in the burrs, adjusting the grind setting without activating the grinder may cause the motor to jam.
Power On
Activate the grinder by holding the Power Switch (D).

Adjust the Grind
With the grinder running, rotate the Adjustment Knob (J) clockwise or counterclockwise to adjust the grind setting.

- Clockwise produces a finer grind.
- Counterclockwise produces a coarser grind.
- For more information about grinder use and functionality, see the Important Safeguards section in this manual.
How to Grind
Step 1.

Place Glass Grounds Container Lid (F) in position.
Place Glass Grounds Container (E) underneath the Dispensing Spout (H).
Fill Hopper (B) with coffee beans.
Place Hopper Lid (A) on top of the hopper.
Step 2.

Insert Power Plug (C) into a grounded outlet.
Press and hold the Power Switch (D) until you have ground the desired amount of coffee.
Note: Do not fill the glass grounds container past the bottom of the Moccamaster logo (approx. 110 grams). Allowing the container to overflow may result in the grinder motor jamming.
Step 3.
Remove the Glass Grounds Container from underneath the Dispensing Spout and take off the Lid.

Step 4.
Measure or weigh your grounds and transfer to your prepared brew basket or coffee brewer. If you have leftover grounds, seal the grounds container with Storage Lid (G).


You're ready to brew great coffee!
IMPORTANT SAFEGUARDS
When using electrical appliances, basic safety precautions should always be followed including the following:
READ ALL INSTRUCTIONS
- The appliance is intended for indoor use in households and similar applications such as:
- staff kitchen areas in shops, offices, and other working environments
- farmhouses
- clients in hotels, motels, and other residential-type environments
- bed & breakfast-type environments
- Unwrap the coffee grinder with care. Remove all packaging materials. Keep plastic and cardboard packaging out of reach of children.
- Confirm the voltage of the grinder matches your main voltage. The grinder must be plugged into a socket with safety grounding.
- Place the grinder on a flat surface in a frost-free room.
- To protect against risk of electrical shock do not put cord, plugs or coffee grinder in water or other liquid.
- This appliance can be used by persons with reduced physical, sensory or mental capabilities or lack of experience and knowledge if they have been given supervision or instruction concerning use of the appliance in a safe way and understand the hazards involved.
- Close supervision is necessary when any appliance is used by or near children. Children should be supervised to ensure they do not play with the appliance.
- Turn the appliance OFF, then unplug from the outlet when not in use, before assembling or disassembling parts and before cleaning. To unplug, grasp the plug and pull from the outlet. Never pull from the power cord.
- Do not operate any appliance with a damaged cord or plug or after the appliance malfunctions, or is dropped or damaged in any manner. Contact the manufacturer at their customer service telephone number for information on examination, repair or adjustment.
- Avoid contacting moving parts.
- Do not use outdoors.
- Do not let cord hang over edge of table or counter.
- Do not place on or near a hot gas or electric burner or in a heated oven.
- The use of attachments not recommended or sold by the manufacturer may cause fire, electric shock or injury.
- To disconnect, ensure power switch is in "OFF" position, then remove plug from wall outlet.
- Do not use grinder for any purpose other than its intended use.
- Always place all lids in the correct position, as shown in the descriptive images in this manual.
- NOT DISHWASHER SAFE.
MAXIMUM OPERATION TIME
For proper use, operate this appliance for no more than 1 minute at a time. Allow 15 minutes of rest after use, letting the grinder cool down to room temperature after each batch.
GLASS GROUNDS CONTAINER CAPACITY
To ensure correct operation, avoid filling the glass grounds container past the bottom of the Moccamaster logo as indicated below. Overfilling the glass grounds container can clog the dispensing spout and cause the motor to jam.

SAVE THESE INSTRUCTIONS
Do Not Return to Store!
FOR IMMEDIATE ASSISTANCE WITH ASSEMBLY, USE, OR TROUBLESHOOTING PLEASE CONTACT US!
HOW TO CONTACT US
Email
support@moccamaster.com
Phone
855.662.2200
Find Help Online
support.moccamaster.com
Business Hours
Monday - Friday, 8AM-5PM CST
We look forward to hearing from you!
Documents / Resources
References
Download manual
Here you can download full pdf version of manual, it may contain additional safety instructions, warranty information, FCC rules, etc.
Advertisement
Need help?
Do you have a question about the KM5 and is the answer not in the manual?
Questions and answers