
Summary of Contents for DATATEC FLIR Si2 Series
- Page 1 Ihr Ansprechpartner / dataTec AG Your Partner: E-Mail: info@datatec.eu >>> www.datatec.eu 0FLIR PREMIUM PARTNER User’s manual FLIR Si2 series...
- Page 2 Important note Before operating the device, you must read, understand, and follow all instructions, warnings, cautions, and legal disclaimers. Důležitá poznámka Před použitím zařízení si přečtěte veškeré pokyny, upozornění, varování a vyvázání se ze záruky, ujistěte se, že jim rozumíte, a řiďte se jimi.
-
Page 3: Table Of Contents
Table of contents Safety information ................1 Radio ..................1 Handling and operation .............. 1 Battery and charging ..............1 Declaration of conformity ............2 Notice to user ...................3 Register your camera..............3 Online documentation..............3 About this manual ..............3 Support .................. - Page 4 Table of contents Position the camera..............16 Save and analyze sounds ............17 8.6.1 Example: Large sound source......... 17 Leak detection ................18 Work flow ................18 Leak analysis results ............... 18 Leak analysis parameters ............19 9.3.1 Set the leak analysis parameters ........20 Distance ................
- Page 5 Table of contents Disposal of electronic waste ............. 34 17.1 Battery removal ..............34 Disclaimers ..................35 18.1 Legal disclaimer ..............35 18.2 Export controls ............... 35 18.3 Patents ................. 35 18.4 Quality assurance ..............35 18.5 Third-party licenses..............35 18.6 Usage statistics ..............
-
Page 6: Safety Information
Safety information 1.1 Radio WARNING This device complies with Part 15 of the FCC Rules and with Industry Canada licence-exempt RSS standard(s). Operation is subject to the following two conditions: this device may not cause harmful interference, and this device must accept any interference received, including interference that may cause undesired operation. -
Page 7: Declaration Of Conformity
Safety information 1.4 Declaration of conformity The full text of the Declaration of conformity is available at the following internet address: http://support.flir.com/resources/f34f. #T810637; r. AD/96533/96533; en-US... -
Page 8: Notice To User
2.2 Online documentation Our manuals are continuously updated and published online. To access the FLIR Si2 series user manual and other product documentation, go to http://support.flir.com/resources/f34f. To access the manuals for our other products, as well as manuals for our discontinued products, go to https://support.flir.com/resources/app. -
Page 9: Introduction
Distance (FLIR Si2-LD and FLIR Si2 Pro), and Advanced AI for optimal performance and data accuracy (all models). For enterprise-level customers the FLIR Si2 series also provides easy data export for re- porting and worksheets, Fleet Management tools, automatic data upload and online stor- age, and API Data Integration for a seamless asset health data transfer into your preferred Asset Management software. -
Page 10: Getting Started
Getting started Note Before operating the camera, you must read, understand, and follow the warnings and cautions in section 1 Safety information. 1. Fully charge the battery. 2. Remove the battery cover. 3. Align the battery and push it into the camera battery compartment. 4. -
Page 11: Camera Parts
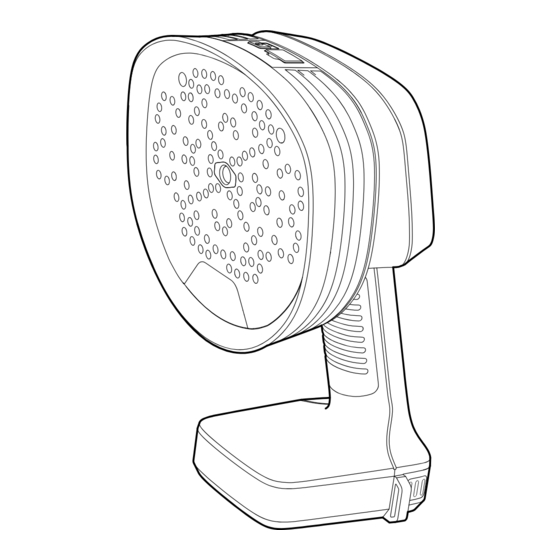
Camera parts 5.1 View from the front 1. Microphones 2. LED lamps 3. Digital camera #T810637; r. AD/96533/96533; en-US... -
Page 12: View From The Rear
Camera parts 5.2 View from the rear 1. LCD screen 2. Neck strap attachment points 3. Battery cover #T810637; r. AD/96533/96533; en-US... -
Page 13: View From The Top
Camera parts 5.3 View from the top 1. USB port 2. On/Off button 3. Heat sinks 4. Power LED 5.4 E-label The e-label is the primary identification plate for the camera. It contains certification and compliance information and other relevant product details. The e-label is available in the camera settings: 1. -
Page 14: User Interface
User interface 6.1 General 1. Analysis results (mode specific) 2. Acoustic image 3. Zoom button 4. Quick menu button 5. Settings button 6. Archive button 7. Snapshot button 8. Record button 9. Filter button 10. Distance setting 11. Battery indicator 6.2 Quick menu 1. -
Page 15: Archive Indicators
User interface 5. Mode button: Tap to cycle through the application mode options: LD (Leak detection), PD (Partial discharge), Mechanical. The available application modes depend on the camera model. 6.3 Archive indicators The number of files in the archive is displayed next to the Archive button. Two dots next to the number indicates that files are being uploaded to the FLIR Acoustic Camera Viewer cloud service. -
Page 16: Basic Operation
Basic operation 7.1 Safety information Before operating the camera, you must read, understand, and follow the warnings and cautions in section 1 Safety information. 7.2 Battery 7.2.1 Battery cover To remove the battery cover, push the ends of the cover. Then lift the cover off the camera. -
Page 17: Battery Charging
Basic operation 7.3 Battery charging CAUTION When you connect the power supply to a mains socket, select a socket that is easy to access. Should a hazardous situation occur, you must be able to easily disconnect the power supply. Note It is good practice to disconnect the power supply from the mains socket when not in use. -
Page 18: Record A Video
Basic operation 7.6 Record a video 1. To start the recording, tap the Record button. 2. To stop the recording, tap the Stop button. 3. A preview with editing options is displayed. 4. Tap Change to enter information or change a setting. 5. - Page 19 Basic operation 6. When the transfer is completed, the live view will be displayed. 7. Remove the USB memory stick. Put the USB port cover back in place. #T810637; r. AD/96533/96533; en-US...
-
Page 20: Locating Sound Sources
Locating sound sources 8.1 Basic steps to sound location • In the Leak detection and Partial discharge modes, it is recommended to use the Auto filter. • In the Mechanical mode, it is recommended to start with the default-selected filter. Later, you can test if other filter settings are better for the current situation. -
Page 21: Change The Filter Setting
Locating sound sources 8.2.3 Change the filter setting Note In the Leak detection and Partial discharge modes, manual filter selection is dis- abled by default and no Filter button is available. Manual filter selection is enabled on the Settings menu; select Advanced settings > Filter mode = Manual. To change the filter setting, tap the Filter button repeatedly and cycle through the filter options. -
Page 22: Save And Analyze Sounds
Locating sound sources A sound source can be directional, meaning that the sound level differs depending on the direction. Again, it is useful to move the camera around and look at the sound source from different angles. The minimum distance between the sound source and the camera should be around 0.3 meters. -
Page 23: Leak Detection
Leak detection Note The availability of the leak detection feature depends on the camera model. The camera can detect all kinds of pressurized gas leaks and vacuum leaks, by analyz- ing the sound emitted by the leak. In addition to compressed air leaks, the camera is able to detect leaks of various industrial gases. -
Page 24: Leak Analysis Parameters
Leak detection Note • The accuracy of the leak size and leak cost estimates depends on the correct input of the distance setting and leak analysis parameters. • The strength of the sound from a gas leak will depend on from which direction you ob- serve the leak. -
Page 25: Set The Leak Analysis Parameters
Leak detection • Utilization By entering the hours, days, and/or weeks of use, you can describe how often the equipment is being used in practice. The camera will use the resultant utilization figure as a factor in leak cost calculations. 9.3.1 Set the leak analysis parameters 1. -
Page 26: Partial Discharge Detection
Partial discharge detection Note The availability of the partial discharge detection feature depends on the camera model. When an electric component begins to fail, one of the first indicators is sound. This sound is caused by partial discharges, that signal the harmful flow of electricity and dete- riorate components over time. -
Page 27: Partial Discharge Parameters
Partial discharge detection 6.4. The camera displays the analysis results, see section 10.4 Partial discharge analysis results. 7. For more accurate results, enter the environmental temperature and relative humidity. On the Settings menu, tap Power mode settings. 8. You can take snapshots and videos of the detected partial discharge for further in- spection and reporting in the FLIR Acoustic Camera Viewer or FLIR Thermal Studio. -
Page 28: Prpd Pattern
Partial discharge detection 10.4.1 PRPD pattern The Phase-Resolved Partial Discharge pattern – or PRPD – is a widely used tool for anal- ysis and diagnosis of partial discharge activity. Partial discharge activity occurs due to defects in electrical components. Each “dot” in the PRPD pattern corresponds to an event caused by a discharging defect. -
Page 29: Mechanical Fault Detection
Mechanical fault detection Note The availability of the mechanical fault detection feature depends on the camera model. Constant wear and tear of key components in conveyor systems can lead to deteriora- tion. Bearings that are in need of lubrication or are developing faults begin to emit exces- sive noise. -
Page 30: Crest Factor
Mechanical fault detection bearings in good condition. As the condition gets worse, the SPL reading is likely to in- crease further. Note Comparison should be made using the same filter and from a similar distance, otherwise the SPL values cannot be directly compared. 11.2.2 Crest factor Crest factor is the ratio between the peak amplitude and the root mean square (RMS) value of a signal. -
Page 31: Flir Acoustic Camera Viewer
FLIR Acoustic Camera Viewer FLIR Acoustic Camera Viewer is a cloud service for acoustic snapshots and videos. Up- load snapshots and videos from your camera and your data will be instantly available on your computer and mobile devices. With the FLIR Acoustic Camera Viewer you can perform further analysis of detected leaks, partial discharges, and mechanical faults, and also generate inspection reports. -
Page 32: Pairing
FLIR Acoustic Camera Viewer 12.4 Pairing To pair the camera with the FLIR Acoustic Camera Viewer, you need the serial number of your camera and also a secret code. These details are available in the camera settings. 1. Make sure the camera is connected to the internet. 2. - Page 33 FLIR Acoustic Camera Viewer Note Before importing the files, ensure that the camera used for capturing the snap- shots and videos is paired with your FLIR Acoustic Camera Viewer account. #T810637; r. AD/96533/96533; en-US...
-
Page 34: Flir Thermal Studio
FLIR Thermal Studio FLIR Thermal Studio is a powerful, flexible, and efficient Windows desktop software for advanced image post-processing and reporting. The software supports images and vid- eos from all modern FLIR thermography cameras, as well as snapshots and videos from the FLIR acoustic imaging cameras. -
Page 35: Camera Settings
Camera settings To open the Settings menu, tap the Settings button. The Settings menu includes the following, depending on the camera model: • Network settings • Change mode • Time settings • Leak mode settings • Power mode settings • Advanced settings •... -
Page 36: Power Mode Settings
Camera settings 14.5 Power mode settings • Environmental temperature: The temperature of the air can affect how sound waves propagate through the air. To obtain more accurate results, it is recommended to specify the environmental temperature. • Relative humidity: The propagation of sound is affected by the relative humidity of the environment. -
Page 37: Maintenance And Cleaning
Maintenance and cleaning 15.1 Clean the camera CAUTION If you do not obey these Cautions, damage to the equipment can occur. • Do not use strong cleaning solutions. • Do not expose the equipment to running or dripping water or liquid. •... -
Page 38: Updating The Camera
Updating the camera To take advantage of our latest camera software, it is important that you keep your cam- era updated. The camera can be updated using one of the following methods: • Over-The-Air (OTA): When connected to the internet, the camera will automatically download software updates available in the FLIR Acoustic Camera Viewer. - Page 39 Disposal of electronic waste Waste of Electrical and Electronic Equipment (WEEE) poses a risk to human health and the environment when not disposed of properly. This product should not be discarded as unsorted waste but must be sent to separate collection facilities for recovery and recy- cling.
- Page 40 Disclaimers 18.1 Legal disclaimer Terms of use is available in the user interface of the product. For warranty terms, refer to https://www.flir.com/warranty. 18.2 Export controls Products described herein may be subject to export regulations. This document does not contain export-controlled information. 18.3 Patents This product is protected by patents, design patents, patents pending, or design patents pending.
- Page 41 Specifications subject to change without further notice. Models and accessories subject to regional market considerations. License procedures may apply. Products described herein may be subject to US Export Regulations. Please refer to exportquestions@flir.com with any questions. Ihr Ansprechpartner / dataTec AG Your Partner: E-Mail: info@datatec.eu >>>...
Need help?
Do you have a question about the FLIR Si2 Series and is the answer not in the manual?
Questions and answers