
Related Manuals for Bionik NEOGLOW

Summary of Contents for Bionik NEOGLOW
- Page 1 User guide Manuel de l’utilisateur Guía del usuario Manuale dell’Utente Guia do usuário Bedienungsanleitung Gebruikershandleiding ユーザー ガイド www.bionikgaming.com...
-
Page 2: Package Content
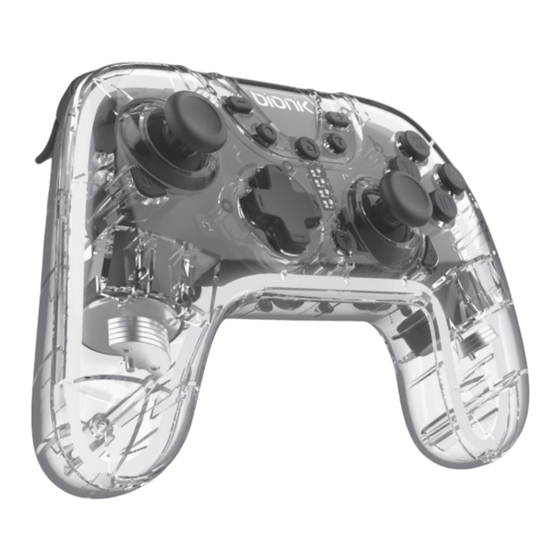
Please review this guide and store it for future reference. Otherwise, please recycle. User guides can also be downloaded from our website at www.bionikgaming.com PACKAGE CONTENT NeoGlow Controller, charge cable and user guide FIG. 1 FIG. 2... - Page 3 FIG. 3 NEOGLOW BUTTON LAYOUT – FRONT (FIG. 1) A. - button B. Capture button C. HOME button D. Turbo button E. + button F. A / B / X / Y buttons G. Vibration button H. Left analog stick / L3 button (functions as L3 when pressed down) I.
-
Page 4: Changing Color Modes
1. Press the A and Sync buttons simultaneously for five seconds. The first player indicator LED will flash showing the controller has entered pairing mode. 2. You will find “NeoGlow Controller” on the list of Bluetooth ® devices. 3. Once selected, the first player indicator LED will become solid green. -
Page 5: Brightness Adjustment
3. To have the LEDs continue to flow from one color to another, press the Color Mode button again. BRIGHTNESS ADJUSTMENT To adjust the brightness (25%, 50%, 75% or 100%), press up or down on the directional pad while holding the Color Mode button. - Page 6 To clear any buttons or directions attached to the M1 or M2 buttons, follow these steps: 1. Press and hold the Program button for five seconds. The second and third player indicator LEDs will flash. 2. Press either the M1 or M2 buttons. a.
-
Page 7: Care And Maintenance
• The Vibration button only works when connected to a device. CHARGING THE NEOGLOW CONTROLLER 1. Connect the USB-A end of the included cable into a powered source. 2. Gently connect the USB-C ®... -
Page 8: Fcc Information
If you run into any issues, visit www.bionikgaming.com/pages/support for more information. DECLARATION OF CONFORMITY A copy of the EU Declaration of Conformity for this product can be found at this link: www.bionikgaming.com/products/neoglow... - Page 9 FRANÇAIS Avertissement sur l'épilepsie. (Article Annexe I) Annexe I A lire avant toute utilisation d'un jeu vidéo par vous-même ou votre enfant. Certaines personnes sont susceptibles de faire des crises d'épilepsie ou d'avoir des pertes de conscience à la vue de certains types de lumières clignotantes ou d'éléments fréquents dans notre environnement quotidien.
- Page 10 En cours d'utilisation, faites des pauses de dix à quinze minutes toutes les heures. Avertissement concernant les risques d'épilepsie et des précautions à prendre lors de l'utilisation d'un jeu vidéo. (Article Annexe II) Annexe II Certaines personnes sont susceptibles de faire des crises d'épilepsie ou d'avoir des pertes de conscience à...
-
Page 11: Contenu De L'emballage
Veuillez examiner le présent guide et conservez-le à titre d’information. Autrement, veuillez le recycler. Vous pouvez également télécharger les guides d’utilisation sur notre site Web www.bionikgaming.com CONTENU DE L’EMBALLAGE NeoGlow Controller, câble de charge et manuel de l’utilisateur FIG. 1 FIG. 2... - Page 12 FIG. 3 DISPOSITION DES BOUTONS DE LA MANETTE NEOGLOW – FACE AVANT (FIG. 1) A. Bouton - B. Bouton Capture C. Bouton HOME D. Bouton Turbo E. Bouton + F. Boutons A / B / X / Y G. Bouton de vibration H.
- Page 13 Pour utiliser la fonction macro, procédez comme suit : Q. Bouton ZR R. Port de charge DISPOSITION DES BOUTONS DE LA MANETTE NEOGLOW – FACE ARRIÈRE (FIG. 3) S. Bouton M1 mappable T. Bouton M2 mappable U. Bouton de programmation UTILISATION DE LA MANETTE NEOGLOW SUR ®...
-
Page 14: Réglage De La Luminosité
La LED d’indication du premier joueur clignote pour indiquer que la manette est entrée en mode appariement. 2. Vous trouverez « NeoGlow Controller » dans la liste de ® appareils Bluetooth 3. Une fois que vous avez sélectionnée la manette, la LED d’indication du premier joueur s’allume en vert. -
Page 15: Mode Turbo
deuxième lecteur continuera à clignoter. 3. Appuyez sur le bouton ou la direction de votre choix. 4. Appuyez à nouveau sur le bouton Programmer pour quitter. Le voyant du lecteur indique l'état du lecteur d'origine. Pour utiliser la fonction macro, procédez comme suit : 1. - Page 16 être activées. • Le bouton de vibration ne fonctionne que lorsqu'il est connecté à un appareil. CHARGEMENT DE LA MANETTE NEOGLOW 1. Connectez l’extrémité USB-A du câble fourni à une source d’alimentation. 2. Connectez délicatement l’extrémité USB-C ®...
-
Page 17: Entretien Et Maintenance
REMARQUE : • Les LED d’indication de joueur clignotent lorsque la batterie de la manette est faible. • Vous pouvez utiliser la manette en cours de chargement. • Appuyez sur le bouton de synchronisation pour éteindre la manette. ENTRETIEN ET MAINTENANCE •... -
Page 18: Garantie
fiabilité le plus élevé. Si vous rencontrez des problèmes, consultez le site Web www.bionikgaming.com/pages/support pour de plus amples renseignements. DÉCLARATION DE CONFORMITÉ Une copie de la déclaration de conformité CE pour ce produit peut être trouvée à ce lien: www.bionikgaming.com/products/neoglow... -
Page 19: Contenido Del Paquete
Consulte esta guía y consérvela para consultarla en el futuro; de lo contrario, recíclela. Las guías del usuario también se pueden descargar desde nuestro sitio web en www.bionikgaming.com CONTENIDO DEL PAQUETE NeoGlow Controller, cable de carga y guía del usuario FIG. 1 FIG. 2... - Page 20 FIG. 3 DISEÑO DE LOS BOTONES DE NEOGLOW – PARTE DELANTERA (FIG. 1) A. Botón - B. Botón de captura C. Botón HOME D. Botón de turbo E. Botón + F. Botones A / B / X / Y G. Botón de vibración H.
- Page 21 El LED indicador de primer jugador parpadeará para mostrar que el mando entró en el modo de emparejamiento. 2. Encontrará el “NeoGlow Controller” en la lista de ® dispositivos Bluetooth 3. Una vez seleccionado, el LED indicador de primer jugador...
-
Page 22: Ajuste Del Brillo
CAMBIO DE MODOS DE COLOR 1. Para cambiar entre modos de color, presione el botón de modo de color dos veces seguidas. 2. Para quedarse en un color específico, presione el botón de modo de color una vez. 3. Para que los LED sigan pasando de un color a otro, presione el botón de modo de color otra vez. - Page 23 a. Si se presiona el botón M1, solo seguirá parpadeando el LED indicador del tercer jugador. b. Si se presiona el botón M2, solo seguirá parpadeando el LED indicador del segundo jugador. 3. Presione el patrón deseado de botones o direcciones. Puede elegir un patrón de hasta 32 cambios de función.
-
Page 24: Cuidado Y Mantenimiento
• El botón de vibración solo funciona cuando está conectado a un dispositivo. CARGA DEL MANDO NEOGLOW 1. Conecte el extremo USB-A del cable que se incluye a una fuente alimentada. 2. Conecte con cuidado el extremo USB-C ®... -
Page 25: Información De Fcc
• Mantenga el mando libre de residuos y polvo. • Cuide el cable de manera de evitar que se enrede o anude. Evite superficies afiladas que puedan dañar o desgastar el cable. Si el cable muestra señales de daño, suspenda su uso. -
Page 26: Declaración De Conformidad
Si tiene cualquier problema, visite www.bionikgaming.com/pages/support para obtener más información. DECLARACIÓN DE CONFORMIDAD Se puede encontrar una copia de la Declaración de conformidad de UE para este producto en este vínculo: www.bionikgaming.com/products/neoglow... -
Page 27: Contenuto Della Confezione
La invitiamo a leggere questo manuale e a conservarlo per future consultazioni. In alternativa, può riciclarlo. I nostri manuali dell’Utente possono essere scaricati anche dal sito Web www.bionikgaming.com CONTENUTO DELLA CONFEZIONE NeoGlow Controller, cavo di ricarica e manuale dell'Utente FIG. 1 FIG. 2... - Page 28 FIG. 3 DISPOSIZIONE PULSANTI NEOGLOW – SEZIONE FRONTALE (FIG. 1) A. Pulsante - B. Pulsante di acquisizione C. Pulsante HOME D. Pulsante del turbo E. Pulsante + F. Pulsanti A / B / X / Y G. Pulsante di vibrazione H.
- Page 29 NOTA: Dopo che il controller è stato connesso alla console, premere il pulsante HOME per attivare la console ® Nintendo Switch UTILIZZO DI NEOGLOW IN UN PC Per connettere il controller a un PC utilizzando il protocollo ® Bluetooth , e ettuare le seguenti operazioni: 1.
-
Page 30: Regolazione Della Luminosità
2. Nell'elenco dei dispositivi Bluetooth ® verrà visualizzata la voce “NeoGlow Controller”. 3. Una volta selezionato il controller, la spia a LED del primo giocatore rimarrà verde. MODIFICA DELLE MODALITÀ A COLORI 1. Per modificare le modalità colore, premere per due volte consecutivamente il pulsante della modalità... - Page 31 LED relativo al giocatore segnalerà lo stato originale del giocatore. Per utilizzare la funzione macro, procedere nel modo seguente: 1. Tenere premuto per cinque secondi il pulsante di impostazione del programma. Gli indicatori a LED del secondo e del terzo giocatore inizieranno a lampeggiare. 2.
- Page 32 • Il pulsante della vibrazione funziona solo se il controller è collegato a un dispositivo. RICARICA DEL CONTROLLER NEOGLOW 1. Collegare l'estremità USB-A del cavo incluso in dotazione a un'alimentazione attivata. 2. Collegare delicatamente l'estremità USB-C ®...
-
Page 33: Cura E Manutenzione
NOTA: • Quando il livello di carica della batteria è basso, le spie a LED dei giocatori lampeggiano. • È possibile utilizzare il controller mentre è in corso la ricarica. • Per disattivare il controller, premere il pulsante di sincronizzazione. CURA E MANUTENZIONE •... -
Page 34: Garanzia
In caso di problemi, è possibile ottenere ulteriori informazioni accedendo alla pagina Web www.bionikgaming.com/pages/support DICHIARAZIONE DI CONFORMITÀ Una copia della dichiarazione di conformità UE per questo prodotto è disponibile a questo link: www.bionikgaming.com/products/neoglow... - Page 35 Revise este guia e armazene-o para consultar no futuro. Caso contrário, recicle. Os guias de usuário também podem ser baixados em nosso site: www.bionikgaming.com CONTEÚDO DA EMBALAGE NeoGlow Controller, cabo de carregamento e manual do usuário FIG. 1 FIG. 2...
- Page 36 FIG. 3 LAYOUT DE BOTÕES DO NEOGLOW – PARTE DA FRENTE (FIG. 1) A. Botão - B. Botão Capture C. Botão HOME D. Botão Turbo E. Botão + F. Botões A/B/X/Y G. Botão Vibration H. Botão analógico da esquerda/L3 (funciona como L3 quando pressionado) I.
- Page 37 O LED indicador do jogador um vai piscar, mostrando que o controle entrou em modo de emparelhamento. 2. Você encontrará o “NeoGlow Controller” na lista de ® dispositivos Bluetooth 3. Assim que estiver selecionado, o LED indicador do jogador...
- Page 38 um ficará verde. PARA ALTERAR OS MODOS DE COR 1. Para alternar entre os modos de cor, aperte o botão Color Mode duas vezes seguidas. 2. Para permanecer em uma cor específica, aperte o Color Mode uma vez. 3. Para fazer com que os LEDs continuem passando de uma cor para outra, pressione o botão Color Mode novamente.
- Page 39 b. Se o botão M2 for apertado, somente o LED indicador de segundo jogador continuará piscando. 3. Aperte seu padrão desejado de botões ou direções. Você pode escolher um padrão de até 32 alterações de função. 4. Aperte novamente o botão Program para sair. O LED indicador de jogador mostrará...
-
Page 40: Cuidado E Manutenção
é suportada. • O botão Vibration só funciona quando conectado a um dispositivo. PARA CARREGAR O NEOGLOW CONTROLLER 1. Conecte a extremidade USB-A do cabo incluído a uma fonte energizada. 2. Conecte cuidadosamente a extremidade USB-C ®... - Page 41 • Adulterar o produto pode danificá-lo, anular a garantia e causar ferimentos. • Descontinue o uso caso o produto esteja danificado ou haja suspeita de avarias. Contate nosso suporte ao cliente para obter ajuda ou informações adicionais. • Armazene e use o produto entre 32 °F e 113 °F [ 0 °C –...
-
Page 42: Declaração De Conformidade
Caso você tenha algum problema, visite www.bionikgaming.com/pages/support para mais informações. DECLARAÇÃO DE CONFORMIDADE Uma cópia da Declaração de conformidade da UE deste produto pode ser encontrada neste link: www.bionikgaming.com/products/neoglow... - Page 43 Ihr Gaming-Erlebnis bereichert. Lesen Sie diese Anleitung und bewahren Sie sie zum späteren Nachschlagen auf. Führen Sie sie andernfalls bitte der Wiederverwertung zu. Bedienungsanleitungen können auch von unserer Website www.bionikgaming.com heruntergeladen werden. PACKUNGSINHALT NeoGlow Controller, Ladekabel und Bedienungsanleitung FIG. 1 FIG. 2...
- Page 44 H. Analogstick links / L3-Taste (funktioniert als L3, wenn gedrückt) I. Steuerkreuz J. Spieler-Leuchte-/Lade-LED K. Sync-Taste L. Analogstick rechts / R3-Taste (funktioniert als R3, wenn gedrückt) M. Farbmodustaste NEOGLOW TASTENANORDNUNG – OBERSEITE (FIG. 2) N. L-Taste O. R-Taste P. ZL-Taste Q. ZR-Taste R. Ladeanschluss...
- Page 45 1. Drücken Sie die Tasten A und Sync gleichzeitig für fünf Sekunden. Die erste Spieler-LED-Leuchte blinkt und zeigt an, dass der Controller sich nun im Kopplungsmodus befindet. 2. Sie finden den „NeoGlow Controller“ in der Liste der ® Bluetooth -Geräte.
-
Page 46: Einstellung Der Helligkeit
durchgängig grün. WECHSELN DER FARBMODI 1. Um zwischen den Farbmodi zu wechseln, drücken Sie die Farbmodustaste zweimal hintereinander. 2. Um bei einer bestimmten Farbe zu bleiben, drücken Sie einmal auf die Farbmodustaste. 3. Wenn die LEDs weiterhin von einer Farbe zur anderen wechseln sollen, drücken Sie erneut die Farbmodustaste. - Page 47 Die LED-Leuchten für den zweiten und dritten Spieler blinken. 2. Drücken Sie entweder die Taste M1 oder M2. a. Wenn die Taste M1 gedrückt wird, blinkt nur die dritte Spieler-LED-Leuchte weiter. b. Wenn die Taste M2 gedrückt wird, blinkt nur die zweite Spieler-LED-Leuchte weiter.
- Page 48 Sie in den Einstellungen der einzelnen Spiele, ob Vibration unterstützt wird. • Die Vibrationstaste funktioniert nur, wenn ein Gerät verbunden ist. AUFLADEN DES NEOGLOW-CONTROLLERS 1. Schließen Sie das USB-A-Ende des im Lieferumfang enthaltenen Kabels an eine Stromquelle an. 2. Schließen Sie das USB-C ®...
-
Page 49: Pflege Und Wartung
PFLEGE UND WARTUNG • Von Feuer, Flüssigkeiten und hohen Temperaturen fernhalten und elektronische Teile stets einer Wiederverwertung zuführen. • Nicht werfen oder schütteln. • Nicht bedienen, wenn das Gerät Stößen ausgesetzt wurde oder beschädigt ist. • Verwenden Sie zur äußeren Reinigung ein weiches Tuch. Verwenden Sie keine aggressiven Chemikalien oder starken Reinigungsmittel. -
Page 50: Garantie
Reihe von sorgfältigen Prüfungen unterzogen, um ein höchstmögliches Maß an Betriebssicherheit zu gewährleisten. Sollten Probleme auftreten, besuchen Sie uns auf www.bionikgaming.com/pages/support um weitere Informationen zu erhalten. KONFORMITÄTSERKLÄRUNG Eine Kopie der EU-Konformitätserklärung für dieses Produkt findet sich unter folgendem Link: www.bionikgaming.com/products/neoglow... -
Page 51: Inhoud Van De Verpakking
NEDERLANDS Bedankt voor de aanschaf van dit bionik ® gamingproduct. Ons streven is om innovatieve accessoires van hoge kwaliteit te leveren die zorgen voor een superieure speelervaring. Lees deze gids door en bewaar hem voor toekomstig gebruik. U kunt deze gids ook recyclen. - Page 52 FIG. 3 VORMGEVING VAN DE NEOGLOW-K VOORZIJ (FIG. 1) A. "-"-knop B. Vastlegknop C. HOME-knop D. Turboknop E. "+"-knop F. A/B/X/Y-knoppen G. Vibratieknop H. Linker analoge stick/L3-knop (druk in om als L3 te gebruiken) I. Pijltjestoetsen J. Spelerindicator/oplaadled K. Synchronisatieknop L.
- Page 53 -APPARAAT ™ 1. Houd de A-knop en de Synchronisatieknop tegelijkertijd vijf seconden ingedrukt. De indicator speler 1 knippert om aan te geven dat de controller in de koppelingsmodus staat. 2. “NeoGlow Controller” staat op de lijst met ® Bluetooth -apparaten.
-
Page 54: Helderheid Aanpassen
3. Eenmaal geselecteerd, zal de indicator voor speler 1 groen branden. KLEURMODUS WIJZIGEN 1. Om de kleurmodus te wijzigen, druk je twee keer achter elkaar op de Kleurmodusknop. 2. Druk eenmaal op de Kleurmodusknop om een kleur te selecteren. 3. Druk opnieuw op de Kleurmodusknop om de leds continu van de ene kleur in de andere over te laten vloeien. - Page 55 1. Houd de programmaknop vijf seconden ingedrukt. De indicatoren van de tweede en derde speler zullen knipperen. 2. Druk op de knop M1 of M2. a. Als de knop M1 wordt ingedrukt, blijft alleen de indicator van de derde speler knipperen. b.
-
Page 56: Verzorging En Onderhoud
• De vibratieknop werkt alleen wanneer er verbinding is met een apparaat. DE NEOGLOW-CONTROLLER OPLADEN 1. Sluit het USB-A-uiteinde van de meegeleverde kabel aan op een voedingsbron. 2. Sluit het USB-C ®... - Page 57 • Gebruik het niet als het is blootgesteld aan schokken of schade. • Gebruik een zachte doek om de buitenkant af te nemen. Gebruik geen agressieve chemicaliën of sterke schoonmaakmiddelen. • Zorg dat er geen vuil en stof in de controller komt. •...
- Page 58 Ga naar www.bionikgaming.com/pages/support voor meer informatie in geval u op problemen stuit. CONFORMITEITSVERKLARING Een kopie van de EU-conformiteitsverklaring voor dit product vindt u onder de volgende link: www.bionikgaming.com/products/neoglow...
- Page 59 このたびは、 bionik ゲームをお買い上げいただき、 誠にありが ® と うございます。 当社では、 お客様のゲーム体験の向上を目指し 、 高品質で革新的なアクセサリの開発に努めています。 まず最初 に本書をお読みになり、 後で参照するために保管いただく か、 リ サイクルに出してく ださい。 なお、 ユーザーガイ ドはウ ェブサイ ト (www.bionikgaming.com) からもダウンロードいただけます。 内容物 NeoGlow Controller、 充電ケーブル、 ユーザーガイド FIG. 1 FIG. 2...
- Page 60 FIG. 3 NEOGLOWのボタン配置 - 前面 (FIG. 1) A. -ボタン B. キャプチャボタン C. HOMEボタン D. Turboボタン E. +ボタン F. A、 B、 X、 Yボタン G. 振動ボタン H. 左アナログスティ ック/L3ボタン (押下時にL3として機能) ) I. 十字ボタン J. プレーヤーインジケーター/充電LED K. 同期ボタン L. 右アナログスティック/R3ボタン (押下時にR3として機能) M. カラーモードボタン...
- Page 61 ます。 3. 選択すると、 1番目と2番目のプレーヤーインジケーターLED が緑色に点灯します。 注 : コントローラーは付属のケーブルで接続することもできま す。 デバイスでのNEOGLOWの使用 ANDROID ™ 1. Aボタンと同期ボタンを同時に5秒間押します。 コントロー ラーがペアリングモードになると、 1番目のプレーヤーインジ ケーターLEDが点滅します。 デバイスのリストに、 「 NeoGlow Controller」 が表 2. Bluetooth ® 示されます。 3. 選択すると、 1番目のプレーヤーインジケーターLEDが緑色 に点灯します。 カラーモードの変更 1. カラーモードを変更するには、 カラーモードボタンを2回続 けて押します。 2. .特定の色を保持するには、 カラーモードボタンを1回押しま す。...
- Page 62 ドボタンを押しながら十字ボタンの上または下を押します。 1. 上を押すと、 明るくなります。 2. 下を押すと、 暗くなります。 注 : 明るさの調整は、 特定のカラーやその組み合わせでロック された場合にのみ可能です。 マッピング可能なボタンの使用 コントローラー背面のM1およびM2のマッピング可能なボタン は、 以下のアクションボタンや方向にマッピングすることができ ます。 A / B / X / Y / L / R / ZL / ZR / Up / Down / Left / Right / L3 / R3。...
- Page 64 します。 コントローラーが充電中はプレーヤーインジケータ ーLEDが点滅します。 3. コントローラーの充電が完了すると、 プレーヤーインジケー ターLEDが消灯します。 注 : • コントローラーのバッテリー残量が少なくなると、 プレーヤ ーインジケーターLEDが点滅します。 • 充電中にコントローラーを使用できます。 • コントローラーの電源をオフにするには、 同期ボタンを押し ます。 取り扱いとお手入れについて • 火気 ・ 液体 ・ 高温の場所に近づけないでください。 また、 電子 機器は必ずリサイクルしてください。 • 投げたり、 衝撃を与えたり しないでください。 • 衝撃を受けたり、 損傷している場合は動作させないでください。 外側は、 柔らかいきれいな布で拭いてください。 刺激の強い 化学物質や強力な洗浄剤は使用しないでください。 • コントローラーは、 ほこ りなどのない清潔な場所に保管してく ださい。...
- Page 65 波エネルギーを発生、 使用、 放出する可能性があるため、 説明 書に従って設置または使用しないと、 無線通信に有害な干渉を 引き起こす可能性があります。 ただし、 特定の設置条件で電波干渉が起こらないという保証は ありません。 この装置がラジオやテレビに有害な干渉を引き起 こしている場合は (装置をオフ/オンにして判断できます)、 次の いずれかの方法で干渉を是正することが推奨されます。 • 受信アンテナの方向や位置を変える。 • 装置と受信機の距離を離す。 • 受信機を接続している回路とは別の回路の差し込みに装置 を接続する。 • ラジオ/テレビの販売店、 あるいは経験のある技術者に相談 する。 本デバイスはFCC規定パート15に準拠しています。 次の 2つの条件に従って使用してください。 1. 本デバイスが有害な干渉を引き起こさないこと 2. 本デバイスが、 望ましくない動作を引き起こす可能性のある 電 波干渉を含め、 あらゆる干渉を受容できること。 保証 すべての製品には限定保証が適用され、 またすべての製品に ついて一連の徹底的な試験により最高水準の信頼性が確認さ れています。 問題が発生した場合は、 www.bionikgaming.com/pages/support で詳細を確認してく ださい。 適合宣 本製品のEUの適合宣言書の写しは、 こちらのリンクから入 手可能です: www.bionikgaming.com/products/neoglow...
- Page 66 ® www.bionikgaming.com NeoGlow Controller FIG. 1 FIG. 2...
- Page 67 FIG. 3 (FIG. 1) NEOGLOW Capture HOME Turbo A/B/X/Y/ Vibration Sync Color Mode...
- Page 75 www.bionikgaming.com/products/neoglow...
- Page 77 REGISTER | ENREGISTRER | REGISTRO | REGISTRAZIONE | CADASTRE SE | REGISTRIEREN | GEREGISTREERD | 登録 | www.bionikgaming.com/product-registration SUPPORT | SOUTIEN | SOPORTE | SUPPORTO | SUPORTE | UNTERSTÜTZEN | ONDERSTEUNING | サポート | support@bionikgaming.com (844) 424-6645...
Need help?
Do you have a question about the NEOGLOW and is the answer not in the manual?
Questions and answers
Top 2 player indicator lights flash continuously. What is the problem ?
When the top two player indicator lights flash continuously on the Bionik NEOGLOW, it means the controller is in the process of clearing any buttons or directions attached to the M1 or M2 buttons.
This answer is automatically generated
The neoglow drivers are not working on my Window's 11 laptop, does not allow controller to appropriately connect wirelessly. How can I fix this?