Advertisement
Introduction
We take pride in the craftsmanship, innovation and design that goes into every Café product, and we think you will too. Among other things, registration of your appliance ensures that we can deliver important product information and warranty details when you need them.
Register your Café appliance now online. Helpful websites are available in the Consumer Support section of this Owner's Manual. You may also mail in the pre-printed registration card included in the packing material.
Using The Cooktop
In Case of a Power Failure
In the event of a power failure, the surface burners may be lit with a match. Using extreme caution, hold a lit match near the ports beneath the surface burner cap, then slowly turn the knob to the LITE position. Once lit, surface burners will continue to operate normally.
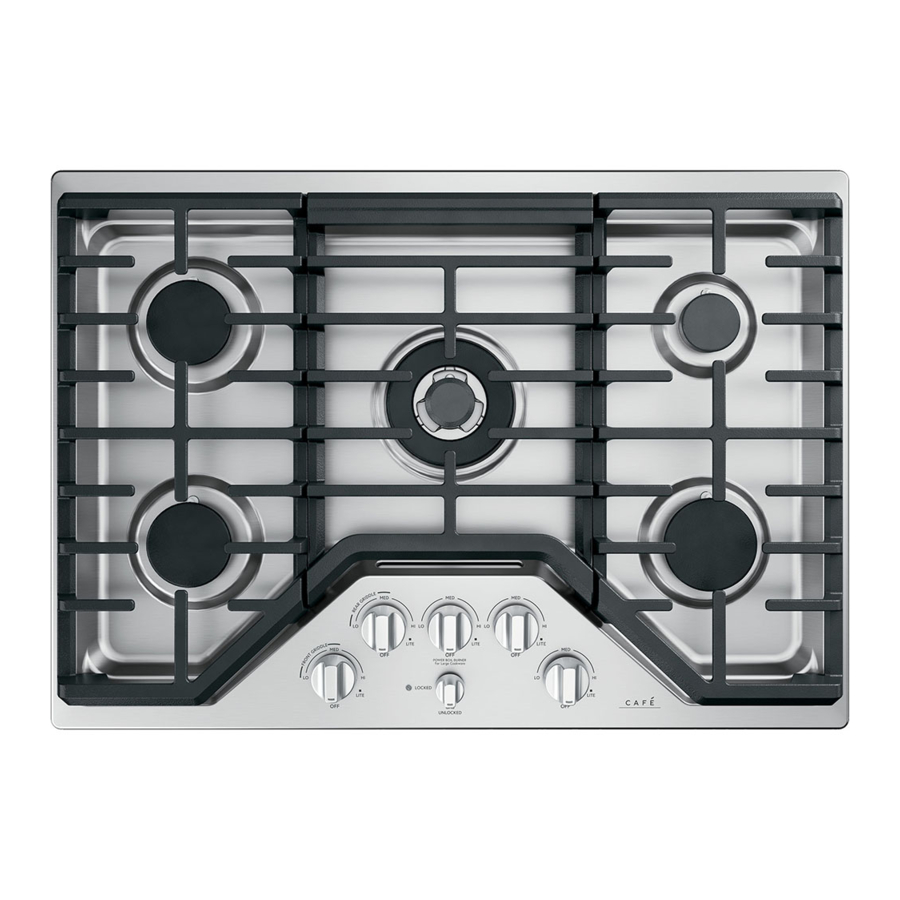
Surface Burners
Lighting a Surface Burner

Burners should be operated only when covered by cookware. Burner flames not covered by cookware present a risk of fire or clothing ignition. Never let flames extend beyond the sides of the cookware. Failure to comply may result in serious injury. Make sure all burners are in their correct locations and fully assembled before attempting to operate any burner. Select a burner and find its control knob. Push the knob in and turn it to the LITE position.
You will hear a clicking noise— the sound of the electric spark igniting the burner. When one burner is turned to LITE, all burners will spark. Sparking will continue as long as the knob remains at LITE. Once gas is ignited, turn the knob to adjust the flame size.

Selecting a Flame Size
Watch the flame, not the knob, as you adjust heat. When rapid heating is desired, the flame size should match the size of the cookware you are using. Flames larger than the bottom of the cookware will not heat faster and may be hazardous.

Using the Surface Burners
NOTES:
- Do not operate the burner for an extended period of time without cookware on the grate. The finish on the grate may discolor or chip without cookware to absorb the heat.
- Do not attempt to disassemble any burner while another burner is on. Damage to the product may occur.
- Be sure the burners and grates are cool before you place your hand, a pot holder or cleaning materials on them.
Your cooktop has sealed gas burners that offer convenience, cleanability and flexibility for a wide range of cooking applications. The smallest burner is the simmer burner. A simmer burner turned down to LO provides precise cooking performance for foods such as delicate sauces that require low heat for a long cooking time. The extra-large burner is designed to quickly bring large amounts of liquid to a boil. Some models have a POWER BOIL™ setting especially designed for use with cookware with a diameter of 11 inches or larger.
Types of Surface Burners
Round Burner (on some models)
Use this burner for general cooking purposes. Size cookware appropriately to the flames.

Multi-Ring Burner (on some models)
Use this burner for large cookware or for simmering applications.

Multi-Ring Burner (some models)
For large cookware, activate all rings by setting the burner between Hi and Med.

For small cookware or low heating applications, only activate the inner rings by setting the burner between Lo and Sim.

Control Lock (on some models)
To lock the cooktop and prevent unwanted use, turn the control lock knob clockwise to Locked. An indicator light will illuminate when the cooktop is locked. When locked, gas flow to the burners is prevented. Burners will spark if a knob is turned, but will not ignite. To unlock, turn the control lock knob to Unlocked.

Cooktop Cookware
Aluminum: Medium-weight cookware is recommended because it heats quickly and evenly. Most foods brown evenly in an aluminum skillet. Use saucepans with tightfitting lids when cooking with minimum amounts of water.
Stainless Steel: This metal alone has poor heating properties and is usually combined with copper, aluminum or other metals for improved heat distribution. Combination metal skillets usually work satisfactorily if they are used with medium heat or as the manufacturer recommends.
Cast-Iron: If heated slowly, most skillets will give satisfactory results.
Enamelware: Under some conditions, the enamel of some cookware may melt. Follow the cookware manufacturer's recommendations for cooking methods.
Glass: There are two types of glass cookware—those for oven use only and those for surface burner cooking (saucepans, coffee and teapots). Glass conducts heat very slowly.
Heatproof Glass Ceramic: Can be used for either surface or oven cooking. It conducts heat very slowly and cools very slowly. Check the cookware manufacturer's directions to be sure it can be used on gas surface burners.
Stove Top Grills
Do not use an after-market stove top grill on your gas surface burners. A stove top grill will cause incomplete combustion resulting in carbon monoxide levels above allowable standards. This could be hazardous to your health.

Griddle Accessory (available on some models)

Fire Hazard
- Use care when cooking greasy foods. Spilled grease may result in fire.
- Never place any items on the griddle when it is not in use. Heat from surrounding burners can heat the griddle and may result in fire.
- Place and remove the griddle only when griddle is cool and all surface burners are turned Off.
Using Your Cast-Iron Griddle (on some models)
Your griddle provides an extra-large cooking surface for meats, pancakes and other foods usually prepared in a skillet. Before first use, rinse with hot water and dry thoroughly. Prepare the surface with cooking spray or vegetable oil.
Griddle Precautions:
- Do not place the griddle in a microwave oven.
- Do not clean your griddle in the dishwasher.
- If something has spilled under the griddle, it should be cleaned up as soon as possible to prevent "baked on" food soil.
- Do not allow grease to accumulate under the griddle as it can be a fire hazard. Clean under the griddle with hot, soapy water as soon as it is cool.
Positioning Your Griddle
The cast-iron griddle (on some models) can only be used over the left burners of the cooktop. To position the griddle, place the griddle on top of the left grate. Adjust the griddle until it is fully seated and sitting flat on the grate below. Do not turn on the left burners until you are certain the griddle has been positioned correctly.
Preheating Your Griddle
Preheat your griddle by setting both left burners to Hi for 5 minutes before placing food on the griddle. Once the griddle is preheated, turn the knob on each left burner to the griddle zone and use the cook setting outlined in the table below.
Preseasoned Cast-Iron Griddle
| Type of Food | Cook Setting |
| Bacon | Med |
| Breakfast Sausage Links | Med |
| Eggs | Lo |
| Grilled Cheese | Med-Lo |
| Hamburgers | Med-Lo |
| Pancakes | Med-Lo |
| Warming Tortillas | Lo |
Cook settings may need to be reduced if the griddle is used for an extended time.

Care And Cleaning
Cleaning the Cooktop
Cooktop Surface
Do not use oven cleaners, abrasive cleansers, strong liquid cleansers, steel wool, plastic scouring pads, or cleaning powders on the cooktop surface. Clean with a mild soap and water or a 50/50 solution of vinegar and water. Rinse with clean water and dry with a soft cloth. When cleaning surfaces, make sure that they are at room temperature and not in direct sunlight.
Spillage of marinades, fruit juices, tomato sauces and basting liquids containing acids may cause discoloration and should be wiped up as soon as hot surfaces cool, then clean and rinse.
Stainless Steel Surfaces (on some models)
Do not use a steel wool pad; it will scratch the surface.
To clean the stainless steel surface, use warm sudsy water or a stainless steel cleaner or polish. Always wipe the surface in the direction of the grain. Follow the cleaner instructions for cleaning the stainless steel surface.
Cleaners with oxalic acid such as Bar Keepers Friend Soft Cleanser™ will remove surface rust, tarnish and small blemishes. Use only a liquid cleanser free of grit and rub in the direction of the brush lines with a damp, soft sponge.
To inquire about purchasing cleaning products including stainless steel appliance cleaner or polish, see the Accessories and Consumer Support sections at the end of this manual.
Cleaning Knobs
For easier cleaning, the control knobs may be removed by pulling them directly upwards once the knobs are in the OFF position. The knobs can be washed by hand with soap and water or in a dishwasher.
To replace knobs after cleaning, align the hole on the knob backside with the gas valve shaft and push downward until the knob is securely fastened. All knobs are interchangeable except control lockout (on some models).

Removal of Surface Burners for Cleaning
Turn all controls OFF. Allow cooktop to cool before removing grates and burner parts. When removing the burner caps and heads, remember their size and location. Replace them in the same location after cleaning.

Cleaning the Surface Burners
Cleaning the Burner Caps
Wash burner caps in hot, soapy water and rinse with clean water. You may scour with a plastic scouring pad to remove burned-on food particles. The round burner caps may also be cleaned in your dishwasher.
Cleaning the Burner Heads
Wash the burner heads routinely, especially after bad spillovers which could clog the burner openings. Lift burners off when cool. Wash with hot, soapy water. Rinse with clean water. For more stubborn stains, use a brush with plastic bristles.
NOTE: Do not use steel wool or scouring pads to clean the burner parts as these may clog the openings. Never wash burner heads in your dishwasher. Doing so may cause them to discolor.
The ports in the burner heads must be kept clean at all times for an even, unhampered flame.
Clogged or dirty burner ports or electrodes will not allow the burner to operate properly.
Replacing Surface Burners
Before replacing the burner caps, heads and oval head/ cap assembly, shake out excess water and allow them to dry thoroughly.
Replace burner heads in the correct locations according to size. Ensure each cap is properly seated on the burner head, as pictured below.

Do not operate the cooktop without all burner parts and grates in place.
Any spill on or around an electrode must be carefully cleaned. Avoid hitting the electrode with anything hard or it could be damaged.
The electrode of the spark igniter is exposed when the burner head is removed. When one burner is turned to LITE, all the burners spark. Do not attempt to disassemble or clean around any burner while another burner is on.

Burner Grates
Manual Cleaning
Grates should be washed in hot, soapy water and rinsed with clean water. To soften burned-on food, place grates in a solution containing ¼-cup of household ammonia for several hours. Afterward, scrub grates with a plastic scouring pad soaked in hot, soapy water. Rinse well and dry.
Oven Cleaning
Some models have grates that can be cleaned in a selfcleaning oven. If grates do NOT have rubber bumpers (pads) attached to the bottom of the grates, they may be cleaned in the oven using the self-clean cycle. See your oven's Owner's Manual for specific instructions. If self-cleaning instructions are not mentioned in Owner's Manual, the grates should not be cleaned in a selfcleaning oven.
Dishwasher Cleaning
The grates may be cleaned in the dishwasher. Remove any burnt-on food particles prior to placing the grates in the dishwasher. Place them on the lowest rack of the dishwasher and run on a "heavy duty" cycle.
Do not operate a burner for an extended period of time without cookware on the grate. The finish on the grate may chip without cookware to absorb the heat.
Although the grates are durable, they will gradually lose their shine, regardless of the best care you can give them. This is due to their continual exposure to high temperatures and abrasion by the cookware.
NOTE: Use caution when removing the grates from the oven after the self-clean cycle has ended. The grates may still be hot. Once the self-clean cycle is complete, the grates may carefully be removed. You may notice a white residue on the grates. Wipe it off with a damp sponge. If white spots persist, wet the sponge with a 50/50 solution of vinegar and water and wipe the grates again. When replacing the grates on the cooktop, be sure to locate them correctly. Grates should fit securely into the cooktop.
Grate Support Bumpers (on some models)
If any of the rubber grate support bumpers in the cooktop are missing or damaged, replacement parts can be obtained by visiting cafeappliances.com/part.
To insert the new bumpers, simply place the coneshaped end of the bumper into the hole in the cooktop and push down while gently twisting the bumper.

Griddles (on some models)
Cast-Iron: Clean your cast-iron griddle with a stiff brush and hot water. Using soap is not recommended, and harsh detergents should never be used as they will remove the seasoning. Rinse with hot water and dry thoroughly. After rinsing, preseason the griddle by applying a light coat of cooking oil to the griddle surface. Wipe off excess oil with a paper towel.
Store in a cool, dry place.
Griddle Precautions:
- If something has spilled under the griddle, it should be cleaned up as soon as possible to prevent the spill from getting baked onto the cooktop.
- Do not allow grease to accumulate under the griddle as it can be a fire hazard. Clean under the griddle with hot, soapy water as soon as it is cool.
- Do not wash your griddle in the dishwasher.
- Do not clean the griddle in the self-cleaning oven.
Troubleshooting Tips
Before you schedule service
Save time and money! Review the charts on the following pages first and you may not need to schedule service.
| Problem | Possible Causes | What To Do | ||||
Burners have yellow or yellowtipped flames | The combustion quality of burner flames needs to be determined visually. | Determine the quality of flames visually. Normal burner flames should look like (A) or (B).
| ||||
Control knobs will not turn | Knob isn't pushed down. | To turn from the OFF position, push the knob down and then turn. | ||||
Burners do not light | Plug on cooktop is not completely inserted in the electrical outlet. | Make sure electrical plug is plugged into a live, properly grounded outlet. | ||||
| Gas supply not connected or turned on. | See the Installation Instructions that came with your cooktop. | |||||
| A fuse in your home may be blown or the circuit breaker tripped. | Replace the fuse or reset the circuit breaker. | |||||
| Burner parts not replaced correctly. | See the Cleaning the Cooktop section. | |||||
| The electrodes under the burners are soiled. | See the Cleaning the Cooktop section. | |||||
| Cooktop is locked. | Unlock the cooktop. See the Using the Cooktop section. | |||||
| The igniter hole (on some models) is plugged. | See the Cleaning the Cooktop section. | |||||
Ticking sound of igniter persists after burner lights | Control knob is still in the LITE position. | Turn the knob out of the LITE position to the desired setting. | ||||
| Turn the burner off and relight. If ticking is still present, call for service. | ||||||
Top burners do not burn evenly | Improper burner assembly. | Make sure the burner caps are seated correctly. See the Care and Cleaning of the range section. | ||||
| Burner slots on the side of the burner may be clogged. | Remove the burners for cleaning. See the Care and Cleaning of the range section. |


Accessories
Looking For Something More?
Café offers a variety of accessories to improve your cooking and maintenance experiences!
Refer to the Consumer Support page for phone numbers and website information.
The following products and more are available:
Cleaning Supplies
- CitruShine Stainless Steel Wipes
- Stainless Steel Polishing Cloth
- Cerama Bryte ® Burnt-On Grease Remover
Write the model and serial numbers here:
Model #
Serial #
You can find them on a label under the cooktop.
IMPORTANT SAFETY INFORMATION
READ ALL INSTRUCTIONS BEFORE USING THE APPLIANCE
Read all safety instructions before using the product. Failure to follow these instructions may result in fire, electrical shock, serious injury or death.
If the information in these instructions is not followed exactly, a fire or explosion may result, causing property damage, personal injury or death.
- Do not store or use gasoline or other flammable vapors and liquids in the vicinity of this or any other appliance.
- WHAT TO DO IF YOU SMELL GAS
- Do not try to light any appliance.
- Do not touch any electrical switch.
- Do not use any phone in your building.
- Immediately call your gas supplier from a neighbor's phone. Follow the gas supplier's instructions.
- If you cannot reach your gas supplier, call the fire department.
- Installation and service must be performed by a qualified installer, service agency or the gas supplier.
NEVER OPERATE THE TOP COOKING SECTION OF THIS APPLIANCE UNATTENDED
- Failure to follow this warning statement could result in fire, explosion, or burn hazard that could cause property damage, personal injury, or death.
- If a fire should occur, keep away from the appliance and immediately call your fire department.
DO NOT ATTEMPT TO EXTINGUISH AN OIL/ GREASE FIRE WITH WATER.
KEEP FLAMMABLE MATERIALS AWAY FROM THE COOKTOP Failure to do so may result in fire or personal injury.
- Do not store or use flammable materials near the cooktop, including paper, plastic, pot holders, linens, wall coverings, curtains, drapes and gasoline or other flammable vapors and liquids.
- Never wear loose-fitting or hanging garments while using the cooktop. These garments may ignite if they contact hot surfaces causing severe burns.
- Do not let cooking grease or other flammable materials accumulate in or near the cooktop. Grease on the cooktop may ignite.
IN THE EVENT OF A FIRE, TAKE THE FOLLOWING STEPS TO PREVENT INJURY AND FIRE SPREADING
- Do not use water on grease fires. Never pick up a flaming pan. Turn the controls off. Smother a flaming pan on a surface unit by covering the pan completely with a well-fitting lid, cookie sheet or flat tray. Use a multipurpose dry chemical or foam-type fire extinguisher.
GENERAL SAFETY INSTRUCTIONS
NEVER use this appliance as a space heater to heat or warm the room. Doing so may result in carbon monoxide poisoning and overheating of the oven.
- Use this appliance for its intended purpose as described in this owner's manual.
- Have your cooktop installed and properly grounded by a qualified installer in accordance with the provided installation instructions.
- Any adjustment and service should be performed only by a qualified gas cooktop installer or service technician. Do not attempt to repair or replace any part of your cooktop unless it is specifically recommended in this manual.
- Your cooktop is shipped from the factory set for use with natural gas. It can be converted for use with propane gas. If required, these adjustments must be made by a qualified technician in accordance with the installation instructions and local codes. The agency performing this work assumes responsibility for the conversion.
- Have the installer show you the location of the cooktop gas shut-off valve and how to turn it off if necessary.
- Plug your cooktop into a 120-volt grounded outlet only. Do not remove the round grounding prong from the plug. If in doubt about the grounding of the home electrical system, it is your responsibility and obligation to have an ungrounded outlet replaced with a properly grounded, three prong outlet in accordance with the National Electrical Code. Do not use an extension cord with this appliance.
- Before performing any service, unplug the cooktop or disconnect the power supply at the household distribution panel by removing the fuse or switching off the circuit breaker.
- Be sure all packing materials are removed from the cooktop before operating to prevent ignition of these materials.
- Avoid scratching or impacting cooktop or control panel. Doing so may lead to glass breakage. Do not cook on a product with broken glass. Shock, fire, or cuts may occur. Contact a qualified technician immediately.
- Do not remove the 6 black Z brackets screwed to the bottom of the cooktop (on some models).
- Do not leave children alone or unattended in an area where an appliance is in use. They should never be allowed to climb, sit or stand on any part of the appliance.
-
![]()
Do not store items of interest to children in cabinets above a cooktop - children climbing on the cooktop to reach items could be seriously injured. - Use only dry pot holders—moist or damp pot holders on hot surfaces may result in burns from steam. Do not let pot holders touch surface burners or burner grate. Do not use a towel or other bulky cloth in place of pot holders.
- Be careful not to touch hot surfaces of the cooktop.
- Do not heat unopened food containers. Pressure could build up and the container could burst, causing an injury.
- Cook food thoroughly to help protect against foodborne illness. Minimum safe food temperature recommendations can be found at IsItDoneYet.gov and fsis.usda.gov. Use a food thermometer to take food temperatures and check several locations.
COOKTOP SAFETY INSTRUCTIONS
- Never leave the surface burners unattended at medium or high heat settings. Foods, especially oily foods, may ignite resulting in fire that could spread to surrounding cabinets.
- Never leave oil unattended while frying. If allowed to heat beyond its smoking point, oil may ignite resulting in fire that may spread to surrounding cabinets. Use a deep fat thermometer whenever possible to monitor oil temperature.
- To avoid oil spillover and fire, use the minimum amount of oil when using a shallow pan-frying and avoid cooking frozen foods with excessive amounts of ice.
- Use proper pan size and avoid pans that are unstable or easily tipped. Select cookware that is matched to the size of the burner. Burner flames should be adjusted so that they do not extend beyond the bottom of the pan. Excessive flame may be hazardous.
- Always use the LITE position when igniting the top burners and make sure the burners have ignited.
- When using glass/ceramic cookware, make sure it is suitable for cooktop service; others may break because of sudden change in temperature.
- To minimize the possibility of burns, ignition of flammable materials and spillage, the handle of a container should be turned toward the center of the cooktop without extending over nearby burners.
- Do not use a wok with a round metal support ring. The ring may trap heat and block air to the burner resulting in a carbon monoxide hazard.
- Do not attempt to lift the cooktop. Doing so may damage the gas tubing to the surface burners resulting in a gas leak and risk of fire.
- When disabling gas lockout (on some models), make sure the surface controls are set to the OFF position. This will prevent unintended gas flow from the burners.
- Do not use aluminum foil to cover the grates or line any part of the cooktop. Doing so may result in carbon monoxide poisoning, overheating of the cooktop surfaces, or a potential fire hazard.
How to Remove Protective Shipping Film and Packaging Tape
Carefully grasp a corner of the protective shipping film with your fingers and slowly peel it from the appliance surface. Do not use any sharp items to remove the film. Remove all of the film before using the appliance for the first time. To assure no damage is done to the finish of the product, the safest way to remove the adhesive from packaging tape on new appliances is an application of a household liquid dishwashing detergent. Apply with a soft cloth and allow to soak.
NOTE: The adhesive must be removed from all parts. It cannot be removed if it is baked on. Consider recycling options for your appliance packaging material.
READ AND SAVE THESE INSTRUCTIONS
Documents / ResourcesDownload manual
Here you can download full pdf version of manual, it may contain additional safety instructions, warranty information, FCC rules, etc.
Advertisement


Need help?
Do you have a question about the CGP95362MS1 and is the answer not in the manual?
Questions and answers