
Summary of Contents for ADT Pulse GD00Z-6
- Page 1 ® GARAGE DOOR OPENER REMOTE COMMAND CONTROLLER with TILT SENSOR GD00Z-6 Installation Instructions...
- Page 2 Regulatory Information Regulatory Information Z-Wave ® is a registered trademark of Sigma Designs Inc. and/or its subsidiaries. • • Changes or modifications not expressly approved by the manufacturer could void the user’s authority to operate the equipment. • Les changements ou modifications non approuvés expressément par la partie responsable de la conformité...
-
Page 3: Table Of Contents
Table of Contents Product Description ............2 Overview . -
Page 4: Product Description
◊ The GD00Z-6 is a garage door opener remote command transceiver with built-in Z-Wave® technology. ◊ Allows remote operation of a garage door opener using the ADT Pulse touch screen, web portal, or mobile app. ◊ Z-Wave is an Interoperable two-way RF mesh networking technology designed for use with a Z-Wave gateway/controller and other Z-Wave enabled devices. -
Page 5: Package Contents
• The Controller — The Controller wires to the garage door opener’s pushbutton terminals, receives door status from the tilt sensor, and communicates with the ADT Pulse system. • The Tilt Sensor — The battery powered Tilt Sensor monitors the position of the garage door and sends the status to the Controller. -
Page 6: Tilt Sensor Installation
Tilt Sensor Installation Mounting the Tilt Sensor The battery powered Tilt Sensor attaches to the top panel of the garage door. 1. Before installation, activate the Tilt Sensor by pulling and removing the battery protection strip. 2. If using screws to mount the Tilt Sensor, open the sensor case with a small screwdriver. 3. -
Page 7: Enrolling With The System
Enrolling with the System Enrolling the Garage Door Controller Before the system can be used, the ADT Pulse system needs to enroll the Garage Door Controller. Bring the Controller near your ADT Pulse Gateway and apply power to the Garage Door Controller. - Page 8 NOTE: Adding the Garage Door Controller can take one to three minutes. A successful inclusion is also indicated by three short audible beeps. NOTE: If adding the device to a S2 compliant system, when prompted, enter the DSK information located on QR code label on the bottom of the GD00Z-6.
- Page 9 Enrolling with the System (Cont.) 9. When the device is successfully recognized, the Z-Wave Device Details screen opens. Enter a name for the device, and then click Save at the upper right. 10. Click Go Back, and then Close the exit Manage Devices. 11.
-
Page 10: Resetting Or Excluding The Garage Door Controller
Enrolling with the System (Cont.) Resetting or Excluding the Garage Door Controller If you have trouble adding the Garage Door Controller you can reset the device. Resetting the device removes it from a site (Not the same as factory resetting the device). You can then try to add the device again. -
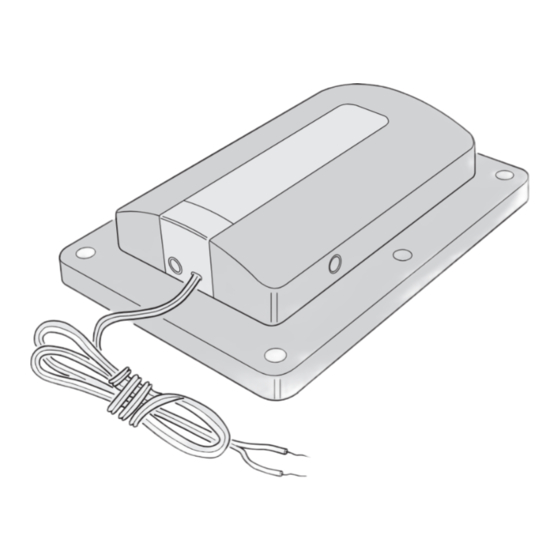
Page 11: Controller Mounting
LAMP MUST BE VISIBLE IN ALL DOOR POSITION S Figure 4. Controller Components TYPICAL MOUNTING METHOD ALTERNATE MOUNTING METHOD THE GD00Z-6 CAN ALSO BE ATTACHED TO THE OPENER'S HARDWARE USING THE ADJUSTABLE MOUNTING BRACKE T SECURE USE THE FOUR SCREWS THE OPTIONAL ADJUSTABLE... -
Page 12: Controller Connections
The Garage Door Controller wires to the garage door opener with a two wire connection. 1. Connect the GD00Z-6 connection wires to the two pushbutton terminals on the garage door opener. The terminals on various models may have different names. Either wire can connect to either terminal. -
Page 13: System Operation
System Operation Opening and Closing the Garage Door After the installation is complete, the garage door opener can be activated by the ADT Pulse system and the door’s status can be viewed through the system. 1. Restore power to the garage door opener. -
Page 14: Operation Notes
If the second attempt fails, the Controller will go into lock-out mode. See next paragraph. ◊ If the GD00Z-6 is in lock-out mode and will not accept remote commands, activate the door from the pushbutton wall console. -
Page 15: Troubleshooting
2. Make sure that the GD00Z-6 connection wires are connected to the proper terminals on the garage door opener. Trace the wires from the garage door opener’s pushbutton wall... - Page 16 ® Copyright © 2018 Nortek Security & Control 10015084A X1...
Need help?
Do you have a question about the GD00Z-6 and is the answer not in the manual?
Questions and answers