
Related Manuals for CPS KNIGHT Flex OPL


Summary of Contents for CPS KNIGHT Flex OPL
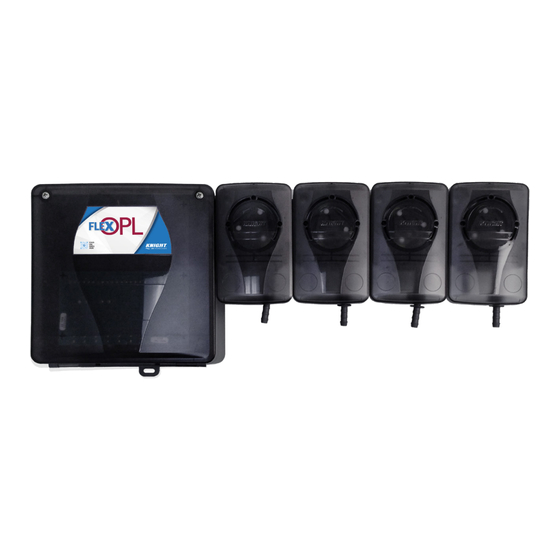
- Page 1 INSTRUCTION MANUAL # 0901240 VERSION: MANUAL 2024-0118 DATE: Flex OPL Example Flex OPL installation: • Base Unit (#7550000) • 500 Series pumps (#7550014) • SIB module (#7550020) • Remote (#7550011)
-
Page 2: Equipment Ratings
Flex OPL Instruction Manual T T A A B B L L E E O O F F C C O O N N T T E E N N T T S S Pre-Installation .......................3 Pre-Installation ...................... Installation ........................3 Installation ...................... - Page 3 Flex OPL Instruction Manual P P R R E E - - I I N N S S T T A A L L L L A A T T I I O O N N Before the equipment is installed, you should survey the installation site thoroughly. At the very least, your survey should include the following: •...
- Page 4 Flex OPL Instruction Manual O O P P E E R R A A T T I I O O N N NOTE: Do not run more than 3 pumps at a time in any of the operating modes listed below. ❑...
-
Page 5: Screen Colors
Flex OPL Instruction Manual K K E E Y Y P P A A D D D D I I A A G G R R A A M M LED Colors (page LED Colors (page • Amber – communication •... - Page 6 Flex OPL Instruction Manual P P R R O O G G R R A A M M M M I I N N G G 01 FORMULA 01 All systems are shipped from the factory with the access code set at 000. Changing the access code is explained later in this manual.
- Page 7 Flex OPL Instruction Manual P P R R O O G G R R A A M M M M I I N N G G ( ( C C O O N N T T I I N N U U E E D D ) ) Press ENTER to clear load counts.
- Page 8 Flex OPL Instruction Manual P P R R O O G G R R A A M M M M I I N N G G ( ( C C O O N N T T I I N N U U E E D D ) ) DISPENSER ID Use the ▲/▼...
- Page 9 Flex OPL Instruction Manual P P R R O O G G R R A A M M M M I I N N G G ( ( C C O O N N T T I I N N U U E E D D ) ) This selection allows you to choose if you wish to use multiple pump PUMP LEVELS level programming.
- Page 10 Flex OPL Instruction Manual P P R R O O G G R R A A M M M M I I N N G G ( ( C C O O N N T T I I N N U U E E D D ) ) WASHER WEIGHT This selection allows you to enter the load capacity for the wash wheel that the dispenser is presently connected to.
- Page 11 Flex OPL Instruction Manual P P R R O O G G R R A A M M M M I I N N G G ( ( C C O O N N T T I I N N U U E E D D ) ) TUBES CHANGED Use the ▲/▼...
- Page 12 Flex OPL Instruction Manual P P R R O O G G R R A A M M M M I I N N G G ( ( C C O O N N T T I I N N U U E E D D ) ) LOGO Use the ▲/▼...
- Page 13 Flex OPL Instruction Manual E E R R R R O O R R S S C C R R E E E E N N S S This error will occur if the flow switch on the flush manifold breaks contact for longer than the error time.
-
Page 14: Installation
Flex OPL Instruction Manual F F L L E E X X O O P P L L S S O O F F T T W W A A R R E E A A P P P P The Flex OPL software app allows you to use your computer to program setup files for your dispensers and also has functions to generate reports for tracking chemical usage. -
Page 15: Creating A New Location
Flex OPL Instruction Manual L L O O C C A A T T I I O O N N S S Each installation should be setup with a specific customer location to organize dispenser files and reports more effectively. A new location setting creates its own file folder on your computer by allowing you to enter a descriptive name for the location. -
Page 16: Global Settings
Flex OPL Instruction Manual P P R R O O G G R R A A M M M M I I N N G G A A S S E E T T U U P P F F I I L L E E This is the view you will see when you click the Create Program File button. -
Page 17: System Settings
Flex OPL Instruction Manual System Settings This screen allows you to input or change the following settings: • Mode: • Washer Settings: • Delay Time Units: • Levels: • Auto Formula Select: • Lockout Time: • Auto Formula Reset: • Drain Signal: •... -
Page 18: Signal Settings
Flex OPL Instruction Manual Signal Settings This screen allows you to input or change the following settings: • Signal Mode: • Signal Qualifying Time: • Signal Pump Assignments: Version: BX2 2024-0118 Page 18 of 36 0901240 | Rev: BX2 (draft 01/18/24) - Page 19 Flex OPL Instruction Manual Drain Settings This screen allows you to input or change the following settings: • Signal Qualifying Time • Set Drain Counts Version: BX2 2024-0118 0901240 | Rev: BX2 (draft 01/18/24) Page 19 of 36...
- Page 20 Flex OPL Instruction Manual Formula Settings This screen allows you to input or change the following settings: • Formula Name: • Formula Enable: • Pump Volumes & Delay Times: • Copy Formula Function: Version: BX2 2024-0118 Page 20 of 36 0901240 | Rev: BX2 (draft 01/18/24)
-
Page 21: Saving Setup Data
Flex OPL Instruction Manual Saving Setup Data After all fields have been programmed and all data appears correct click on the Save Setup button. The setup file will now appear in the Dispenser Files view where it can be selected then uploaded to the system to start operation. Setup Files are saved in a .set format. - Page 22 Flex OPL Instruction Manual Select the USB flash drive in the Select Drive pull-down. Select the file to copy then click on the Copy button. Repeat for any other setup files. After setup files have been uploaded from the USB drive access the programming menus on the system and check that your settings have transferred properly.
- Page 23 Flex OPL Instruction Manual D D O O W W N N L L O O A A D D I I N N G G R R E E P P O O R R T T S S F F O O R R V V I I E E W W I I N N G G / / M M A A N N A A G G I I N N G G (1) Follow the procedures in this manual for instructions on downloading reports to a USB drive.
-
Page 24: Setup Report
Flex OPL Instruction Manual Setup Report The complete setup report contains the entire settings record for operation of the system Version: BX2 2024-0118 Page 24 of 36 0901240 | Rev: BX2 (draft 01/18/24) -
Page 25: Summary Reports
Flex OPL Instruction Manual Summary Reports This report provides “easy to consume” data on wash cycles run, chemical usage and washer productivity. Version: BX2 2024-0118 0901240 | Rev: BX2 (draft 01/18/24) Page 25 of 36... - Page 26 Flex OPL Instruction Manual Cycle report This is the most important report in terms of managing chemical usage, cleaning quality, and operation of the dispensers. Version: BX2 2024-0118 Page 26 of 36 0901240 | Rev: BX2 (draft 01/18/24)
- Page 27 Flex OPL Instruction Manual Exporting to Excel format Anytime a Flex OPL report is open for viewing you can choose to save the file in an Excel format by simply clicking on the “Save to Excel File” button located in the upper left of the report viewer. The Excel version of the report appears in the System Files directory in the column marked Excel Reports.
- Page 28 Flex OPL Instruction Manual P P A A R R T T S S D D I I A A G G R R A A M M — — S S Y Y S S T T E E M M L L A A Y Y O O U U T T System Layout Reference Item Part No...
- Page 29 Flex OPL Instruction Manual P P A A R R T T S S D D I I A A G G R R A A M M — — 7 7 5 5 5 5 0 0 0 0 0 0 0 0 Base, Flex OPL Part No Description...
- Page 30 Flex OPL Instruction Manual P P A A R R T T S S D D I I A A G G R R A A M M — — 7 7 5 5 5 5 0 0 0 0 1 1 5 5 Pump Kit, 800 Series 110 RPM Part No Description...
- Page 31 Flex OPL Instruction Manual P P A A R R T T S S D D I I A A G G R R A A M M — — 7 7 5 5 5 5 0 0 0 0 1 1 4 4 Pump Kit, 500 Series 200 RPM Part No Description...
- Page 32 Flex OPL Instruction Manual P P A A R R T T S S D D I I A A G G R R A A M M — — F F L L U U S S H H M M A A N N I I F F O O L L D D W W I I T T H H O O U U T T F F L L O O W W S S W W I I T T C C H H Flush Manifold without Flow Switch Part No Description 0300363 Check Valve, 1/2 FNPT, EPDM...
- Page 33 Flex OPL Instruction Manual P P A A R R T T S S D D I I A A G G R R A A M M — — F F L L U U S S H H M M A A N N I I F F O O L L D D W W I I T T H H F F L L O O W W S S W W I I T T C C H H Flush Manifold Part Nor Description...
- Page 34 Flex OPL Instruction Manual S S Q Q U U E E E E Z Z E E T T U U B B E E R R E E P P L L A A C C E E M M E E N N T T Remove / install pump face plate Removal or installation of the pump face plate for maintenance purposes should ONLY be performed by qualified and trained personnel who are considered the Responsible Body for the system.
- Page 35 Flex OPL Instruction Manual W W I I R R I I N N G G D D I I A A G G R R A A M M Version: BX2 2024-0118 0901240 | Rev: BX2 (draft 01/18/24) Page 35 of 36...
- Page 36 D D I I S S C C L L A A I I M M E E R R Knight LLC does not accept responsibility for the mishandling, misuse, or non-performance of the described items when used for purposes other than those specified in the instructions. For hazardous materials information consult label, MSDS, or Knight LLC.
Need help?
Do you have a question about the KNIGHT Flex OPL and is the answer not in the manual?
Questions and answers