Advertisement
Quick Links
BC541E42
Four-channel HDCVI Recording Kit
UNPACKING
❶
Your system includes the following:
• 4 x HDCVI Dome Cameras
• 4 x Hardware Packs, with:
Moun ng Template,
Expansion Bolts (3),
Self-tapping Screws (3), Hex Wrench,
Startup Guide, and So ware CD
• 1 x 4-channel HDCVI DVR, with:
Pre-installed 2 TB HDD,
12 VDC Power Supply,
Ethernet Cable, Mouse,
Hard Drive SATA Cable, HD Hardware,
Startup Guide, and So ware CD
DIMENSIONS
❹
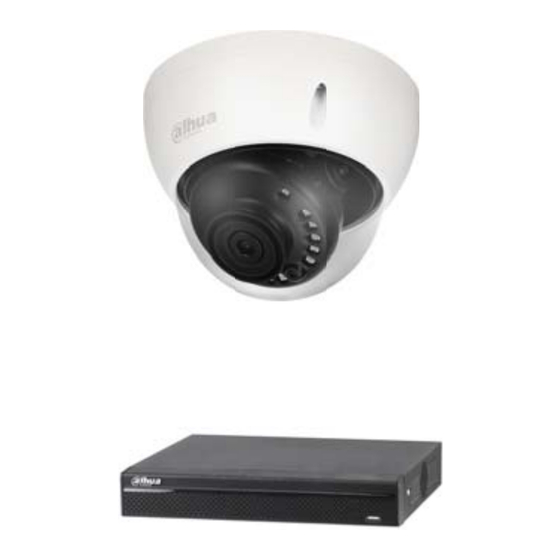
Camera and HDCVI DVR
❷
Cameras
HDCVI DVR
1
Video Output
2
Power Input
❺
• Ensure the wall or ceiling can support 3x the weight of the
camera.
• Do not connect the camera to the power supply during
installa on.
• Connect a 12 VDC power supply to the power input cable.
• Connect a coaxial cable with BNC connector to the Video
Out cable.
CONNECTIONS
Camera Connec ons
HDCVI, CVBS, AHD, TVI
12 VDC
INSTALLATION
Mount and Make Connec ons
CONNECTIONS
❸
HDCVI DVR Connec ons
1
Analog Video IN (x4)
7
2
Audio OUT
8
3
HDMI OUT
9
4
RJ-45
10
5
RS485 (A/B)
11
6
USB 2.0
INSTALLATION
❻
Posi oning the Camera
• Loosen, but do not remove the set screws on either side of
the bracket that holds the camera.
• Tilt the camera to adjust the lt angle (0° to +65°). Tighten
the two locking screws on the bracket to lock the lt angle.
• Turn the camera module to adjust image pan orienta on
(0° to +355°).
• Turn the camera base to adjust the rota on of the camera
(0° to +355°).
12 VDC Power IN
Alarm I/O
On/Off Bu on
Audio IN (x4)
VGA OUT
Advertisement

Related Manuals for Dahua Technology BC541E42

Summary of Contents for Dahua Technology BC541E42
- Page 1 BC541E42 Four-channel HDCVI Recording Kit UNPACKING CONNECTIONS CONNECTIONS ❶ ❷ ❸ Your system includes the following: Camera Connec ons HDCVI DVR Connec ons Cameras • 4 x HDCVI Dome Cameras • 4 x Hardware Packs, with: Moun ng Template, Expansion Bolts (3),...
- Page 2 Main stream and sub stream se ngs Rev. 001.005. Copyright © 2017 Dahua Technology. All rights reserved. Information contained in this document is subject to change without prior notice. Dahua does its best to provide accurate information, but cannot be held responsible for typos or mistakes.
Need help?
Do you have a question about the BC541E42 and is the answer not in the manual?
Questions and answers