Advertisement
- 1 Introduction
- 2 Specifications
- 3 Product Requirements
- 4 Product Diagram
- 5 WiFi Indicator
- 6 Installation
- 7 VeSync App Setup
- 8 Configuration
- 9 Using the App
- 10 Device Settings
- 11 Share Your Device
- 12 Delete the Device
- 13 More Features
- 14 Maintaining Your Device
- 15 Troubleshooting
- 16 Safety Information
- 17 Customer Support
- 18 Documents / Resources
Introduction
The smart dimmer switch allows you to control lights, such as LED, fluorescent, halogen, and incandescent bulbs, using your iOS or Android smartphone. With the VeSync app, connect the smart dimmer switch to your home WiFi network to control your lights from anywhere, at any time.
If you have any questions or concerns, please reach out to our helpful Customer Support Team at support@etekcity.com.
Become an Etekcitizen
Exclusive deals, giveaways, and product registration.
Better products for better living.
Find us here: etekcity.com
Specifications
| Dimensions | 4.92 x 3.14 x 1.67 in / 12.5 x 8 x 4.25 cm |
| Communication Mode | IEEE802.11b/g/n (WiFi) |
| Communication Frequency | 2.4GHz |
| Wireless Distance (Switch to Router) | 98–164 ft / 30–50 m (max visible range) |
| Maximum Load | LED/CFL: 180W Halogen/Incandescent: 400W |
| Power | 120V, 60Hz |
| Operating Environment | 14º–100ºF / -10º–38ºC |
| Storage and Transportation Environment | -4º–158ºF / -20–70ºC |
| Compatible Systems | iOS 8.0 or higher / Android 4.3 or higher |
Note: The number of lights the smart dimmer switch can control depends on the type of bulb and whether multiple dimmer switches are installed in a multi-switch junction box.
For example, if the maximum load is 150W, and you use LED 10W bulbs, then the dimmer switch can support 15 bulbs. If you use LED 15W bulbs, the dimmer switch can support 10 bulbs.
| Single-Switch Junction Box: | |
 | LED/CFL: Maximum 180W Halogen/Incandescent: Maximum 400W |
| Multi-Switch Junction Box (with more than 2 dimmer switches installed): | |
 | LED/CFL: Maximum 150W Halogen/Incandescent: Maximum 300W |
Product Requirements
- In-wall installation with hardwired connections
- Neutral wire (see About the Wires)
- Bulb with dimming capability
Note: If a non-dimming bulb is used, it may burn out.- junction box that is more than 2 inches deep
- smartphone running iOS 8.0 or higher, or running Android 4.3 or higher
- 2.4GHz WiFi connection (supports 802.11b/g/n standard)
Note: The smart dimmer switch is compatible with incandescent, LED, halogen, and compact fluorescent light bulbs.
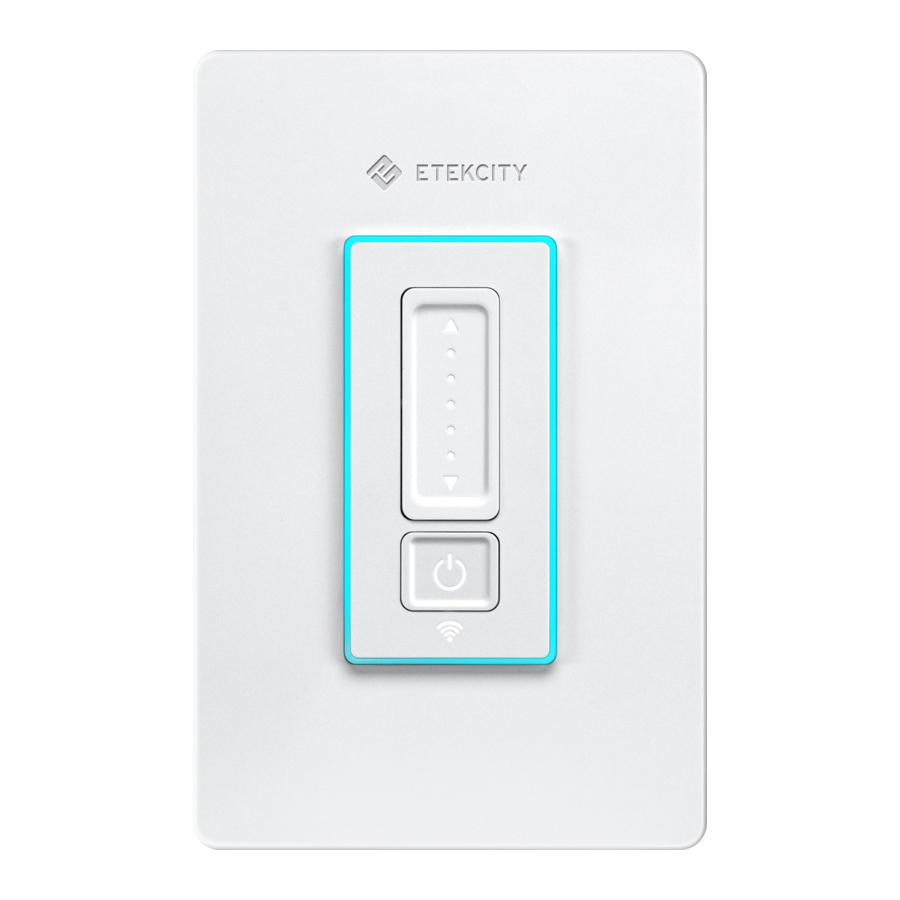
Product Diagram

- Increase Button
- Decrease Button
- Power Button
- RGB Light
- Brightness Level Indicators
- Power Indicator
- WiFi Indicator
Increase / Decrease Buttons
- These buttons raise or lower the brightness level of the light.
Brightness Level Indicators
- The 5 indicators represent the 5 brightness levels. You can turn these indicator lights off in the VeSync app (see Using the App).
RGB Light
- Lights up in a color of your choice. Use the VeSync app to set the color and to turn it on/off (see RGB Light).
Power Button / Indicator
- Use
![]() to turn the light on/off.
to turn the light on/off. - When the switch is OFF, the power indicator will be ON.
- When the switch is ON, the power indicator will be OFF.
- You can turn the indicator light off in the VeSync app (see Using the App).
WiFi Indicator
| WiFi Indicator | Status |
| WiFi Indicator is off | Switch is configured. |
| WiFi Indicator blinks 1 time per second | Switch is in Configuration Mode (see Configuration). |
| WiFi Indicator blinks 4 times per second (10 total times) | Switch is being reset (see Maintaining Your Device). |
| WiFi Indicator blinks 2 times every 5 seconds | Switch has not connected with router. |
| WiFi Indicator blinks 1 time every 5 seconds | Switch has connected with router, but is not connected to the internet. |
Installation
What You'll Need
- Non-contact voltage tester
- Wire nuts (twist-on wire connectors)
- Pliers
- Philips-head screwdriver
- Flathead screwdriver
- Insulated gloves


- Only install the smart dimmer switch if you are familiar and comfortable with electrical work. If not, contact a qualified electrician. Improper installation significantly increases the risk of fire, electric shock, injuries, or even death.
- Wear insulated gloves while installing the smart dimmer switch.
Checking Wires
- Use the voltage tester to test a powered electrical cable to make sure the voltage tester is working. If the voltage tester lights up, it's working.
![shock hazard]() To avoid electric shock, TURN OFF THE POWER by turning off the circuit breaker before installation.
To avoid electric shock, TURN OFF THE POWER by turning off the circuit breaker before installation.
Note: You may need to shut off more than 1 circuit breaker or switch to make sure the power is off.- Unscrew and remove the faceplate from the old switch.
- Use the voltage tester to test around the old switch to make sure that the power is OFF. Flip your switch on and off a few times to confirm. The voltage tester should not light up, and the light should not turn on.
- Unscrew and pull out the old switch (without detaching the wires).
- Check to see if there are 4 wires connected to your old switch. These wires are the ground, load, line (or "live"), and neutral wires. If you do not see at least 4 wires in the junction box, the smart dimmer switch may not be compatible with that junction box. You can check other switches in your home to see if there are compatible junction boxes.
 To avoid electric shock, TURN OFF THE POWER by turning off the circuit breaker before installation.
Connection Schematic

About the Wires

Load
- This wire connects the dimmer switch to appliances. This is the wire that the smart dimmer switch controls. All switches have a load wire.

Line ("Live")
- This wire brings electricity to the dimmer switch. All switches have a line wire.

Never twine the load wire and the line wire together or connect them both to power. Only the line wire should be connected to power.
![]()
Neutral
- Some old switches do not have a neutral wire. However, a neutral wire is required to install the smart dimmer switch. This is because the smart dimmer switch needs to be powered on at all times to operate.
- If you cannot find a neutral wire in your junction box, contact a qualified electrician to rewire the switch.
Never connect the neutral wire with any other wire. This can cause circuit abnormalities or burn out the dimmer switch.

Ground
- A ground wire is not required for the smart dimmer switch to work, as not all switches need ground wires.
- However, if a ground wire is present, it must be connected to the smart dimmer switch.

Wire Nuts
- These are the cap-like objects connecting wires together, also known as twist-on wire connectors.
Removing the Old Light Switch
- After taking off the faceplate and checking the wires, use the voltage tester again to test for any current around the wires.
- Unscrew a wire from the old light switch. Use pliers to straighten the wire. Then, screw a wire nut onto that wire.

- Follow the same steps for the other 3 wires.

Installing the Device
- Make sure you understand the 4 wires on your smart dimmer switch and the wires inside the junction box. Check the labels on the switch next to each wire.

- Connect the white wire to the neutral wire, which is usually white as well, by screwing a wire nut tightly around the 2 wires.
Note: There will often be 2 neutral wires already connected by a wire nut. Connect all the neutral wires together with 1 wire nut. - For extra safety, wrap electrical tape around the wires to make sure the copper conductor is fully concealed.
- Connect the green wire to the ground wire, which is also usually green.
- Connect the black line wire to the line wire, which is usually black or red.
- Connect the red load wire to the load wire, which may be any color except green.
- Push the wires and the wire nuts back into the junction box.
- Attach the dimmer switch to the wall by screwing in the mounting screws.
- Snap the smart dimmer switch faceplate on tightly.
- Turn power back on at the circuit breaker, then test the dimmer switch by turning it on.

VeSync App Setup
Note: Due to continuing updates and improvements, the VeSync app may appear slightly different. In case of any differences, follow the in-app instructions.
- To download the VeSync app, scan the QR code or search "VeSync" in the Apple App Store or Google Play Store.
Note: For Android users, you must select Allow to use VeSync. - Open the VeSync app. If you already have an account, tap Log In. To create a new account, tap Sign Up.


Note: You must create your own VeSync account to use thirdparty services and products, such as the Amazon Echo or Google Home. These will not work with the guest account. With a VeSync account, you can also allow your family or friends to control your smart dimmer switch.
Configuration
Set up your smart dimmer switch with the VeSync app.
- After installing your smart dimmer switch, open the VeSync app.
- Tap
![]() to add your smart dimmer switch.
to add your smart dimmer switch.

- Tap Switches. Then, tap Etekcity Dimmer Switch.

- Follow the in-app instructions to add your smart dimmer switch.


Note: After setup is complete, you can change the name and icon at any time by going to the smart dimmer switch screen and tapping ![]() .
.
![]()
Using the App
Turning the Unit On/Off
To turn the dimmer switch on/off, tap ![]() on the My Home screen or the dimmer switch screen in the VeSync app.
on the My Home screen or the dimmer switch screen in the VeSync app.
Note: The dimmer switch will remain connected to the internet even when it is turned off.
 | Dimmer switch is off |
 | Dimmer switch is on |
Indicator Lights
- From the My Home screen, tap on the name of the dimmer switch to open the dimmer switch screen.
- Tap
![]() to turn on/off the Power Indicator light and Brightness Level Indicator lights.
to turn on/off the Power Indicator light and Brightness Level Indicator lights.
 | Indicator Lights are on |
 | Indicator Lights are off |
Note: This does not control the RGB Light.
RGB Light
Note: This will change the color of the RGB light on the switch, not the color of the light bulb.
- From the My Home screen, tap on the name of the dimmer switch to open the dimmer switch screen.
- Tap
![]() to open the RGB Light settings.
to open the RGB Light settings.

- Select the color of the RGB Light using the palette. Tap
![]() to turn the RGB Light on/off.
to turn the RGB Light on/off.


Schedules
You can use a schedule to turn your smart dimmer switch on/off.
- From the My Home screen, tap on the name of the dimmer switch to open the dimmer switch screen.
- Tap
![]() , then
, then ![]() Create Schedule.
Create Schedule.

- Tap Start and End to set the start and end times. Tap
![]() to confirm the times.
to confirm the times.


Note:
- The dimmer switch will turn off when the End time is reached.
- When selecting a time, tap < for "Sunrise" and > for "Sunset". Allow the VeSync app to access your location to determine when sunrise and sunset are for your area.


- To repeat the schedule, tap Weekly, then tap the desired days.

- Set a specific brightness level for the schedule between 16%–100%.
- Tap Confirm to save the schedule.


Tap Schedule to view a list of all schedules. To remove a schedule, swipe left and tap ![]() . Tap
. Tap ![]() to collapse the list of schedules.
to collapse the list of schedules.
Timer
You can create a timer to turn your smart dimmer switch on/off.
- From the My Home screen, tap on the name of the dimmer switch to open the dimmer switch screen.
- Tap
![]() , then
, then ![]() Create Timer.
Create Timer.

- Scroll up and down to set the time and tap On or Off.
- Tap
![]() to confirm and start the timer. When the timer finishes, the smart dimmer switch will turn on or off based on your selection.
to confirm and start the timer. When the timer finishes, the smart dimmer switch will turn on or off based on your selection.

- Tap
![]() to stop the timer. Tap
to stop the timer. Tap ![]() to restart the timer.
to restart the timer.
Tap![]() to view the timer. To remove the timer, swipe left and tap
to view the timer. To remove the timer, swipe left and tap ![]() . Tap
. Tap ![]() to collapse the timer.
to collapse the timer.


Device Settings
- From the My Home screen, tap on the name of the dimmer switch to open the dimmer switch screen.
- Tap
![]() to see Device Settings. Tap on any setting to change it.
to see Device Settings. Tap on any setting to change it.


Share Your Device
Use Share Device to allow someone else to control your smart dimmer switch (such as family, friends, roommates, or anyone you choose).
Note:
- People who you share your smart dimmer switch with must have a VeSync account.
- Shared users cannot edit or delete any of your device settings.

- From the My Home screen, tap on the name of the dimmer switch to open the dimmer switch screen.
- Tap
![]() to see Device Settings, then tap Share Device.
to see Device Settings, then tap Share Device. - Tap + on the "Share Device" screen.
- Type in the email for the VeSync account you want to share your smart dimmer switch with. Tap Invite.
- Tap
![]() to remove people you have shared your smart dimmer switch with. They will no longer be able to control your smart dimmer switch.
to remove people you have shared your smart dimmer switch with. They will no longer be able to control your smart dimmer switch.
Delete the Device
You can delete the smart dimmer switch from the My Home screen in the VeSync app.
- iOS: Swipe left on the smart dimmer switch's name to delete.

- Android: Press and hold for 2 seconds on the smart dimmer switch's name to delete.


You can also delete the smart dimmer switch from Device Settings.
- From the My Home screen, tap on the name of the dimmer switch to open the dimmer switch screen.
- Tap
![]() to see Device Settings, then tap Delete Device.
to see Device Settings, then tap Delete Device.


More Features
Connecting with Amazon Alexa
To view instructions in the VeSync app, tap More, then tap Link to Alexa.
Note: You must create your own VeSync account to connect with Alexa.
Connecting with Google Assistant
To view instructions in the VeSync app, tap More, then tap Link to Google Assistant.
Note: You must create your own VeSync account to connect with Google Assistant.
Contact Customer Support
You can contact our friendly Customer Support Team through the VeSync app, in addition to the help line.
- To chat directly with our US office Customer Support Team, tap Inbox at the bottom of the screen. Then, tap Online support to send a chat message.
Note: Chat hours are Mon–Fri, 9:00 am–5:00 pm PST/PDT. Messages sent outside chat hours will receive an email response. - To send feedback directly to our VeSync app team, tap More at the bottom of the screen, then tap Contact Us. Please note that our VeSync app team may have a longer response time.
- You can also contact Customer Support by email or phone (see Customer Support).
Maintaining Your Device
Firmware Updates
To keep the smart dimmer switch up to date with the latest improvements and fixes, you should always update the firmware when available.
On the Device Settings screen (see Device Settings), tap Upgrade Firmware.
Resetting
- Delete the dimmer switch from the VeSync app. Swipe left (iOS) or tap and hold (Android), and tap Delete.
- Press and hold the power button for more than 15 seconds, or until the WiFi Indicator blinks white rapidly. The dimmer switch will automatically go into Configuration Mode and the WiFi indicator will start blinking slowly (1 blink per second).
- Reconfigure the dimmer switch with the VeSync app (see Configuration).
Troubleshooting
Why isn't my dimmer switch connecting to the VeSync app?
- During the setup process, you must be on a secure 2.4GHz WiFi network.
- Make sure the WiFi password you entered is correct.
- Your router should be within 164 ft / 50 m visible range of the dimmer switch.
- Your router may need to be at a higher location and away from appliances (such as microwave ovens, refrigerators, electronic devices, etc.) to avoid signal interference.
- Make sure you don't have too many devices connected to your router (10 or fewer is best).
- Close and reopen the VeSync app.
- Clear your VeSync app cache.
- Reset the dimmer switch (see Resetting).
I can't find the Etekcity access point during configuration
- Press and hold the power button on the dimmer switch for 5–15 seconds to trigger Configuration Mode. The "Etekcity" access point will appear in your list of available WiFi connections.
- During Configuration Mode, the LED light on the dimmer switch will slowly blink. You will have 10 minutes to pair the dimmer switch with your phone.
My unit is offline
- Make sure your router is connected to the internet, and your phone's network connection is working properly.
- Delete the offline dimmer switch from the VeSync app. Swipe left (iOS) or tap and hold (Android), and tap Delete.
- Reset the dimmer switch (see Resetting).
- Once the dimmer switch has been deleted and reset, reconfigure the dimmer switch with the VeSync app (see Configuration).
- When the dimmer switch is online again, go to Device Settings (see Device Settings), and tap Upgrade Firmware.
Note: Power outages, internet outages, or changing WiFi routers may cause the dimmer switch to go offline.
After adding my dimmer switch to the VeSync app, why won't the dimmer switch icon appear on the My Home screen?
- Refresh the VeSync menu by swiping down on the screen.
- Close and reopen the VeSync app.
Amazon Alexa or Google Assistant can't find my app or can't discover my dimmer switch.
- Make sure your wireless network router is close enough to the dimmer switch. The dimmer switch must be within a 164 ft / 50 m visible range from the router.
- Check that your Amazon Alexa or Google Assistant is working properly.
Why isn't my dimmer switch turning on/off as scheduled?
- Make sure that the schedule is still turned on. The toggle switch should look like
![]() , not
, not ![]() .
. - Make sure that your phone's Location Services are turned on.
- Make sure the dimmer switch is connected to a working network and is not offline.
If your problem is not listed, please contact Customer Support (see Customer Support).
Safety Information
To reduce the risk of injury and/or damage to this dimmer switch, please read and follow all instructions and safety guidelines in this manual.
Installation

RISK OF ELECTRIC SHOCK OR FIRE
- Before installing and wiring, TURN OFF POWER by locking the appropriate circuit breaker in the OFF position or removing the appropriate fuse. Use a non-contact voltage tester to ensure all electrical power is off. Installing and wiring with active electrical power may result in serious injury or death.
![burn hazard]()
![shock hazard]()
Only install the smart dimmer switch if you are comfortable with electrical work. If not, contact a qualified electrician. Improper installation significantly increases the risk of fire, electric shock, and other injuries.- The smart dimmer switch must be installed and used in accordance with the National Electric Code (NEC) or your local electrical code.
- Do not install the smart dimmer switch with wet hands or when standing on wet or damp surfaces.
Note: Etekcity cannot guarantee the quality of installation, and cannot cover associated costs.
General Safety
![]()
FOR CONTROL OF INCANDESCENT, HALOGEN, CFL, OR LED LUMINAIRES ONLY.- Only use indoors, in a dry location with ambient temperature controls, avoiding extreme heat and freezing temperatures.
- Do not modify the smart dimmer switch hardware or software. This may cause injury or property damage, and will void the warranty.
- Household useonly.
SAVE THESE INSTRUCTIONS
Customer Support
If you have any questions or concerns about your new product, please contact our helpful Customer Support Team.
Etekcity Corporation
1202 N. Miller St., Suite A
Anaheim, CA 92806
Email: support@etekcity.com
Toll-Free: (855) 686-3835
Support Hours
Mon–Fri, 9:00 am–5:00 pm PST/PDT
*Please have your order invoice and order ID ready before contacting Customer Support.

Connect with us @Etekcity
Documents / Resources
References
Download manual
Here you can download full pdf version of manual, it may contain additional safety instructions, warranty information, FCC rules, etc.
Advertisement

Need help?
Do you have a question about the ESWD16 and is the answer not in the manual?
Questions and answers