
Summary of Contents for Maxxus BBQ Chief 12.0
- Page 1 BBQ Chief 12.0 OUTDOOR GAS GRILL USE AND Gasgrill CARE MANUAL Model NO. K106BG2C3 THIS GAS GRILL IS DESIGNED SAVE THESE INSTRUCTIONS FOR 2575-23 FUTURE REFERENCE FOR OUTDOOR USE ONLY...
- Page 2 © 2019 by MAXXUS Group GmbH & Co. KG Alle Rechte vorbehalten / All rights reserved Die Verwertung der Texte und Bilder, auch auszugsweise, ist ohne die schriftliche Zustimmung der MAXXUS Group GmbH & Co. KG urheber- und farbliche Änderungen vorbehalten. Nachdruck sowie jegliche elektronische Vervielfältigung nur mit ausdrücklich schriftlicher Genehmigung der MAXXUS Group GmbH &...
-
Page 3: Safety Instructions
Safety Instructions BEFORE USE: Make sure to read the instructions before assembling and using the grill. The gas grill should only be used outdoors with adequate ventilation. Parts sealed by the manufacturer must not be altered. The user must assemble the gas grill correctly, ensure proper gas cylinder installation, and check for defects before each use. - Page 4 Safety Instructions • If the appliance is not going to be used for a long time, always disconnect the gas cylinder and store it properly. Gas cylinders, even empty ones, must always be stored upright. Always close the gas cylinder valve with the locking nut and cap.
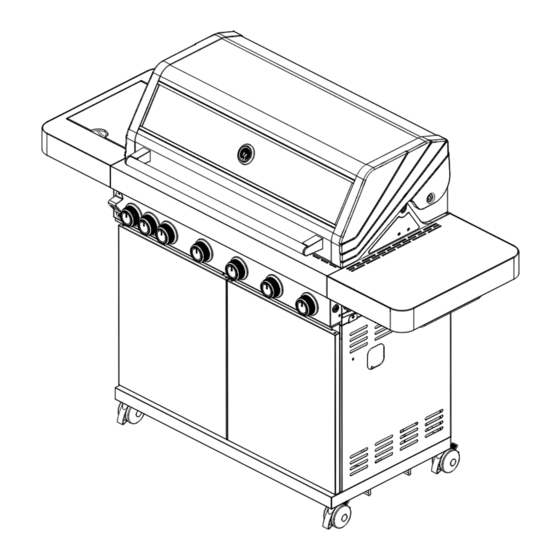
- Page 6 Parts List Components Components Lid assembly Knob Thermometer and thermometer Knob decoration ring holder assembly Lid handle assembly Side burner knob decorative ring Warming rack Light switch 305 cast iron grid Regulator Multifunctional cast iron grid Pulse mounting plate V-shaped flame tamer Pulse igniter circlip Bottle opener...
- Page 7 Assembly Assemble the grill in a level, clean area free of objects that could obstruct the assembly. It is essential to have two people involved in the assembly process. Only use the grill after it has been fully assembled. The assembly of the grill should be performed carefully by adults. Wear protective gloves when unpacking and assembling the components since some may have sharp edges.
- Page 8 Assembly ASSEMBLY STEP 2 ASSEMBLY STEP 3:...
- Page 9 Assembly ASSEMBLY STEP 4 ASSEMBLY STEP 5...
- Page 10 Assembly ASSEMBLY STEP 6 ASSEMBLY STEP 7...
- Page 11 Assembly ASSEMBLY STEP 8 ASSEMBLY STEP 9...
- Page 12 Assembly ASSEMBLY STEP 10 ASSEMBLY STEP 11...
- Page 13 Assembly ASSEMBLY STEP 12 ASSEMBLY STEP 13...
- Page 14 Assembly ASSEMBLY STEP 14 ASSEMBLY STEP 15...
- Page 15 Assembly ASSEMBLY STEP 16 ASSEMBLY STEP 17...
- Page 16 Assembly ASSEMBLY STEP 18 ASSEMBLY STEP 19...
- Page 17 Assembly ASSEMBLY STEP 20 ASSEMBLY STEP 21...
- Page 18 Assembly ASSEMBLY STEP 22 ASSEMBLY STEP 23...
- Page 19 Assembly ASSEMBLY STEP 24 ASSEMBLY STEP 25 Step 4 Step 1 Step 2 Step 3...
-
Page 20: Safety Warnings
Safety Warnings GENERAL NOTE: During use, individual components of the grill can become very hot. Additionally, please note that the side parts of the lid handle (indicated in black in the illustration) can also become very hot. Therefore, it is advisable to hold the handle using the middle support bar. -
Page 21: Connecting The Gas Bottle
Connecting the Gas Bottle CAUTION: Perform the following steps outdoors in a well-ventilated area only when the grill has com- pletely cooled down. If you’ve recently used the grill, ensure it has cooled down completely before con- necting a gas bottle to avoid the risk of burns. To connect the gas bottle, you will need the following items: •... - Page 22 Connecting the Gas Bottle Connecting the gas bottle • Choose a suitable location for the grill so that the gas bottle can be connected safely. This should • Make sure that the grill is secure and stable and that the transport wheels are blocked to prevent accidental movement.
-
Page 23: Gas Leak Test
Gas Leak Test sure to conduct a comprehensive leak test on all gas pipes and connections. You have two options for this: (ensure you follow the operating instructions for the leak detector.) To conduct this test, you’ll need a connected gas bottle. Follow these steps: Ensure all the grill knobs are set to “OFF”... - Page 24 Gas Leak Test...
-
Page 25: Igniting The Main Burner
Igniting the Main Burner Before using the grill, ensure: • Strict adherence to all safety instructions in this manual. • The grill is on a level, stable surface and securely positioned. Check in particular that: • The grill is fully assembled and free of defects or damage. •... -
Page 26: Igniting The Side Burner
Igniting the Side Burner Ignition Instructions: • Open the covers of the side burners CAUTION: following steps. • Ensure that the side burner knobs are in the “-” (OFF) position. • Open the valve of the gas bottle. • Push the corresponding knob of the side burner inwards and then turn it to the left in the direction of the lightning symbol until you hear a click, and the burner ignites. -
Page 27: Cleaning And Maintenance
Cleaning and Maintenance CAUTION: of burns. • Be cautious as there may be sharp corners and edges inside the grill. It’s advisable to wear safety gloves for added protection. • Disconnect the gas bottle from the grill before beginning the cleaning process. Cleaning lint-free cloth. -
Page 28: Grilling Tips
Winter Barbecue or Snow Barbecue Barbecuing in winter, even in the snow and ice, is no problem with the MAXXUS gas grill. However, the gas bottle should be stored frost-free and only connected shortly before barbecuing. When cleaning the grill, it’s better not to use water and instead use the burn-out method, as water could freeze in sub-zero temperatures. -
Page 29: Troubleshooting
Troubleshooting Malfunction Possible cause Solution Gas odor is detected Leak in the gas system If there is a leak in the gas system, close the valve on the gas cylinder immediately. Check all screws on the gas system (gas bottle, pressure regulator, grill) and tighten them if necessary. - Page 30 The MAXXUS service team is of course also available to help you solve problems if cases of a defect occur after the end of the warranty, or cases that are not covered by the warranty. In such a case, please contact us directly by email: service@maxxus.de...
- Page 31 Date Place Signature MAXXUS Group GmbH & Co KG Nordring 80 64521 Groß-Gerau Germany ...e-mail**: info@maxxus.de Please ensure that the letter is adequately stamped; regrettably, we cannot accept unstamped letters. Kindly send a scanned copy with your original signature. Orders lacking an original signature, unfortunately,...
- Page 32 Distribution Germany & Austria Vertrieb Deutschland & Österreich Maxxus Group GmbH & Co. Maxxus Group GmbH & Co. KG Nordring 80 Zeppelinstr. 2 D-64331 Weiterstadt 64521 Gross-Gerau Germany Deutschland E-mail: info@maxxus.de E-Mail: info@maxxus.de www.maxxus.de www.maxxus.com Vertrieb Schweiz Gorilla Sports Schweiz AG...
Need help?
Do you have a question about the BBQ Chief 12.0 and is the answer not in the manual?
Questions and answers