OBSBOT Me - Auto Tracking Phone Manual
- User manual (7 pages) ,
- User manual (10 pages)
Advertisement
Overview
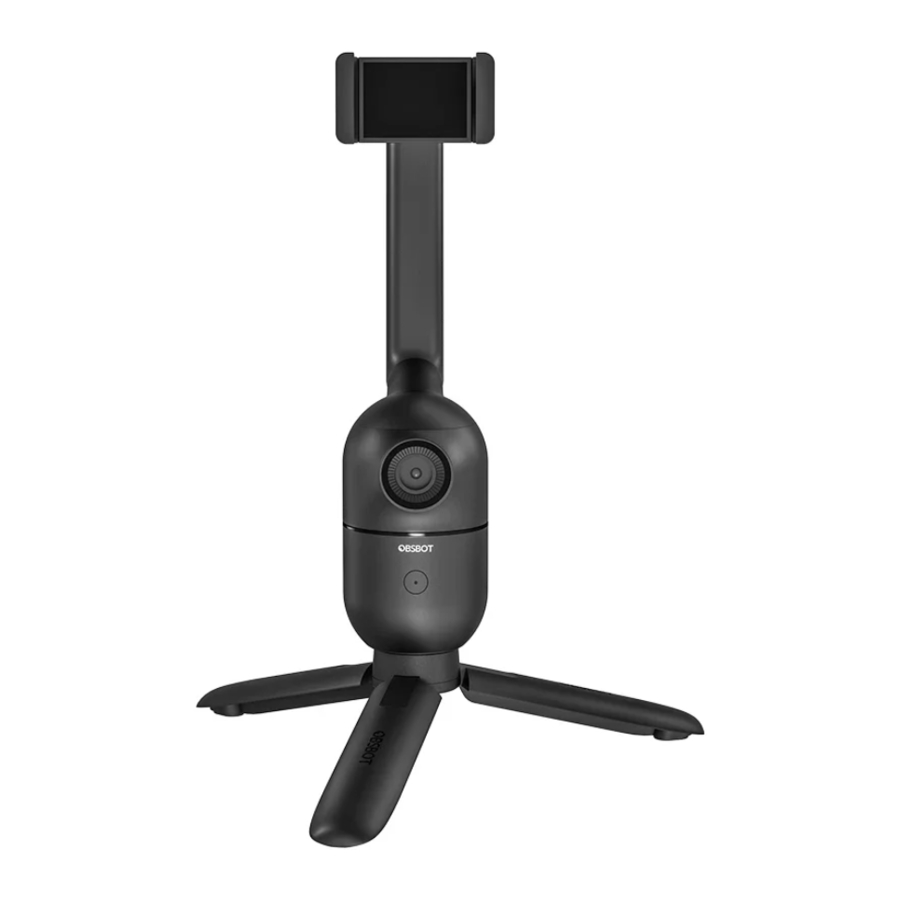
About Me
OBSBOT Me AI-powered selfie phone mount inherited the strong tracking ability of the OBSBOT family, uses deep learning neural networks and brushless motor control technology to provide an accurate and stable tracking experience.
Parts Info

- Phone Holder
- Phone Holder Arm
- Vertical Rotation Axis
- Horizontal Rotation Axis
- Lens
- Status Indicator
- Power Indicator
- Power Button
- Universal Joint Tightness Adjustment Knob
- Universal Joint
- USB Type-C Interface
- UNC 1/4-20 Interface
Quick Start
Unfold the OBSBOT Me
Hold the Phone holder arm and rotate it vertically clockwise or counterclockwise by 180° to unfold the OBSBOT Me.
Conversely, it can be folded for storage.

Horizontal Rotation
Hold the phone holder arm and rotate it horizontally clockwise or counterclockwise by 180°, suitable for shooting by the rear camera of your phone.


Installation and Leveling
- Install the phone.
To install the phone, you need to make sure the OBSBOT Me is turned off.
Open the phone holder and put the phone into it, before shooting, you need to adjust the phone to make it balanced.

- Adjust the camera angle
You can adjust the universal joint to change the camera angle.

- Adjust the tightness of the universal joint
The phone holder is connected to the phone holder arm by a universal joint. If the phone holder is loosened, you can use the metal round plate in the package to tighten it.

- Use with a tripod
OBSBOT Me equipped with a 1/4'' interface, please use it with the tripod that comes along with the package. OBSBOT Me is also compatible with all mainstream tripods on the market.
![caution]()
- Please make sure that the back of the phone is entirely close to the panel of the phone clip, and the long side of the phone should be fully buckled into the phone clip.
- Make sure that the smart phone and phone holder in a balanced state during the usage.
- The phone holder is specially designed for preventing pressing smartphone buttons by accident.


The Power Button Instruction
| Button Instruction | In shutdown state, press the button to check the power level. |
| In shutdown state, press the button and hold for 3s to power on the product. | |
| In the powered-on state, press the button once to lock/unlock the tracking target. | |
| In the powered-on state, Press the button and hold for 3s to turn off the product. | |
| In the powered-on state, after turn on the 'Gesture Control-Button Switch' on the OBSBOT Me Tool, you can triple-click the button on the device to turn on/off the 'Gesture Control' function. |
Lock / Unlock the Tracking Target
OBSBOT Me provides two ways to lock or unlock the tracking target.
- Gesture control
To perform gesture control, users can simply show the same pose below in front of the sensing camera. *Please be careful not to block your face while doing the gesture, and slightly spread your fingers.
To make the OBSBOT Me lock the tracking target, just do the same pose shown in the picture below. When the OBSBOT Me successfully locks the tracking target, the status indicator light will flash green light twice, then turn blue and stay on.
To make the OBSBOT Me unlock the tracking target, it requests the locked person do the pose in front of the sensing camera.
When the OBSBOT Me successfully unlock the tracking target, the status indicator light will flash blue light twice, then turn green and stay on.
![]()
- Quick pick
In the powered-on state, you can lock/unlock the tracking target by pressing the power button.
If the OBSBOT Me doesn't have a locked target, you can make the OBSBOT Me lock a person by a simply click on the power button.
When the OBSBOT Me successfully locks a target, the status indicator light will turn blue and stay on; If there is no available target, the status indicator light will flash blue light, and the OBSBOT Me will enter target searching mode.- Target searching mode and recognizable range: When using Quick pick to try locking a person, the best recognition range is a fan shape area as shown below in the picture.
![]()
If you use Quick pick but there are no available targets, the OBSBOT Me will enter target searching mode, the status indicator light will keep blinking blue. In the target searching mode, OBSBOT Me will continue to search for a target, when a person enters the recognition range, the status indicator will turn blue and stay on, indicating that the target searching is successful; if there are no available targets within the best recognition range for 3 second, the status indicator will turn green and stay on, indicating that the target search has failed.
To unlock the tracking target, you can simply click the power button.
When the OBSBOT Me successfully unlock the target, the status indicator light will turn to green and stay on.
- Target searching mode and recognizable range: When using Quick pick to try locking a person, the best recognition range is a fan shape area as shown below in the picture.


Tracking Distance
The best tracking distance range is 0.5 meter to 3 meters away from the OBSBOT Me, the furthest tracking distance is 15 meters.
![]()
The Status Indicator Light
The status indicator light can display three colors of yellow, green and blue. The combination of different colors and blink pattern respectively represent different status of product.
| Definition | Lighting |
| Boot initialization | The status indicator light turns blue and stays on for 5 seconds, then starts to flash blue every second. |
| Not target locked | Solid green. |
| Target locked | Solid blue. |
| Gesture recognition | The status light flash for twice, then turn to the light keeps on which means identified. |
| Target searching mode | Blinking blue |
| Target lost | Solid yellow. |
| Upgrading | Blinking green and blue. |
| Fail to upgrade | Flash yellow. |
| Gimbal error, AI error etc | Blinking green, yellow and blue. |
| Gesture Control-Button Switch | The status blue light flash twice, which means the switch is successful. |
Battery and Charging
Charging
To charge OBSBOT Me, you can connect OBSBOT Me with a power adaptor or a power bank by a USB Type-C cable.
It takes 75 minutes to fully charge the battery, the power indicator light will keep flashing when charging, and it will turn to solid green after fully charged.
- OBSBOT Me has a 950mAh battery capacity, and a play time of 120 minutes.
![]()

Power indicator light
 Solid
Solid
 Flashing
| Category | Power level | Status |
| Power level display | 0% — 9% |  |
| 10% — 49% |  | |
| 50% — 100% |  | |
| Charging | 0% — 9% |  |
| 10% — 49% |  | |
| 50% — 99% |  | |
| 100% | |
OBSBOT Me Tool
Software Overview
OBSBOT Me Tool is the software that comes with the OBSBOT Me. It is compatible with Windows and macOS. The user can do some control such as turn on/off gesture control or upgrade firmware, and so on.
Installation
Please visit https://obsbot.com/download to download the OBSBOT Me Tool to get further user experience.
Firmware Upgrade
OBSBOT Me can be upgraded in OBSBOT Me Tool. A prompt will be displayed after the device is connected when the firmware is available to upgrade. Please follow the instructions.
 Do not disconnect the OBSBOT Me during firmware upgrade.
Please check the Firmware Upgrade Guide on https://obsbot.com/service/user-guide
The content is subject to update without notice. Please download the latest version of "User Manual" on the official website of REMO TECH:
https://www.obsbot.com
Tutorial Video
User could access and watch tutorial videos through the following links to use the product correctly.
https://obsbot.com/obsbot-me/explore

Documents / Resources
References
Download Center | OBSBOT
User Guide | OBSBOT
OBSBOT - Connecting You to the Future [Official]
Explore More About OBSBOT Me
Download manual
Here you can download full pdf version of manual, it may contain additional safety instructions, warranty information, FCC rules, etc.
Advertisement


Need help?
Do you have a question about the Me and is the answer not in the manual?
Questions and answers