Advertisement
Quick Links
Installation Instructions For Pressure Balance Valve
Recommended for all SH-PB Series Shower Fittings with Auto-Drain™
Notice to the Installer
Notice to the Installer
• Read this entire instruction sheet before installing to ensure proper installation.
• Installation must comply with local codes and ordinances.
Pressurized plumbing fittings shall be installed in accordance with manufacturer's recommendations.
The supply piping to these devices shall be securely anchored to the building structure to prevent installed device from unnecessary movement
when
operated by the user. Care shall be exercised when installing the device to prevent marring the exposed surface.
NOTE: The information in this manual is subject to change without notice.
Please leave this manual with the facility manager after completing the valve installation. This document contains information necessary for routine
maintenance and servicing.
NOTE: The information in this manual is subject to change without notice.
Please leave this manual with the facility manager after completing the valve installation. This document contains information necessary for routine
maintenance and servicing.
Mixing Valve
1910-VONF
Mixing Valve Trim
1910-002KCP
Hand Shower Complete Kit
150-ADCP
For additional technical assistance, call 800/TEC-TRUE (800-832-8783) or visit our website at chicagofaucets.com.
1
Diverter Valve*
773-VONF
Diverter Valve Trim
763-TPCP
Auto-Drain Only
1920-022KCP
Remote Auto-Drain
1920-039KCP
1920-028KCP
Hand Shower Elbow
622-001KCP
1920-029KCP
IMPORTANT! Setting Hot Limit Stop
The removal of the warning label barrier on the
face of this mixing valve constitutes the transfer
of liability from the manufacturer to the installer
under the laws of the United States. It is the in-
staller's responsibility to set the maximum output
temperature of the valve to no more than 120°F,
in accordance with Standard ASSE 1016/ASME
A112.1016/CSA B125.16 dealing with individual
thermostatic, pressure balancing, and combination
pressure balancing and thermostatic control valves
for individual fixtures, temperature limit setting.
*U.S. Patent Pending
Advertisement

Summary of Contents for Chicago Faucets 1910-VONF
- Page 1 Please leave this manual with the facility manager after completing the valve installation. This document contains information necessary for routine maintenance and servicing. Mixing Valve Diverter Valve* Remote Auto-Drain 1920-039KCP 1920-028KCP 773-VONF 1910-VONF Mixing Valve Trim Diverter Valve Trim Hand Shower Elbow 622-001KCP 1920-029KCP 1910-002KCP 763-TPCP...
-
Page 2: Installation Configurations
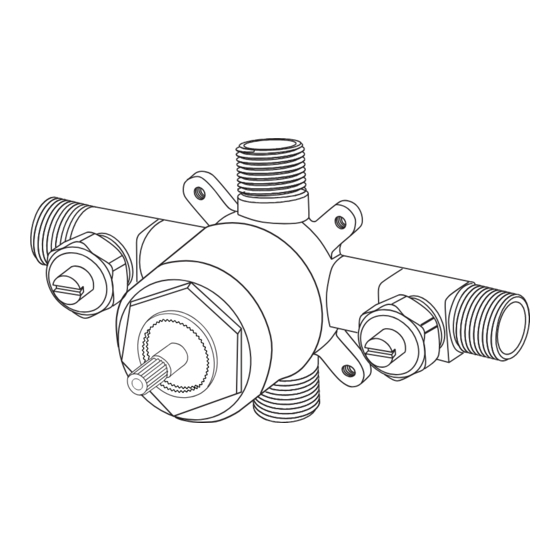
Rough-In of Valve and Assembly of Trim: 1. R ough valve body into wall, connecting piping to 1/2˝ female copper sockets or 1/2˝ male I.P. nipples (see Figure 1). Important: note “UP” and “DOWN” markings on back of valve. 2. T he depth of rough-in should account for thickness of wall materials to be used (combined thickness of wall board and finished wall material). Face of guard should be positioned to be flush with finished wall surface. 3. A nchor installation to bracing between studs (ears on the valve body can be used for this by removing the plastic guard). Otherwise, anchor the connection piping. 4. V alve should be pressurized and tested for leaks at the connections. 5. Plastic guard should be left attached to the valve until finished wall material is installed. 6. A fter wall is finished, remove plastic guard and replace with trim sleeve and escutcheon plate (see Figure 2). Orient handle so that lever is pointed down toward “OFF” position. - Page 3 Installation Configurations (cont) 3. Hand Shower with Valve and Shower Hose Drain 1. Install lower valve drain following steps in configuration example #2 (A). 2. For hand shower, install a short supply pipe up from valve and attach a 45º elbow (B). 3. Run extension supply pipe from the elbow to desired location that is 18˝ - 24˝ above valve center, maintaining a 45º angle (C). ½-14 NPT thread is required for hand shower exposed elbow installation.
- Page 4 Installation Configurations 4. Hand Shower with Valve and Shower Hose Auto-Drain 1. Install remote Auto-Drain following steps in configuration example #2 (A). 2. Run extension supply pipes from the mixing valve and the diverter valve. There may be a difference in mounting depths that may require an offset Hand spray connection (B). If there is a difference and elbow...
-
Page 5: Back-To-Back Installation
Back-to-Back Installation When a valve is installed with reversed supply connections (typically in a back-to-back situation), the cartridge can be reversed to allow normal operation. 1. Remove trim sleeve to expose top of valve. 2. Loosen and remove hex nut above cartridge. 3. Remove cartridge from valve cavity. 4. L ook into cavity to see upper and lower locating holes for cartridge pin on the floor of the cavity. 5. R e-insert cartridge, aligning the pin with lower locating hole (partially cut away by discharge opening). - Page 6 Standard Mixing Valve Trim Installation Escutcheon Diverter Sleeve Handle Set Follow “Setting Limit Stop” instructions below before proceeding. 1. A ttach foam seal to back of trim plate along outer edge. Cut to size leaving 1/8˝ gap at the bottom of the plate. 2. Align face plate with mounting holes on valve and attach with screws. 3. Attach handle. Make sure it is positioned in “OFF” position. For additional technical assistance, call 800/TEC-TRUE (800-832-8783) or visit our website at chicagofaucets.com.
- Page 7 Outlet Cap Outlet Cap and Washer and Washer Valve Unit Cartridge Stem Cartridge Stem Wall Escutcheon Handle Handle Standard Diverter Valve Trim Installation 1. Before installing the valve trim, be sure the final Outlet Cap wall finish is completely installed. The wall sur Valve Unit face should be level, clean, and dry.
-
Page 8: Care And Maintenance
OTHER WARRANTIES — All other Products not covered above are warranted against material manufacturing defects for a period Technical: 800/832-8783 of one (1) year from the date of Product purchase. www.chicagofaucets.com Other restrictions and limitations apply. For complete warranty details, call Chicago Faucets Customer Service at 847-803-5000 or visit chicagofaucets.com. TAG-SHPB © 2023 Chicago Faucet Company...
Need help?
Do you have a question about the 1910-VONF and is the answer not in the manual?
Questions and answers