Advertisement
Quick Links
Advertisement

Related Manuals for ARCO ZEUS

Summary of Contents for ARCO ZEUS
- Page 1 powered by High Energy Alternator Regulator Installation Guide...
- Page 2 What’s Included in the Zeus Package ......2 Tools You Will Need .
-
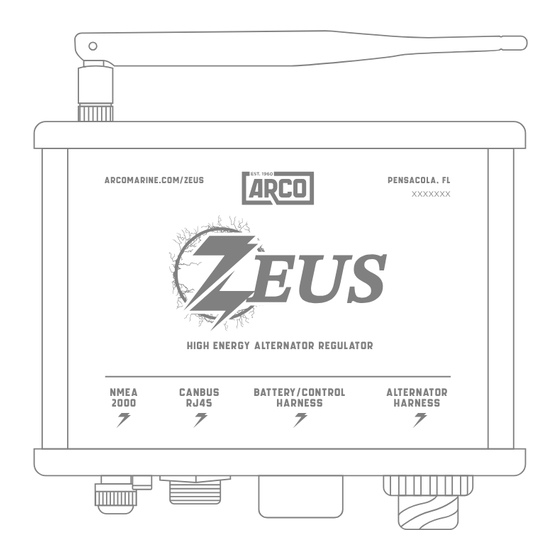
Page 3: Bluetooth Antenna
Battery Thermistor Alternator Thermistor (Temperature Sensor) (Temperature Sensor) Bluetooth Antenna ARCOMARINE.COM/ZEUS PENSACOLA, FL XXXXXXX HIGH ENERGY ALTERNATOR REGULATOR NMEA CANBUS BATTERY/CONTROL ALTERNATOR 2000 RJ45 HARNESS HARNESS ARCO Zeus Alternator Regulator Battery/Control Wire Harness 6’ Alternator Wire Harness 6’... - Page 4 Visit arcomarine.com/Zeus download the app for iOS and Android. Follow prompts in the app for easy guide installation. Click here to begin the installation and configuration process for your regulator...
- Page 5 Click NEXT to continue. Because you are working with electricity, always pay attention to the warning symbols in this guide. Click NEXT to continue.
- Page 6 Hardwire the Regulator to the batteries* Why would I hardwire the Regulator to the batteries? To take advantage of using the ARCO Zeus as a State of Charge Meter! Yes, you can easily do that with a shunt sold separately.
- Page 7 For state of charge, the shunts must be connected. Suggestion on shunt placement. Positive side shunts are typically used with case ground alternators. Congratulations! You have set up measuring instruments on the only Regulator that monitors 1) BOTH Batteries and Alternator inputs AND 2) can measure State of Charge (SOC).
- Page 8 Before you begin the installation process, you will need to gather information, turn o your power and plan placements of your regulator and accessories. Click NEXT to continue. A battery shunt is required to observe current limitations for the battery bank in addition to the use of the onboard battery monitor.
- Page 9 You will need information on your alternator. You will be able to find your alternator details through their website or contacting the manufacturer. Click NEXT to continue. You will need information on your battery. Most batteries have the information you need on their label.
- Page 10 Click NEXT once your power is disconnected or turned o . Determine Your ARCO Zeus Install Location • The regulator should be mounted in a central location with access to your battery. • The included battery harness is 6ft long.
- Page 11 Do not make connections to your wiring harness while it is plugged into your smart regulator. Click NEXT to continue.
- Page 12 Select your battery type from the list below. Click NEXT to continue. To find your alternator type, contact your alternator’s manufacturer. Most modern alternators are P type. You can find how many poles your alternator has by contacting the alternator manufacturer.
- Page 13 Set the parameter of 12v, 24v, 36v, or 48v This is the total Amp hours of all batteries in the bank, for example, three 300Ah batteries would be 900Ah. Amp hours is the amount of energy charge in a battery that enables one ampere of current to flow for one hour.
- Page 14 Voltage Meter Fuse Holder Assorted Ring Terminals and Butt Connectors Wire Cutters/Strippers Wire Crimpers Optional Accessories • Alternator Shunt • Feature in Switches (Up to 3)
- Page 15 The preparation for your installation is now finished. Next, you will begin the wiring installation guide. Click NEXT to continue. Click NEXT to continue.
- Page 16 When mounting your smart regulator, if possible, mount it with the connectors facing down to decrease the chance of water ingress. Once your regulator is mounted in a location that is accessible, connect the wiring harness and view the LED. Click NEXT to continue.
- Page 17 Add fuses to the following wires (wire with inline fuses crimped in place). • Alternator Field • Alternator V+ • Battery V+ Click NEXT to continue. Carefully crimp all wires and verify that it matches the diagram. Click NEXT to continue. Verify all the pins in the wiring harness using a multi meter.
- Page 18 Follow your alternator wiring harness connections carefully. The wiring harness instructions are included within this manual and can also be enlarged in the app by long pressing the wiring harness instruction image. Continue installing wires per the following diagrams, using the Ring Terminals and Butt Connectors where needed.
- Page 19 OUTPUT 1 (LAMP) (OPTIONAL) Usually connect this wire to a lamp to indicate that the ARCO Smart Regulator is on but not charging, or to blink error codes. The feature output lamp that can be configured in the app. This output acts like a switch between your load (light or fan) and the internal ground in the Smart Regulator.
- Page 20 Complete wiring guide...
- Page 21 Now that the wiring is ready, it is time to connect these to your Zeus. Click NEXT to continue. With your regulator connected, you should see your ARCO Zeus in the window provided. Click NEXT to continue.
- Page 22 Once everything is mounted and connected, turn your power back on. Click NEXT when complete. There is an LED light near the ports on your regulator. If the LED is currently blinking red, review all of the app warnings in the next section.
- Page 23 The smart regulator will blink on a six second pattern. A blue blink indicates that the device connected to Bluetooth. A red blink indicates errors. Open the app to see details. One green blink indicates standby (not charging). Solid green indicates bulk charging. And two green blinks indicates float charging.
- Page 24 Due to the information you have already submitted, we have prefilled your battery settings. Please double check these settings with the information on your battery’s label. Click NEXT to continue.
- Page 25 Due to the information you have already submitted for your alternator, we have prefilled your alternator settings. Please check these settings. Click NEXT to continue. RPM Limits can be adjusted with the swipe of your finger.
- Page 26 A PIN is required as a layer of security to protect your ARCO Zeus settings from unauthorized users. Click NEXT to continue. Your setup is now complete. Click Go to Dashboard to view your dashboard. arcomarine.com Toll Free: 1-800-722-2720 Fax: 850-453-2630...
Need help?
Do you have a question about the ZEUS and is the answer not in the manual?
Questions and answers