Advertisement
- 1 PRODUCT OVERVIEW
- 2 SETUP/BASIC OPERATION
- 3 LISTENING TO FM RADIO
- 4 LISTENING TO AN EXTERNAL AUDIO DEVICE (BT MODE)
- 5 SETTING THE TIME
- 6 SETTING THE ALARM
- 7 ALARM OFF/SNOOZE FEATURE
- 8 DIMMER FEATURE
- 9 CHARGING AN EXTERNAL DEVICE
- 10 TROUBLESHOOTING GUIDE
- 11 SPECIFICATIONS
- 12 IMPORTANT SAFETY INSTRUCTIONS
- 13 Documents / Resources
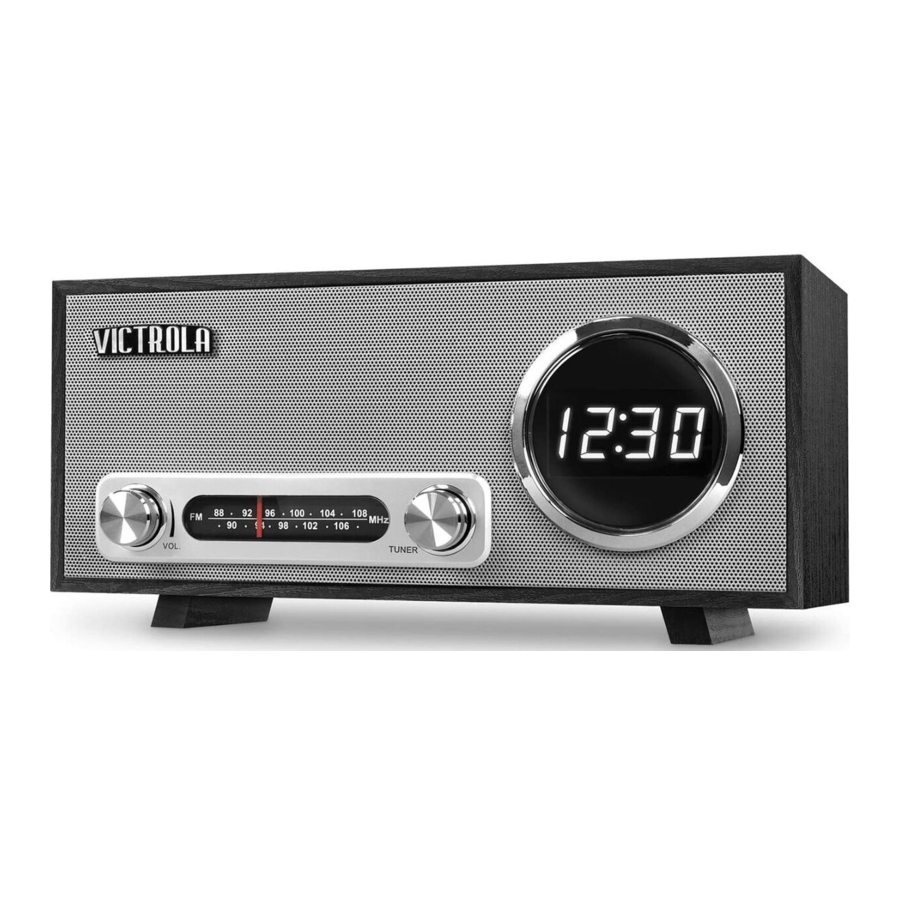
PRODUCT OVERVIEW

- VOLUME: When unit is ON, rotate to adjust the volume.
- RADIO TUNER KNOB: In FM mode, turn knob to tune to desired station.
- ANALOG RADIO
- LED CLOCK DISPLAY

- SNOOZE/DIMMER:
SNOOZE: When the alarm sounds, press to snooze alarm.
DIMMER: Touch lightly to adjust the brightness of the LED clock display.

- USB CHARGING PORT: In OFF or Bluetooth mode, it will charge an external device.
- SET/PAIR/PLAY/PAUSE: In OFF mode, press and hold to set the time and alarm time. Once the Bluetooth connection is successful, press and hold to disconnect from your external device. Press again to connect the device which has been connected.
When listening to music, press to temporarily pause the track, press again to resume. - UP: In Bluetooth mode, press to skip to the previous track.
- DOWN: In Bluetooth mode, press to skip to the next track.
- OFF-FM-BT: Slide to select function (OFF, FM Radio, Bluetooth)
- FM wire antenna
While tuned to a station in FM mode, extend the wire and reposition to adjust for best reception. - AC SOCKET: Connect the AC power cord into AC connection socket and then insert the AC plug into a wall outlet.
It is strongly recommended that this product be operated only from the type of power source indicated on the marking label. - FEET
- BATTERY COMPARTMENT
SETUP/BASIC OPERATION
BATTERY OPERATION
- Remove the battery compartment door at the back of unit.
![]()
- Insert two (2) AAA batteries (not included) into the battery compartment, making sure that the batteries are installed in the designated numerical order and that the proper polarities (+ and -) are maintained.
Note: The batteries are used for memory backup function only.

Battery Precautions
Be sure to insert the batteries with correct positive "+" and negative "-" orientation.
ALWAYS use batteries of the same type. Never mix different types of batteries together.
When using rechargeable batteries, refer to the precautions on their labels.
Do not heat or disassemble batteries, and NEVER dispose of old batteries by throwing them in a fire.
Do not dispose device into standard garbage disposal sites. Dispose of device at available Battery Recycling Sites after fully discharging battery. Not doing so may violate disposal laws and regulations. Please refer to local regulations for proper battery disposal.
Setup
- Remove any packaging materials from the unit.
- Connect the AC power cord into AC connection socket and then insert the AC plug into a wall outlet.
Note:
- It is strongly recommended that this product should be operated only from the type of power source indicated on the marking label.
- To prevent interference, avoid bundling audio signal cables together with the AC power cord.
Standby
The main unit will switch to economic standby mode when the speaker is idle for approximately 15 minutes, except for Radio mode. Once the unit turn into standby mode, you can slide the OFF-FM-BT button to select source again.
Basic Operation
- Select the source by sliding the OFF-FM-BT button.
- Rotate the VOLUME knob to adjust to the desired sound level.

CONDENSATION WARNING:
When the unit is moved from a cold or warm place, or is used following a sudden temperature change, there is the danger that water vapor in the air may condense on the unit, preventing proper operation. In such cases, leave the unit for 1-2 hours after plugging it into an AC outlet to allow it to stabilize at the temperature of its surroundings.
LISTENING TO FM RADIO
- Slide the OFF-FM-BT button to switch to FM function, "FM" and the time will show on the display.
- Tune to the desired station by using the Radio Tuner Knob.
- Rotate the VOLUME knob to adjust your desired volume.
LISTENING TO AN EXTERNAL AUDIO DEVICE (BT MODE)
In BT (Bluetooth) mode, this unit can play music from an external device with the Bluetooth feature.
GETTING CONNECTED USING BLUETOOTH
- Slide switch to the BT function. The display will show "Blue" with the
![]() icon.
icon. - The blue LED indicator and the
![]() icon will flash while searching for a device.
icon will flash while searching for a device. - On your external device, turn the Bluetooth function ON.
NOTE: The effective distance between your external device and this apparatus is 10 meters (33ft). - Wait a moment for "VC-100" to appear on the devices list. Press "VC-100" to connect to the unit. If asked for a password. Use "0000", then press OK on your external device.
- Once the Bluetooth connection is successful, the
![]() icon will remain lit.
icon will remain lit. - Press the UP or DOWN button to skip to the previous/next track OR control it from your device.
- Press SET/PAIR/PLAY/PAUSE button to temporarily pause the track, press again to resume.
- If you want to reconnect your external device after disconnecting, press the SET/PAIR/PLAY/PAUSE button to reconnect.
NOTE: The PAIR Button will allow you to disconnect from your external device while remaining in BT mode. Press and hold the PAIR button to disconnect and search for a new device. Follow the pairing directions above to connect to the new device.
SETTING THE TIME
- Slide the OFF-FM-BT button on the OFF mode, which is the clock mode. The time will appear on the display automatically.
Note: The batteries are used for the memory backup function only. - Press and hold the SET/PAIR/PLAY/PAUSE button to adjust the time.
- The digit of Hour will flash, press the UP or DOWN button to select the hour.
- Press the SET/PAIR/PLAY/PAUSE button to confirm, the minutes will flash.
- Press the UP or DOWN button to select the minute, and then press the SET/PAIR button to confirm.
Note: It will auto confirm after flashing approximately 5 times. Once the time stops flashing, repeat Steps 2 through 5 to reset the time if necessary.
SETTING THE ALARM
- Press the SET/PAIR/PLAY/PAUSE button repeatedly until the "alarm" icon appears on the display.
- Press the UP or DOWN button to select the hour, then press the SET/PAIR/PLAY/PAUSE button to confirm.
- The minutes will flash on the display, press the UP or DOWN button to select the minutes.
- Press the SET/PAIR/PLAY/PAUSE button to confirm. The display will show ON or OFF.
- Press the UP or DOWN button to turn the alarm on or off.
- Press the SET/PAIR/PLAY/PAUSE button to confirm the alarm setting.
- When the alarm is turned on, the "alarm" icon will flash briefly. Press the SET/PAIR/PLAY/PAUSE button to turn off the alarm. The alarm icon will remain stay lit. The alarm is now set to chime daily at the same time.
Note: It will auto confirm after flashing approximately 5 times. Once the time stops flashing, repeat Steps 2 through 5 to reset the time, if necessary.
ALARM OFF/SNOOZE FEATURE
- When the alarm sounds, press the SET/PAIR/PAY/PAUSE button to silence the alarm.
- To snooze the alarm, touch the SNOOZE/DIMMER button. The alarm will snooze for approximately nine (9) minutes. To cancel the snooze feature and alarm sound, press the SET/PAIR/PLAY/PAUSE button. The alarm icon will stop flashing.
DIMMER FEATURE
Lightly touch the SNOOZE/DIMMER button to cycle through the three (3) brightness settings.
CHARGING AN EXTERNAL DEVICE
- Connect the AC plug to a wall outlet.
- Plug a USB cable (not included) into the USB port of the speaker. Plug the other end of the USB cable into a Smartphone or an external device.
- The unit will charge the device automatically.
Note: Charging function only works in Bluetooth mode or when the unit is OFF.
TROUBLESHOOTING GUIDE
| GENERAL | Symptom | Possible Cause | Solution |
|
| | |
|
| | |
|
| | |
|
| | |
| FM RADIO |
|
|
|
|
|
| |
| BLUETOOTH |
|
|
|
|
|
| |
|
|
|
SPECIFICATIONS
- Hereby, Innovative Technology Electronics, LLC, declares that this Bluetooth Clock Radio is in compliance with the essential requirements and other relevant provisions of Directive 2014/53/EU.
- The full test of the EU declaration of conformity is available at the following internet address:
www.victrola.com/eudoc
| GENERAL | |
| Power Requirements | AC 230 V~ 50 Hz |
| Backup Battery | 2 AAA (LR03) Batteries |
| Power Consumption | 11W |
| Dimensions (W x H x D) | 13 in x 5.51 in x 5.98 in (approx.) 330 x 140 x 152mm (approx.) |
| Weight | 4.17 lbs (approx.) 1.89 kg. (approx.) |
| AMPLIFIER | |
| Output Power | 5W |
| Frequency Response | 60 to 20,000 Hz |
| SPEAKER SYSTEM | |
| Type | 1-way |
| Impedance | 6 ohms |
| Input Power | Max 10W |
| FM RADIO | |
| Range | 88 to 108 MHz |
| BLUETOOTH | |
| Bluetooth Version | Bluetooth V2.1+EDR |
| Bluetooth Profiles | A2DP, AVRCP |
| Bluetooth Frequency range | 2.402GHz-2.480GHz |
| Operating Distance | 33 feet/10 meters |
| USB | |
| USB port for charging | 5V  1A 1A |
Please note: As a result of continual improvements, the design and specifications of this product are subject to change without notice.
IMPORTANT SAFETY INSTRUCTIONS


To reduce the risk of fire or electric shock, do not expose this appliance to rain or moisture.

To prevent electric shock, do not use this (polarized) plug with an extension cord, receptacle or other outlet unless the blades can be fully inserted to prevent blade exposure.
- Read these instructions – All the safety and operating instructions should be read before this product is operated.
- Keep these instructions – The safety and operating instructions should be retained for future reference.
- Heed all warnings – All warnings on the appliance and in the operating instructions should be adhered to.
- Follow all instructions – All operating and use instructions should be followed.
- Do not use this apparatus near water – The appliance should not be used near water or moisture – for example, in a wet basement or near a swimming pool, and the like.
- Clean only with dry cloth.
- Do not block any ventilation openings. Install in accordance with the manufacturer's instructions.
- Do not install near any heat sources such as radiations, heat registers, stoves, or other apparatus (including amplifiers) that produce heat.
- Protect the power cord from being walked on or pinched particularly at the plugs, convenience receptacles, and at the point where they exit from the apparatus.
- Only use attachments/accessories specified by the manufacturer.
- Use only with the cart, stand, tripod, bracket, or table specified by the manufacturer, or sold with the apparatus. When a cart or rack is used, use caution when moving the cart/apparatus combination to avoid injury from tip-over.
![]()
- Unplug the apparatus during lightning storms or when unused for long periods of time.
- Refer all servicing to qualified personnel. Servicing is required when the apparatus has been damaged in any way, such as power supply cord or plug is damaged, liquid has been spilled or objects have fallen into the apparatus has been exposed to rain or moisture, does not operate normally, or has been dropped.
![]()
- This lightning flash with arrowhead symbol within an equilateral triangle is intended to alert the user to the presence of non-insulated "dangerous voltage" within the product's enclosure that may be of sufficient magnitude to constitute a risk of electric shock.
![]()
To reduce the risk of electric shock, do not remove cover (or back) as there are no user-serviceable parts inside. Refer servicing to qualified personnel.- The exclamation point within and equilateral triangle is intended to alert the user to the presence of important operating and maintenance instructions in the literature accompanying the appliance.
![]()
This equipment is a ClassⅡ or double insulated electrical appliance. It has been designed in such a way that it does not require a safety connection to electrical earth.- The mains plug is used as disconnect device, the disconnect device shall remain readily operable.
![]()
To reduce the risk of fire or electric shock, do not expose this apparatus to rain or moisture. The apparatus shall not be exposed to dripping or splashing and that no objects filled with liquids, such as vases, shall not be placed on apparatus.- The use of the equipment in moderate climate.
- The ventilation should not be impeded by covering the ventilation openings with items such as, newspapers, tablecloths, curtains, etc.
- No naked flame sources, such as lighted candles, should be placed on the apparatus.
- The symbol with
![]() indicates AC voltage.
indicates AC voltage. - The symbol with
![]() indicates DC voltage.
indicates DC voltage. - The batteries (battery pack or batteries installed) shall not be exposed to excessive heat such as sunshine, fire or the like.
- Attention should be drawn to the environmental aspects of battery disposal.
![]()
These servicing instructions are for use by qualified service personnel only. To reduce the risk of electric shock, do not perform any servicing other than that contained in the operating instructions unless you are qualified to do so.


 indicates AC voltage.
 indicates DC voltage.
ACCESSORIES INCLUDED:
- INSTRUCTION MANUAL
- WARRANTY
- DETACHABLE POWER CORD (2 PC)
Imported by:
Exertis Supply Chain Services Ltd.
M50 Business Park, Ballymount Rd. Upper, Dublin 12, D12 T4C2, Ireland
Documents / Resources
References
Download manual
Here you can download full pdf version of manual, it may contain additional safety instructions, warranty information, FCC rules, etc.
Advertisement


Need help?
Do you have a question about the VC-100 and is the answer not in the manual?
Questions and answers