Table of Contents
Advertisement
Quick Links
Advertisement
Table of Contents

Summary of Contents for DELLON PTZ41
- Page 1 Operation Manual PTZ41 Pipe Inspection Camera ---------------------------------------------------------------------------------------------------------------------- ■ Please read the manual carefully before using the product. ■ Please keep it for easy reference...
-
Page 2: Table Of Contents
Catalogue Product instruction ..........................2 System components .......................... 3 Hardware instruction ......................... 4 Controller front ......................... 4 Controller interface ........................6 Back of the Controller ....................... 7 Battery instruction and Charging indicator ................7 Articulation borescope probe ....................8 Rigid camera ..........................9 Installation Notes .......................... -
Page 3: Product Instruction
Product instruction PTZ41 pipe inspection camera is a new nondestructive flaw detection equipment, which combine with optics, electronic technical, precision machinery and micro-camera shooting. 〇 Optical detection The Controller adopts high brightness LCD, micro-small CCD/ CMOS camera, the video signal was processed and amplified, and the detection results will be clearly displayed on the 7inches LCD. -
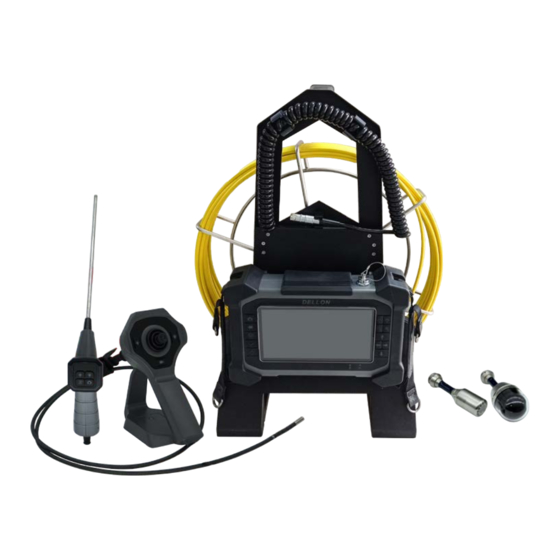
Page 4: System Components
System components (The actual configuration prevails) t ti 24mm wide angle camer A ti l ti Replaceable battery... -
Page 5: Hardware Instruction
Hardware instruction Controller front A: Capture button B: Video button C: Menu button D: OK button E: Power on/ off button and return button F: LED + G: LED - H: Close focus button I: Far focus button J: Up button K:... - Page 6 Power on/ off and return button: Press this button for about 2 seconds to turn on, and then entering real-time image mode; Press this button again for 3-5 seconds,the system prompts whether to shut down,press”OK”to turn off. When the system is working, shortly press the button, the system entering power-saving sleep state,and then press it again, waking up the device to work.During work.There is no any respond when operating the system, press this button to reset, also this button has the returning function.
-
Page 7: Controller Interface
Charging indicator: this indicator is on when charging. Controller interface A: Headphone interface B: SD card slot C: USB interface D: HDMI interface E: Charging interface F: External connecting cable interface Headphone interface: During video playback, by connecting the headphone to listen for sounds picked up by the detection probe. -
Page 8: Back Of The Controller
Back of the Controller Hanging screws Battery Holder Battery instruction and Charging indicator Battery connector 12V charging port Electric quantity Battery level indicator button When using the system, press“ ”, the battery level indicator will display the battery level, please charge to the system when only has two green the indicators is on. Note:... -
Page 9: Articulation Borescope Probe
Articulation borescope probe LED+ Rocker LED- Video button Capture Connecting cable Rocker: to control the bending part on the tip of the probe. Connecting cable: connecting with the controller. Inserting part Bending part Inserting part:using the material of tungsten wire, IP67 waterproof. Bending part:4-way articulation, Ip64 or IP67 waterproof(customized). -
Page 10: Rigid Camera
Rigid camera Hanle intrface Handle Recording Photograph Rigid button button Dimming camera button brightening Video key: Press this key to start or end video recording; when the rigid borescope is equipped with both a front view camera and a side view camera, press this key to swit ch between the front view or side view screen. -
Page 11: Install The Protective Frame
Install the protective frame A、 Take out the 40mm camera. B、 Push the locking ring away from the elastic claw, install the protective frame on the camera, pay attention to the installation in place, the elastic claw of the protective frame should be clipped into the camera’s latch groove. C、... -
Page 12: Install The Camera
Install the camera Unscrew the protective cap at the camera connection on the cable reel, insert the end of the 40MM color rotating camera with the protective frame into the camera connection port of the cable reel, and tighten it. Install support wheels A、Open the support wheel. -
Page 13: Operating Instruction
Operating instruction Operations 1. Before use, install the corresponding lens according to the working conditions. 2. When using, first confirm that the device has installed the battery and SD card, and press and hold the on/off button to turn on the host. 3.Observe the object a Press the LED dimming button to turn on the LED light source;... -
Page 14: Menu Operation
Menu operation After the device is turned on, it will automatically enter the video interface with full screen. The bottom right corner shows the length of the cable out of the reel and the brightness level of the camera light. Click any point on the screen to call up the touch screen button interface. - Page 15 Negative film: click the icon , the image enters the negative film state; Ruler: when the menu is set to "ruler 1", click the icon to turn on or off the XY cross ruler for comparison measurement; XY cross ruler display...
- Page 16 When the menu is set to "Ruler 2", click the icon to turn on or off the circular ruler; (The menu settings will be described in detail in the menu introduction later.) Circular ruler display Split screen switching: cycle the button and click the icon to display in sequence, forward-view full screen, side- view full screen, forward/side view split screen display.
- Page 17 Foward/side view split screen display Image zoom in: Click the icon to zoom in the image, up to 3 times.
- Page 18 Take a photo: Click the icon or the photograph button to take a photo. If the photo is successful, the photo instruction will be displayed, as shown in the figure. Video: Click the icon or the video button to record. When recording, the video indicator flashes and the video duration is displayed at the same time.
- Page 19 Replay : press into image and video replay mode, press to trasnsfer image review and video review. Click up and down on the vertical blue scroll bar on the right side or the up and down buttons to turn pages in the interface.
- Page 20 When previewing image files and video files, click the to enter the delete interface to choose whether to delete the file. Setup : press or menu buttom into menu initerface.
- Page 21 Video setup Enter menu interface, press the corresponding icon at the top of the screen to enter the video settings respectively. Screen setup Application setup system setup White balance: the camera image can accurately reflect the color condition of the subject, with automatic, cloudy, incandescent, daylight and other methods.
- Page 22 Contrast: press the icon bar cursor or press the left and right keys to adjust the contrast. The user can choose according to actual needs. The setting method is the same as above. Hue: Drag the icon cursor or press the left and right keys to adjust the height of the color.
- Page 23 Negative film: Click "on" or "off" to turn on or off the negative film state, and press the enter key to switch between on and off. The user can choose according to actual needs, and the setting method is the same as above. Screen settings Screen brightness: Drag the icon cursor or press the left and right buttons to adjust the screen brightness.
- Page 24 Ruler: press this cursor or enter the submenu to choose to open or close the ruler. Ruler 1 is an XY cross ruler, and ruler 2 is a circular ruler. The user can choose according to actual needs. The setting method is the same as above. Display mode: Click the left or right side of the ○-shaped icon in the figure or the confirm button to select the display mode.
- Page 25 Screen rotation: press on the left or right of the ○-shaped icon in the figure or the confirm button to rotate the screen at 0° and 180°. The user can choose according to actual needs. The setting method is the same as above. Application setup Date setting: press the date setting light bar or enter the date and time sub-menu, you can adjust and choose year/month/day/hour/minute, when the cursor selects the...
- Page 26 Language: This product supports multi-language selection such as simplified Chinese, English, etc. The user can set it by himself, and the method is the same as above. Sound: The user can choose whether to turn on or not according to actual needs, the method is the same as above.
- Page 27 System setup Automatic shutdown: The user can set the length of the automatic shutdown time according to actual needs. When the device is within the set time without any operation, the device will automatically shut down. Software version: The software version is fixed and is used to display the version status of the software.
- Page 28 Settings recovery: Users can choose whether to restore the factory settings of the device according to their needs, in the same way as above. Formatting: The user can choose whether to format the memory card or not, as required, in the same way as above.
-
Page 29: Product Technical Specifications
Product technical specifications Controller section Model Controller LCD monitor 7 inch Resolution 1280*720 30 fps Screen brightness 400cd/m² Screen contrast Touch screen Capacitive touch screens Video output HMDI high resolution USB interface Data transfer Memory card 32G SD Video resolution 1280*720 Picture resolution 1280*720... -
Page 30: Pushrod Cable Section
Pushrod cable section Camera dia. 41mm Camera length 60mm Pixel 720P Light source 12 LEDs Camera housing material Stainless steel 40mm color Tilt 180° rotation camera 360° Manual focus Image sensor CMOS 1/4 Ingress protection IP67 Waterproof depth Camera dia 24mm Camera length 42mm... -
Page 31: Scope Unit(Optional)
Scope unit(optional) Insertion cable section Dia. 8.4mm Length Outer layer Tungsten braided Bending angle >120° Ingress protection IP64 8mm front and side view scope unit Dia. 8.4mm Image sensor CMOS 1/4 Pixel 720P Field of view >90° Depth of focus 25mm-infinity Outer material Stainless steel... -
Page 32: Trouble Shooting
Trouble shooting Description Possible causes Solutions Cannot turn on the Battery is out Charge the battery or connect instrument directly to an external power supply Mnitor blue or blinking Camera is not installed properly Re-install the camera Abnormal video display Error in parameter adjustment on Adjusting the hue, contrast and colours... - Page 33 4. At the end of the use of the equipment, adjust the bending part straight, and then pull out the measured body, prohibit hard pulling and tugging. 5. When the device is finished, please turn off the power supply, and at the same time do a good job of protecting the lens pins by installing a protective cover for the pins (or directly to the built-in cable tray connection port) to avoid damage to the pins.
-
Page 34: After-Sale Service
After-sale Service 1.Service Commitment 1.1 The main body of the product is guaranteed for one year, the warranty period for the parts replaced by the repair is six months, the warranty period for the parts only repaired without replacement is three months, man-made damage is not covered by the warranty, lifetime repair is only charged for the cost of repair. -
Page 35: Maintenance Period
2.1 Your product is repaired by our after-sales service department and continues to be covered by the warranty period for the original machine. If the repaired part exceeds the free warranty period, please pay a repair service fee, which will be customised by our after-sales service department, for your product.
Need help?
Do you have a question about the PTZ41 and is the answer not in the manual?
Questions and answers