Table of Contents
Advertisement
Quick Links
Advertisement
Table of Contents

Summary of Contents for washloo Clean
- Page 1 Remote Control User Manual Clean Comfort Hygiene...
-
Page 3: Table Of Contents
Table of Contents Page Description Page Number Safety Precautions Product Overview Description of parts Operation Installation Guide Hard Water Filter Guide Electrical Supply Maintenance Trouble Shooting Technical Specifications Warranty User Information... -
Page 4: Safety Precautions
May result in death or injury ‘Do Not’ fully submerge the ‘Do Not’ Disassemble, attempt Washloo into water. to repair or alter the Washloo. ‘Do not’ use the product in locations Any alterations should be carried out exposed to excessive moisture and... - Page 5 ‘Do Not’ dispose of any burning materials on top of the Washloo. If materials such as cigarettes in the foreign objects enter the product, toilet. This may result in fire or product this may result in electric shock or deformation.
-
Page 6: Product Overview
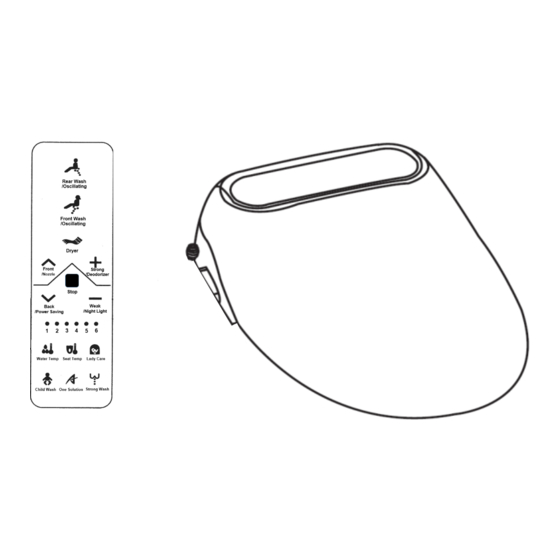
Mounting Bolts Rubber Expansion Sleeves O-Ring Hard Water Spanner Steel Adjustment Brackets Seal Filter One way T- Valve with 2x Internal Filters Water Pipe Connecting Accessories Washloo Attachment Accessories Note : The above illustration is an example only, your version may vary... - Page 7 Product Overview - Remote Control Models Indicator Panel – Washloo Ultra DR/VR and Omega LED Indicator Panel – Washloo Finesse & Finesse Square Only Operation Panel for All Models when Remote Control can’t be used. Remote Control Note : The above illustration is an example only, your version may vary...
-
Page 8: Description Of Parts
Tape Batteries Remote Control Holder to Wall Installation • Clean Area prior to installation of Remote Control Holder. • Press the tape down firmly and evenly and place on wall. Leave for 15 minutes prior to inserting the remote control... -
Page 9: Operation
Operation Rear Wash / Oscillating When you are seated and press this button, this activates the posterior/rear wash. The nozzle comes out and sprays water on the users posterior area. Press this button again and the nozzle will move forwards and backwards. Front Wash / Oscillating When you are seated and press this button, this activates the feminine wash. - Page 10 Operation Strong / Deodoriser (Water Pressure) While cleansing function is operating, press the `Strong/Deodoriser‘ to increase pressure and ‘Weak/Nightlight’ to decrease pressure. There are three pressure levels: LOW , MED and HIGH. When not seated, the deodoriser button will turn on the deodorisation mode for 2 minutes.
- Page 11 Operation Night Light Press this button to operate the light on and off function. ‘Number 4’ light on the remote control will flash when the button is pressed and held, indicating the light will be switched on/off. Lady Care Front wash will automatically be selected. Water temp will be set to its highest - HIGH 39°C (number 3) and water pressure is set to MEDIUM 36°C (number 2).
- Page 12 2 minutes. Number 2 light will flash on the remote when it’s on. This can be heard whilst the Washloo is in operation and when the user leaves the seat. It is the deodorisation features normal operation. Press this button again when no one is seated to turn off the deodoriser.
- Page 13 Operation Seat Temp Use this button to control the seat temperature. There are 4 temperature levels indicated by the numbered lights on the remote control. LOW 33°C (Number 4), MEDIUM 36°C (number 5), HIGH 39°C (number 6) and OFF (no light/numbers).
-
Page 14: Installation Guide
Installation Guide Installation Environment 1. Prior to installation, ensure the area for the Washloo is clear and the correct model has been selected for your pan (please see online fitting/measuring guide). 2. Washloos’ requires water pressure between 0.06Mpa (flow)- 0.75Mpa (Static). - Page 15 4. Install the Mounting bolts and tighten down to ensure the ‘Fixing Bracket’ is in the correct position. *The Fixing Bracket can be adjusted between 120-180mm to allow adjustment of the Washloo. Note : The above illustration is an example only, your version may vary...
-
Page 16: Hard Water Filter Guide
Installation Guide Installation of Washloo Seat Installing the Washloo Seat 1. Place the Washloo in front of the Fixing Cistern Fixing Bracket. Using the release button on the Bracket Release lower righthand side allow the locating button chamfer on the unit to slide backwards onto the fixing bracket. -
Page 17: Electrical Supply
1. Insert the electric plug into the designated socket/fused spur as recommended by a qualified electrician. 2. When switched on – all lights on the unit will be illuminated. The Washloo will now prime the water system for around 10 seconds and finally the nozzle will extend out whilst performing a cleaning/first use test function. -
Page 18: Maintenance
*Do not use a steel brush to clean. Cleaning and Maintenance; Filter Removal NOTE – If the water pressure reduces please remove and clean the filter as shown below. 1. Close the shut off valve and stop the water supply. -
Page 19: Trouble Shooting
Remove and clean. 2. Hard Water build up 3.Internal inlet solenoid blocked. 1. Clogged Mesh Filter 1. Remove, clean and reinstall mesh filter (as 2. Water supply valve not opened per guidelines). Lower water flow / Spray fully. -
Page 20: Technical Specifications
Technical Specifications Product Specification Voltage AC220-240V 50HZ Water Supply Direct connection to water pipe Water Pressure Equivalent to 0.8-7.5 BAR Water Pressure Adjustable in 4 levels Temperature control (4 Levels, room temperature/33°C/36°C/39°C Adjustable) Warm Washing Heater Capacity : 1200W Temperature Control system, , Temperature Reset Switch, Temperature fuse overheat protection with water and electricity isolation system. -
Page 21: Warranty
Warranty This electronic bidet has been designed and manufactured with great care and attention to detail. We offer a 24 month warranty. In the following cases the warranty does not apply; 1. Damage or loss sustained in fire, earth quake, flood, thunder or other acts of providence, pollution, gas damage, salt damage and abnormal voltage. -
Page 22: User Information
Important User Manual Information If you want to dispose of this product, do not mix with general household waste. There is a separate collection system for used electronic products in accordance with legislation that requires proper treatment, recovery and recycling. Only discard discharged batteries. - Page 23 Modern Life, Smart Choice...
Need help?
Do you have a question about the Clean and is the answer not in the manual?
Questions and answers