HILTI Nuron TE DRS-4/6 - Dust Removal System Manual
- Manual (284 pages)
Advertisement
- 1 Information about the operating instructions
- 2 Safety
- 3 Description
-
4
Operation
- 4.1 Preparations at the workplace
- 4.2 Installing the Hilti retaining strap (optional)
- 4.3 Fitting the dust removal module
- 4.4 Setting the length (stroke)
- 4.5 Setting drilling depth (depth gauge)
- 4.6 Emptying the dust box
- 4.7 Bump-cleaning TE DRS 4/6 T1 filter (US version)
- 4.8 Removing the dust removal module
- 4.9 Changing extraction head
- 5 Care and maintenance
- 6 Transport and storage of cordless tools and batteries
- 7 Troubleshooting
- 8 Documents / Resources
Information about the operating instructions
About these operating instructions
- Read these operating instructions before the product is used or operated for the first time. This is a prerequisite for safe, trouble-free handling and use of the product.
- Observe the safety instructions and warnings in these operating instructions and on the product.
- Always keep the operating instructions with the product and make sure that the product is accompanied by these operating instructions only, when the product is given to other persons.
Explanation of symbols
Warnings
Warnings alert persons to hazards that occur when handling or using the product. The following signal words are used:

Draws attention to imminent danger that will lead to serious personal injury or fatality.

Draws attention to a potential threat of danger that can lead to serious injury or fatality.

Draws attention to a potentially dangerous situation that could lead to personal injury or damage to the equipment or other property.
Symbols in the operating instructions
The following symbols are used in these operating instructions:
 | Comply with the operating instructions |
 | Instructions for use and other useful information |
 | Dealing with recyclable materials |
 | Do not dispose of electric equipment and batteries as household waste |
 | Hilti Li ion battery |
 | Hilti charger |
Symbols in illustrations
The following symbols are used in illustrations:
 | These numbers refer to the illustrations at the beginning of these operating instructions. | |
 | The numbers in illustrations refer to important work steps or to components important for the work steps. In the text, the corresponding numbers draw attention to these work steps or components, e.g. (3). | |
 | Item reference numbers are used in the overview illustration and refer to the numbers used in the key in the product overview section. | |
 | This symbol is intended to draw your special attention to certain points for handling the product. | |
Product-dependent symbols
Symbols on the product
The following symbols can be used on the product:

If applied on the product, the product has been certified by this certification body for the US and Canadian markets according to the applicable standards.
Product information
 products are designed for professional users and only trained, authorized personnel are permitted to operate, service and maintain the products. This personnel must be specifically informed about the possible hazards. The product and its ancillary equipment can present hazards if used incorrectly by untrained personnel or if used not in accordance with the intended use.
The type designation and serial number are printed on the rating plate.
- Write down the serial number in the table below. You will be required to state the product details when contacting Hilti Service or your local Hilti organization to inquire about the product.
Product information
| Dust removal module | TE DRS 4/6 |
| Generation: | 01 |
| Serial no.: |
Safety
General power tool safety warnings
Read all safety warnings, instructions, illustrations and specifications provided with this power tool. Failure to follow all instructions listed below may result in electric shock, fire and/or serious injury.
Save all warnings and instructions for future reference.
The term "power tool" in the warnings refers to your mains-operated (corded) power tool or battery-operated (cordless) power tool.
Work area safety
- Keep work area clean and well lit. Cluttered or dark areas invite accidents.
- Do not operate power tools in explosive atmospheres, such as in the presence of flammable liquids, gases or dust. Power tools create sparks which may ignite the dust or fumes.
- Keep children and bystanders away while operating a power tool. Distractions can cause you to lose control.
Electrical safety
- Power tool plugs must match the outlet. Never modify the plug in any way. Do not use any adapter plugs with earthed (grounded) power tools. Unmodified plugs and matching outlets will reduce risk of electric shock.
- Avoid body contact with earthed or grounded surfaces, such as pipes, radiators, ranges and refrigerators. There is an increased risk of electric shock if your body is earthed or grounded.
- Do not expose power tools to rain or wet conditions. Water entering a power tool will increase the risk of electric shock.
- Do not abuse the cord. Never use the cord for carrying, pulling or unplugging the power tool. Keep cord away from heat, oil, sharp edges or moving parts. Damaged or entangled cords increase the risk of electric shock.
- When operating a power tool outdoors, use an extension cord suitable for outdoor use. Use of a cord suitable for outdoor use reduces the risk of electric shock.
- If operating a power tool in a damp location is unavoidable, use a residual current device (RCD) protected supply. Use of an RCD reduces the risk of electric shock.
Personal safety
- Stay alert, watch what you are doing and use common sense when operating a power tool. Do not use a power tool while you are tired or under the influence of drugs, alcohol or medication. A moment of inattention while operating power tools may result in serious personal injury.
- Use personal protective equipment. Always wear eye protection. Protective equipment such as a dust mask, non-skid safety shoes, hard hat or hearing protection used for appropriate conditions will reduce personal injuries.
- Prevent unintentional starting. Ensure the switch is in the off-position before connecting to power source and/or battery pack, picking up or carrying the tool. Carrying power tools with your finger on the switch or energising power tools that have the switch on invites accidents.
- Remove any adjusting key or wrench before turning the power tool on. A wrench or a key left attached to a rotating part of the power tool may result in personal injury.
- Do not overreach. Keep proper footing and balance at all times. This enables better control of the power tool in unexpected situations.
- Dress properly. Do not wear loose clothing or jewellery. Keep your hair and clothing away from moving parts. Loose clothes, jewellery or long hair can be caught in moving parts.
- If devices are provided for the connection of dust extraction and collection facilities, ensure these are connected and properly used. Use of dust collection can reduce dust-related hazards.
- Do not let familiarity gained from frequent use of tools allow you to become complacent and ignore tool safety principles. A careless action can cause severe injury within a fraction of a second.
Power tool use and care
- Do not force the power tool. Use the correct power tool for your application. The correct power tool will do the job better and safer at the rate for which it was designed.
- Do not use the power tool if the switch does not turn it on and off. Any power tool that cannot be controlled with the switch is dangerous and must be repaired.
- Disconnect the plug from the power source and/or remove the battery pack, if detachable, from the power tool before making any adjustments, changing accessories, or storing power tools. Such preventive safety measures reduce the risk of starting the power tool accidentally.
- Store idle power tools out of the reach of children and do not allow persons unfamiliar with the power tool or these instructions to operate the power tool. Power tools are dangerous in the hands of untrained users.
- Maintain power tools and accessories. Check for misalignment or binding of moving parts, breakage of parts and any other condition that may affect the power tool's operation. If damaged, have the power tool repaired before use. Many accidents are caused by poorly maintained power tools.
- Keep cutting tools sharp and clean. Properly maintained cutting tools with sharp cutting edges are less likely to bind and are easier to control.
- Use the power tool, accessories and tool bits etc. in accordance with these instructions, taking into account the working conditions and the work to be performed. Use of the power tool for operations different from those intended could result in a hazardous situation.
- Keep handles and grasping surfaces dry, clean and free from oil and grease. Slippery handles and grasping surfaces do not allow for safe handling and control of the tool in unexpected situations.
Battery tool use and care
- Recharge only with the charger specified by the manufacturer. A charger that is suitable for one type of battery pack may create a risk of fire when used with another battery pack.
- Use power tools only with specifically designated battery packs. Use of any other battery packs may create a risk of injury and fire.
- When battery pack is not in use, keep it away from other metal objects, like paper clips, coins, keys, nails, screws or other small metal objects, that can make a connection from one terminal to another. Shorting the battery terminals together may cause burns or a fire.
- Under abusive conditions, liquid may be ejected from the battery; avoid contact. If contact accidentally occurs, flush with water. If liquid contacts eyes, additionally seek medical help. Liquid ejected from the battery may cause irritation or burns.
- Do not use a battery pack or tool that is damaged or modified. Damaged or modified batteries may exhibit unpredictable behaviour resulting in fire, explosion or risk of injury.
- Do not expose a battery pack or tool to fire or excessive temperature. Exposure to fire or temperature above 130°C (265°F) may cause explosion.
- Follow all charging instructions and do not charge the battery pack or tool outside the temperature range specified in the instructions. Charging improperly or at temperatures outside the specified range may damage the battery and increase the risk of fire.
Service
- Have your power tool serviced by a qualified repair person using only identical replacement parts. This will ensure that the safety of the power tool is maintained.
- Never service damaged battery packs. Service of battery packs should only be performed by the manufacturer or authorized service providers.
Additional safety instructions
- Observe all safety instructions in this documentation and in the documentation of the Hilti rotary hammer drill.
- Use respiratory protection to keep residual dust away from the face and airways when drilling and when servicing the tool or accessories.
- Always use the side handle on the Hilti rotary hammer drill, even when the dust removal module is fitted.
- Wear protective gloves.
- Take breaks between working and do physical exercises to improve the blood circulation in your fingers. Exposure to vibration during long periods of work can lead to disorders of the blood vessels and nervous system in the fingers, hands and wrists.
- Use the TE DRS-4/6 dust removal module for dust extraction. Dust from materials such as lead-based paints, certain types of wood and concrete/masonry/stone containing quartz, minerals or metal can be harmful to health.
- Make sure that the workplace is well ventilated and, where necessary, wear a dust mask appropriate for the type of dust generated. Contact with or inhalation of the dust may cause allergic reactions and/or respiratory or other diseases among operators or bystanders. Certain kinds of dust, such as oak and beech dust, are classified as carcinogenic, especially in conjunction with additives for treating wood (chromate, wood preservative).
- Always use the extraction head that is appropriate for the application (drilling or chiseling). The standard extraction head is suitable for drilling applications only.
- Risk of injury by falling tools and/or accessories. Before starting work, check that installed accessories are secure.
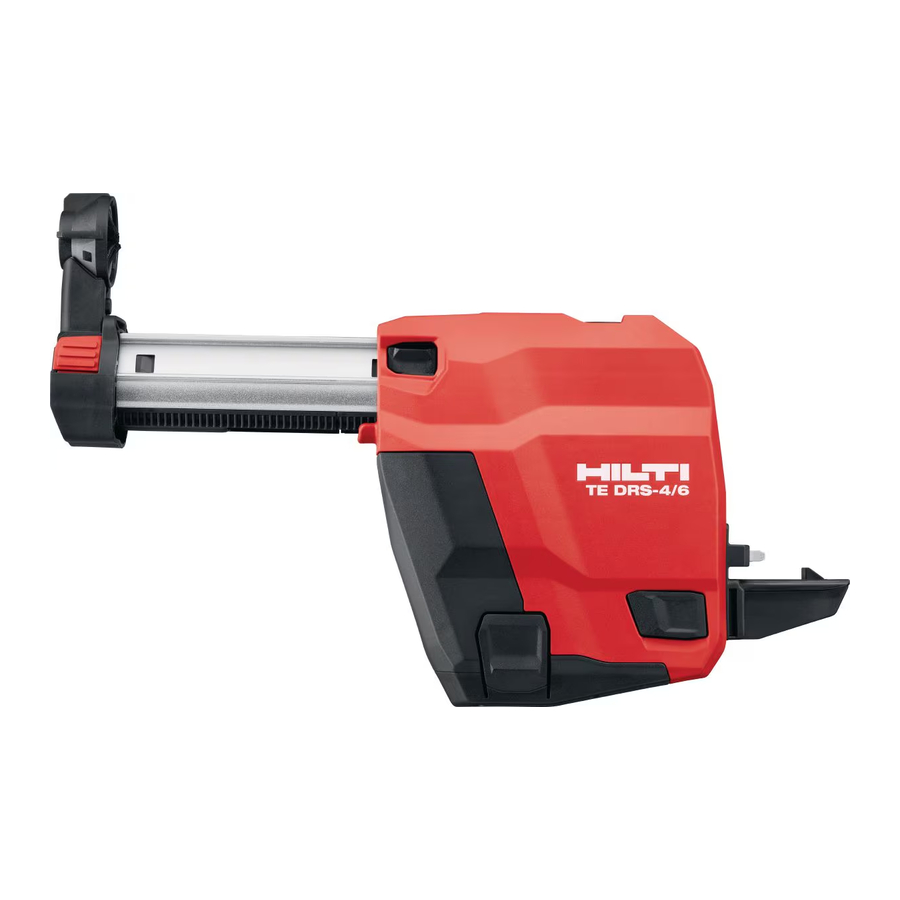
Description
Product overview

Fig.1
- Extraction head
- Stroke preset button
- DRS electrical interface
- Installation opening for accessories
- DRS release button
- Dust container release
- Cleaning mechanism (optional)
- Depth gauge
Intended use
The TE DRS 4/6 dust removal module dust removal module is an accessory for the Hilti TE 4 22 (03) and TE 6 22 (05) rotary hammer drills. It collects a high percentage of the dust and it attaches quickly and easily to the rotary hammer drill. The dust removal module has a built-in extractor fan. This fan is driven by its own motor. When the rotary hammer drill is switched on the dust removal module draws its electric power from the rotary hammer drill's battery.
The dust removal module is not suitable for working on metal and wood.
Items supplied
TE DRS-4/6 dust removal module, operating instructions
 Other system products approved for use with this product can be found at your local Hilti Store or at: www.hilti.group
Technical data
| Voltage | 21.6 V | |||
| Rated power input | 0 W | |||
| Suction | 250 ℓ/min (66 liq. galUS/min) | |||
| Weight | 0 kg (0 lb) | |||
| With TE6-22 | TE-CX XX/17 | 80 mm (3.1 in) | ||
| TE-CX XX/15 | 60 mm (2.4 in) | |||
| TE-CX X" x 6" | 80 mm (3.1 in) | |||
| With TE4-22 | TE-CX XX/22 | 110 mm (4.3 in) | ||
| TE-CX XX/17 | 57 mm (2.2 in) | |||
| TE-CX X" x 8" | 110 mm (4.3 in) | |||
Operation
Preparations at the workplace
Risk of injury by inadvertent starting!
- Before inserting the battery, make sure that the product is switched off.
- Remove the battery before making any adjustments to the power tool or before changing accessories.
Observe the safety instructions and warnings in this documentation and on the product.
Installing the Hilti retaining strap (optional)

Fig.2
Damage to the product and / or the retaining leash. Incorrect handling can result in damage to the product and/or retaining leash.
- Do not use a metal chain as a retaining leash. Do not use a retaining leash with a length of more than 2,0 m (6 ft).
To avoid damage and injury, when working at a height it is advisable to use the Hilti retaining strap.
The retaining strap allows the tool retaining leash to be attached.
When working with the product, you must comply with national regulations for working at heights.
- Insert the two tabs on the retaining strap into the slots on each side of the DRS dust removal module.
- Secure the retaining strap with the screws supplied.
- Loop the Hilti retaining leash through the retaining strap.
Fitting the dust removal module

Fig.3
Before fitting the module, check that the attachment points and the electrical interfaces on the rotary hammer drill and dust removal module are free of dust and that the parts fit or move freely and easily.
- Set the forward / reverse selector switch on the rotary hammer drill to the middle position.
- Remove the depth gauge from the side handle.
- Position the dust removal module on the guides and from the front, push it on to the power tool until it engages.
- After fitting, check that the dust removal module is secure.
Setting the length (stroke)
")
Fig.4
Risk of injury! The telescopic section will jump out when the stroke preselection button is pressed.
- Hold the rotary hammer with the dust removal module so that the telescopic section cannot injure you when it jumps out.
- Press and hold down the stroke preset button.
- With the drill bit fitted, press the rotary hammer drill against the working surface until the tip of the drill bit comes into contact with the surface.
- Release the stroke preset button.
Setting drilling depth (depth gauge)
")
Fig.5
If drilling depth has to be exact, drill test holes to establish the correct depth.
- Press and hold down the button of the depth gauge.
- Move the ring to the desired drilling depth.
- Release the button of the depth gauge.
Emptying the dust box

Fig.6
Dust can escape if the filter is full, so it has to be emptied regularly. Wear respiratory protection when doing this.
- Hold the power tool horizontal and allow it to run for a short time.
- This ensures that residual dust deposits in the dust removal module are drawn into the dust box.
- Press and hold down the release button of the dust container.
- Pull the dust box down and clear of the dust removal module.
- Empty the dust box.
- Push the empty dust box back into the dust removal module from below until it engages.
Bump-cleaning TE DRS 4/6 T1 filter (US version)
")
Fig.7
Clean the filter after drilling 5 holes (12 mm x 50 mm) (1/2 in x 2 in).
- When suction power diminishes, operate the cleaning mechanism and let it snap back to its original position (do this 5 times).
Removing the dust removal module

Fig.8
- Set the forward / reverse switch on the rotary hammer drill to the middle position.
- Press and hold down the DRS release button.
- Pull the dust removal module forward and clear of the power tool.
Changing extraction head

Fig.9
- Remove the dust removal module from the rotary hammer drill.
- Press and hold down the extraction head release button.
- Pull the old extraction head up and out of its guide.
- Press the new extraction head into the guide until it engages.
Care and maintenance
- Check all parts of the module for signs of damage at regular intervals and make sure that they all function correctly. Do not use the module if parts are damaged or if they do not function correctly.
- Do not use water, oil, grease or cleaning products.
- Use only a dry brush and a cloth to clean the dust removal module.
- Do not touch the filter material when cleaning it and do not use compressed air to clean it. This can damage the filter material.
Risk of injury with battery inserted !
- Always remove the battery before carrying out care and maintenance tasks!
Care of the product
- Carefully remove stubborn dirt.
- Carefully clean the air vents, if present, with a dry, soft brush.
- Use only a slightly damp cloth to clean the housing. Do not use cleaning agents containing silicone as these can attack the plastic parts.
- Use a dry, clean cloth to clean the contacts of the product.
Care of the Li -ion batteries
- Never use a battery with clogged air vents. Clean the air vents carefully using a dry, soft brush.
- Avoid unnecessary exposure of the battery to dust and dirt. Never expose the battery to high levels of moisture (e.g. by being dipped in water or left in the rain).
If a battery has been soaked by moisture, treat it as a damaged battery. Isolate it in a non-flammable container and consult Hilti Service. - Keep the battery free of extraneous oil and grease. Do not permit dust or dirt to accumulate unnecessarily on the battery. Clean the battery with a dry, soft brush or a clean, dry cloth. Do not use cleaning agents containing silicone as these can attack the plastic parts.
Do not touch the contacts of the battery and do not remove the factory-applied grease from the contacts. - Use only a slightly damp cloth to clean the housing. Do not use cleaning agents containing silicone as these can attack the plastic parts.
Maintenance
- Check all visible parts and controls for signs of damage at regular intervals and make sure that they all function correctly.
- Do not use the product if signs of damage are found or if parts malfunction. Immediately have the product repaired by Hilti Service.
- After cleaning and maintenance, install all guards and protective devices and check that they are in full working order.
To help ensure safe and reliable operation, use only genuine Hilti spare parts and consumables. Spare parts, consumables and accessories approved by Hilti for use with your product can be found at your Hilti Store or online at: www.hilti.group
Transport and storage of cordless tools and batteries
Transport
Accidental starting during transport !
- Always transport your products with the batteries removed!
- Remove the battery/batteries.
- Never transport batteries loose and unprotected. During transport, batteries should be protected from excessive shock and vibration and isolated from any conductive materials or other batteries that may come in contact with the terminals and cause a short circuit. Comply with the locally applicable regulations for transporting batteries.
- Do not send batteries through the mail. Consult your shipper for instructions on how to ship undamaged batteries.
- Prior to each use and before and after prolonged transport, check the product and the batteries for damage.
Storage
Accidental damage caused by defective or leaking batteries !
- Always store your products with the batteries removed!
- Store the product and the batteries in a cool and dry place. Comply with the temperature limits stated in the technical data.
- Do not store batteries on the charger. Always remove the battery from the charger when the charging operation has completed.
- Never leave batteries in direct sunlight, on sources of heat, or behind glass.
- Store the product and batteries where they cannot be accessed by children or unauthorized persons.
- Prior to each use and before and after prolonged storage, check the product and the batteries for damage.
Troubleshooting
If the trouble you are experiencing is not listed in this table or you are unable to remedy the problem by yourself, please contact Hilti Service.
| Trouble or fault | Possible cause | Action to be taken | ||
| An excessive amount of dust is generated. | The dust container is full. |
| ||
| Dust container or filter faulty. |
| |||
| The suction head is defective. |
| |||
| The suction head brush is worn. |
| |||
| The drill bit is not centered in the suction head. | The dust removal module is not fitted correctly. |
| ||
Documents / Resources
References
Download manual
Here you can download full pdf version of manual, it may contain additional safety instructions, warranty information, FCC rules, etc.
Download HILTI Nuron TE DRS-4/6 - Dust Removal System Manual
Advertisement
Thank you! Your question has been received!


Need Assistance?
Do you have a question about the Nuron TE DRS-4/6 that isn't answered in the manual? Leave your question here.