Table of Contents
Advertisement
Quick Links
Advertisement
Table of Contents

Related Manuals for Neodynamics NeoNavia

Summary of Contents for Neodynamics NeoNavia
- Page 1 User Manual neonavia®...
-
Page 3: Table Of Contents
To install NeoNavia biopsy system............................13 Operation........................................16 To prepare for biopsy....................................16 To perform a biopsy....................................17 To turn off the NeoNavia ® biopsy system and dispose of the probe after biopsy..24 Maintenance......................................25 To clean and inspect....................................25 To do an electrical safety test..............................27 To maintain the driver.....................................28... -
Page 4: Introduction
The FlexiPulse ™ and VacuPulse ™ probes are intended to provide tissue samples from breast lesions and axillary lymph nodes for histologic examination. The NeoNavia ® biopsy system is to be used only by healthcare professionals in hospitals or healthcare facilities. -
Page 5: Contact Information
Contact information Contact us at: Information Manufacturer Address Send a letter to note your specific area of in- NeoDynamics AB terest. Lejonvägen 14 Please include your customer name and ac- SE-181 32 Lidingö count number, your contact information and Sweden your question. -
Page 6: Safety Information
NOTICE means that the information is important for trouble-free and optimal use of the device. Warnings Do not make changes to the NeoNavia ® biopsy system, except for changes given in the • user documentation, without authorization from the manufacturer. -
Page 7: Cautions
Do not use NeoNavia ® biopsy probes if the sterile package is broken or damaged or if • the Use by date has passed. Do not use NeoNavia ® biopsy probes if any part of the device that is intended for •... - Page 8 Driver WEEE Ground/Earth • Base unit Type BF Applied part • Base unit Stand-by • Base unit Light symbol • Driver Pulse symbol • Driver Sampling symbol • Driver Caution • Probes Do not reuse • Probes neonavia user manual...
- Page 9 • Probes Keep dry • Base unit • Driver • Probes Temperature limits • Base unit • Driver • Probes Humidity range • Base unit • Driver • Probes Atmospheric pressure range • Base unit • Driver • Probes neodynamics...
- Page 10 • Probes Lot number • Probes Do not use if damaged • Probes Refer to the NeoNavia ® biopsy system • Probes user manual The sterile package contains 1 probe • Probes (REF# 2102 or 2104) Sterilized using ethylene oxide •...
- Page 11 Symbol Description Where Contains FlexiPulse probe • Probes Contains VacuPulse probe • Probes neodynamics...
-
Page 12: Product Overview
• 1 Holder • 1 Power cord (length: 3 m / 9.8 ft) 1 NeoNavia ® biopsy system user manual • Driver delivery The items in the list below are included in the delivery of the driver, REF# 1103: •... -
Page 13: Driver - Overview
Driver – overview Driver status indicator Release buttons Light button Pressurized air connector Sampling button Vacuum connector Pulse button Electrical connector Light Probes – overview 3.4.1 FlexiPulse – overview Sampling needle Fastener Protective sleeve Vacuum chamber neodynamics... -
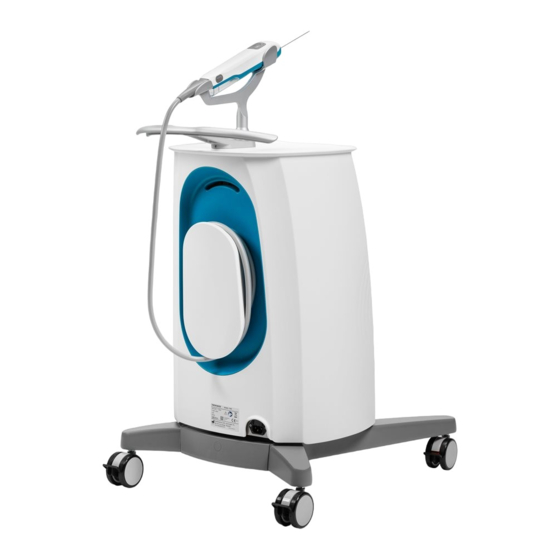
Page 14: Product Description
3.5.1 Component description The base unit supplies NeoNavia ® with power. • The driver is attached to the base unit and controls the operation of NeoNavia ® during • the procedure. The base unit and the driver are non-sterile. •... -
Page 15: Installation
Atmospheric pressure, storage and transport 60 kPa to 106 kPa (8.7 psi to 15.4 psi) Power requirements NeoNavia ® must be connected to a supply mains with protective earth when it is operated. The operation voltage must be 110-120 VAC / 60 Hz. For more information about electrical requirements, see 9.3. - Page 16 manual...
- Page 17 To move and park NeoNavia ® 4.3.2 4.3.3 To connect NeoNavia to the wall socket Caution: Floors should be wood, concrete or ceramic Caution: Make sure not to tile. If floors are covered block the access to the with synthetic material, see appliance inlet.
-
Page 18: Operation
Warning: Do not bend the sampling needle. If the sampling needle is bent, do not use the probe. Caution: Do not manually manipulate the probe before attaching it to the driver. The probe might become unusable. neonavia user manual... -
Page 19: To Perform A Biopsy
If the sampling needle is bent, do not use the probe. Caution: Do not use NeoNavia ® when the power cord is wound around the cover, handle or any other part of the base unit. Caution: Make sure that the driver cable is free from external pressure. - Page 20 The light button Notice: A system self- test is performed every time NeoNavia ® starts up. If the system self-test is successful the On/Off button turns green, if the...
- Page 21 Tap the sampling button to cut the sample. Press and hold the sampling button to eject the sample. Tap the sampling button to retract the trocar and expose the open tip to the edge of the suspicious lesion. neodynamics...
- Page 22 Repeat from step 2 to collect more samples. Tap the sampling button to take the sample. The sequence is completely automatic. Notice: The FlexiPulse probe is tested up to 30 sampling cycles without any signs of degradation. neonavia user manual...
- Page 23 Repeat from step 3 to collect more samples. Notice: The lid on the tissue basket can be Notice: The VacuPulse removed if necessary. probe is tested up to 30 sampling cycles without any signs of degradation. neodynamics...
- Page 24 Adjust the position of the needle manually as needed. 5.2.5 To use the VacuPulse probe – manual mode Press the sampling button to take the sample. Insert the needle and pulse into the suspicious lesion, using short neonavia user manual...
- Page 25 30 sampling cycles without any signs of Notice: The lid on the degradation. tissue basket can be removed if necessary. Samples are collected in the transparent tissue basket. Notice: Blood in the transparent vacuum chamber indicates bleeding at the sample site. neodynamics...
-
Page 26: To Turn Off The Neonavia ® Biopsy System And Dispose Of The Probe After Biopsy
To turn off the NeoNavia ® biopsy system and dispose of the probe after biopsy Warning: Use applicable personal protective equipment following local guidelines (for example gloves), during operation and maintenance of NeoNavia ® , to prevent Discard the probe as referred to in local laws and regulations. -
Page 27: Maintenance
Make sure that no contamination remains. 6.1.1 To clean and inspect the base unit Clean the NeoNavia ® biopsy system and visually inspect it for damage after each procedure or as required. Warning: Do not submerge or spray liquids directly on any parts of the NeoNavia ®... - Page 28 6.1.2 To clean and inspect the driver Clean the NeoNavia ® biopsy system and visually inspect it for damage after each procedure or as required. Warning: Do not submerge or spray liquids directly on any parts of the NeoNavia ®...
-
Page 29: To Do An Electrical Safety Test
(probe attached). Use a soft clean Notice: If damage cloth lightly moisturised with a to the NeoNavia ® detergent based disinfectant, biopsy system is ethanol 96 % or isopropyl discovered during the alcohol. -
Page 30: To Maintain The Driver
Keep a record of when the current or damage is detected driver was installed. within three years or 1000 procedures. Then Replace the driver after 3 years service or replacement or 1000 procedures, whichever will be required. comes first. neonavia user manual... -
Page 31: Troubleshooting
Troubleshooting Notice: Please report product related problems to NeoDynamics AB. See chapter for contact information. To troubleshoot NeoNavia ® biopsy system The base unit On/Off button status indicator does not light up when I press the On/Off button. Possible cause: NeoNavia ®... - Page 32 The driver is not properly connected. Corrective action: Make sure that the driver is properly con- nected. See chapter 4.3.1. Possible cause: There is no probe attached to the driver. Corrective action: Connect the selected probe. See chapter 5.1.2. neonavia user manual...
- Page 33 See chapter 4.3.1. The system is safe to use. If the issue remains, please contact a NeoDynamics representative. See chapter for contact information. The base unit On/Off button status indicator is green but pulses are not activated when the pulse button is pressed.
- Page 34 The base unit On/Off button status indicator is green but pulses are not activated when the pulse button is pressed. Possible cause: NeoNavia ® biopsy system is not working properly. Corrective action: Contact a NeoDynamics representative. See chapter for contact information.
- Page 35 If the driver status indicator is flashing yellow, follow the instructions for The yellow status indicator flashes yellow, no probe is attached. See 5.2.2. Attach a new probe. If the issue remains, please contact a NeoDynamics representative. See chapter for contact information. neodynamics...
- Page 36 If the issue remains, please contact a NeoDynamics representative. See chapter for contact information. The base unit On/Off button status indicator is not lit, but NeoNavia ® is turned on (indica- ted by sound). Possible cause: The status indicator does not work.
-
Page 37: To Troubleshoot The Driver
Corrective action: Dispose of the probe per instruction and se- lect a new probe to continue the procedure. neodynamics... - Page 38 This is not an error but an indication that the probe is loaded/open for sampling. FlexiPulse: from the time the sampling but- ton is pressed until the sequence is com- plete. VacuPulse: from the tip is pulled back until the sample is ejected. neonavia user manual...
-
Page 39: Recycling
Recycling To recycle the NeoNavia ® biopsy system Follow the instructions below when you take NeoNavia ® out of service for decommission or disposal: Make sure that base unit and driver is cleaned as referred to in chapter 6.1.1. -
Page 40: Technical Data
The customer or the user of NeoNavia ® should assure that it is used in an environment that complies with the specifications. Portable and Mobile RF Communications Equipment can affect Medical Electrical Equipment. - Page 41 Electromagnetic immunity – guidance and manufacturer's declaration NeoNavia ® is intended for use in the electromagnetic environment specified in the next section. The customer or the user of the NeoNavia ® should assure that it is used in an environment that complies with the specifications.
- Page 42 AC mains voltage prior to application of the test level. NeoNavia ® is intended for use in the electromagnetic environment specified below. The customer or the user of NeoNavia ® should make sure that it is used in an environment that complies with the specifications.
- Page 43 Table 5: Guidance and Manufacturer’s Declaration – Electromagnetic Immunity to proximity fields from RF wireless communications equipment (additional compliance levels) Test fre- Band Service/Application Modulation Maxi- Dis- quency tance munity power test Level 400 MHz 400 – 470 TETRA Pulse modu- 27 V/m lation 18 Hz 423 MHz neodynamics...
- Page 44 Pulse modu- 54 V/m lation 217 Hz 910 MHz RFID Pulse modu- 54 V/m lation 217 Hz 960 MHz RFID Pulse modu- 54 V/m lation 217 Hz 2450 MHz RFID Pulse modu- 54 V/m lation 217 Hz neonavia user manual...
-
Page 45: Consumables
Consumables Ref# Article name 2104 FlexiPulse (14G) 2102 VacuPulse (10G) 3103 Tissue basket for VacuPulse neodynamics... - Page 46 Document number: NEODYNAMICS-016-002-EN Publication date: 2023-08-28 neonavia user manual...
- Page 47 neodynamics...
- Page 48 NeoDynamics AB Lejonvägen 14 SE-181 32 Lidingö Sweden www.neodynamics.com...
Need help?
Do you have a question about the NeoNavia and is the answer not in the manual?
Questions and answers