Table of Contents
Advertisement
Quick Links
Cold Plunge Chiller Manual
Models: .6HP, .8HP, 1HP
PERSONAL AND COMMMERCIAL USE
120 VAC 15 AMP DEDICATED CIRCUIT WITH GFCI OUTLET REQUIRED
IMPORTANT: After unpacking (or accidental tip-over allow the chiller
to stand upright for 20 minutes before starting. The fluid in the
compressor needs to settle. Failure to do so could result in irrevocable
damage not covered under warranty.
Advertisement
Table of Contents

Summary of Contents for Harvia 6HP
- Page 1 Cold Plunge Chiller Manual Models: .6HP, .8HP, 1HP PERSONAL AND COMMMERCIAL USE 120 VAC 15 AMP DEDICATED CIRCUIT WITH GFCI OUTLET REQUIRED IMPORTANT: After unpacking (or accidental tip-over allow the chiller to stand upright for 20 minutes before starting. The fluid in the compressor needs to settle.
-
Page 2: Important Safety Instructions
IMPORTANT SAFETY INSTRUCTIONS DANGER: Indicates a hazardous situation that, if not avoided, will result in death or serious injury. WARNING: Indicates a hazardous situation that, if not avoided, could result in death or serious injury. CAUTION: Indicates a hazardous situation that, if not avoided, could result in minor or moderate injury. - Page 3 • Prolonged immersion in water below 70 F (21 C) can pose a risk of hypothermia. Please note that the core body temperature can continue to drop even after emerging from the cold plunge tub. Hypothermia can lead to serious injury or death. •...
- Page 4 Pre-Install Checklist & Safety Warning Failure to adhere to the safety instructions and guidelines provided in this warning could result in serious injury or even death. Cold water immersion, electrical installation, and usage entail inherent risks that require careful attention and precautionary measures.
- Page 5 o Chill Unit Fans: Never touch the chill unit fans while in operation, this could lead to damage of the unit or injury to yourself. o Voltage: Make sure that the chiller is plugged into a circuit with the properly rated voltage. If the voltage is incorrect, this could damage the chill unit.
-
Page 6: Electrical Warning
Safety Precautions: Ozone generators should be installed, operated, and maintained by trained professionals. Always follow manufacturer instructions for the safe use of ozone-generating systems. Regularly monitor and maintain ozone levels to ensure effective water treatment. Avoid direct inhalation of ozone gas, as it may have adverse health effects. ... - Page 7 Specs Model .6HP .8HP AC 120V AC 120V AC 120V Power Supply 60Hz 60Hz 60Hz Input Power 640W 725W 1500W Compressor Power 505W 630W 945W Cooling Capacity 1680W 2230W 2700W Heating Function Refrigerant R410A R410A R410A Water Temp. 37°F-85°F 37°F-85°F 37°F-85°F...
-
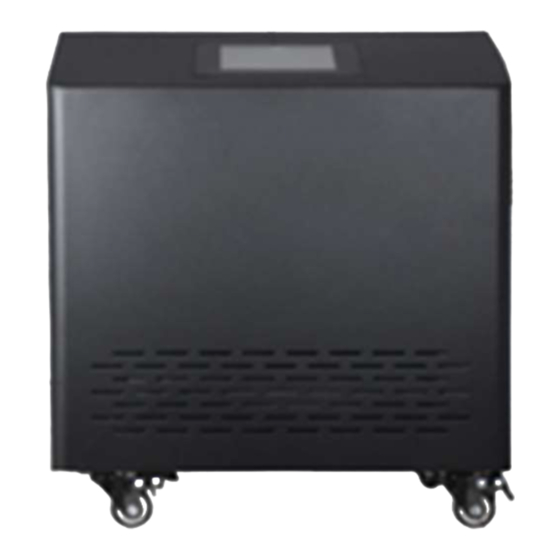
Page 8: Product Diagram
ASSEMBLY Product Diagram Page | 8 CHILLER UNIT OWNER’S MANUAL... - Page 9 Packing List 1pc Cold Plunge Chiller & Spa System 1pc Filter Wrench 1pc Hair Strainer Wrench 3pc 20 Micron Filter Cartridge 2pc Quick-Connect Hoses 2pc Hose Adapters 6pc Rubber Gasket Seals Note: Your cold plunge has been assembled and tested prior to packaging Page | 9 CHILLER UNIT OWNER’S MANUAL...
-
Page 10: Assembly Details
Assembly Details Step 1: Find a level surface for your chiller IMPORTANT: Allow the chiller to stand upright on a level surface for 20 minutes before starting. The fluid in the compressor needs to settle. Failure to do so could result in irrevocable damage not covered under warranty. - Page 11 Assembly Diagram Name Name Chiller Inlet Cold Plunge Inlet Chiller Outlet Cold Plunge Outlet Page | 11 CHILLER UNIT OWNER’S MANUAL...
- Page 12 OPERATING THE COLD PLUNGE CHILLER & SPA SYSTEM Control Panel Introduction Interface Overview Page | 12 CHILLER UNIT OWNER’S MANUAL...
-
Page 13: App Set Up
App Set Up Note: Tuya can only support 2.4G WIFI signal. Before connecting your phone to the chiller, please confirm that the Wi-Fi___33 used by your phone is in the 2.4G frequency band. It will not be able to connect to the chiller, if it is in the 5G frequency band. -
Page 14: Settings & Preferences
Settings & Preferences Step 1: Test your GFCI (reset) button o Locate the GFCI reset button on the back of your chiller. o After the unit it turned on, hit the reset button. o Test to make sure the unit properly shuts down / reboots. IMPORTANT: If the unit does not reset. -
Page 15: Water Maintenance
Water Maintenance Step 1: Filling your plunge o For best results, it’s recommended that you fill your plunge with filtered water. In-line water hose filter attachments are readily available at local hardware stores, pool supply stores, and online at Amazon. Step 2: Turn on your ozone o It’s recommended that you set you ozone pump to run for 2 minutes –... -
Page 16: Unit Maintenance
Unit Maintenance Maintenance Checklist: Regular cleaning: o Wipe down the exterior and fan regularly to prevent dust and debris from entering the system. o We highly endorse getting a small water vacuum to clean debris, especially for outdoor units. ... -
Page 17: Troubleshooting
Test to see if the water level is getting lower in your plunge tub. Mark it and check again the next day. Also ensure that the leak is not coming from the plunge tub. If your leak is significant, please reach out to Harvia customer service directly. Page | 17... -
Page 18: Warranty Information
Harvia warrants that the Cold Plunge Tub, purchased from an authorized agent and in its undamaged original packaging, is free from defects in materials and workmanship. Harvia or its agent will, at their discretion, repair or replace parts that become defective within the warranty period, subject to the specific conditions below.
Need help?
Do you have a question about the 6HP and is the answer not in the manual?
Questions and answers