Table of Contents
Advertisement
Quick Links
Advertisement
Table of Contents

Related Manuals for TAEHA PRO CAN PUMP DUAL

Summary of Contents for TAEHA PRO CAN PUMP DUAL
- Page 1 PRO CAN PUMP DUAL (PRO-CPD20) User manual...
-
Page 2: Table Of Contents
4.3.1 Names of each part ............................21 4.3.2 Change procedure ............................. 22 4.3.3 Insert procedure..............................24 HMI screen operation ............................. 26 Description ..................................26 5.1.1 Changing screen ..............................26 2/95 2023/07/31 Copyright © 2023 by TAEHA CORP. All Rights Reserved... - Page 3 Auto mode ................................41 6.5.2 Manual mode ............................... 42 HMI Screen ................................... 43 Home page ..................................43 Pail page ................................... 45 Menu page ..................................46 Set(mode) page ................................47 3/95 2023/07/31 Copyright © 2023 by TAEHA CORP. All Rights Reserved...
- Page 4 Check and Actions ............................... 72 Disassembly of PRO-CPD20 ............................ 73 Trouble Shooting ................................80 Appearance .................................. 83 Front view ..................................83 Right side view ................................84 Top view ................................... 85 4/95 2023/07/31 Copyright © 2023 by TAEHA CORP. All Rights Reserved...
- Page 5 Control Panel .................................. 85 Part List ..................................86 10.1 Pump part ..................................86 10.1.1 PRO-CPD20-WP ..............................86 10.1.2 PRO-CPD20-DP ..............................89 10.1.3 PRO-CPD20-NP ..............................92 10.2 Equipment part ................................95 5/95 2023/07/31 Copyright © 2023 by TAEHA CORP. All Rights Reserved...
-
Page 6: Safety Precautions
Rev 1.6 Safety precautions This manual is applied to products manufactured and sold by Taeha Co., Ltd. (here in after referred to as “TAEHA”), so it can not be partially copied without our permission. This manual explains the specifications, installation, wiring, maintenance and inspection, abnormal phenomena and measures of our products. - Page 7 4. Failure to attach the cover may result in personal injury or electric shock. Caution 1. Do not apply main power supply other than the voltage specified in this user’s manual. It may cause malfunction. 7/95 2023/07/31 Copyright © 2023 by TAEHA CORP. All Rights Reserved...
- Page 8 Our equipment includes driving and rotating parts. Please install a safety net on the rotating part and ever approach it during operation. 8/95 2023/07/31 Copyright © 2023 by TAEHA CORP. All Rights Reserved...
- Page 9 If not, there is a danger of electric shock. Disposal notes Caution 1. Dispose of this equipment as industrial waste. 9/95 2023/07/31 Copyright © 2023 by TAEHA CORP. All Rights Reserved...
-
Page 10: General Information
2. If a person other than Taeha’s technical support person fixes the equipment or repairs without using the specified parts 3. If any part other than specification specified by Taeha Co., Ltd. Is used in the product 4. Due to intentional breakage 5. -
Page 11: Precautions
4. Do not turn off the power or cut off the air pressure if the equipment is not in danger/caution during operation. Serious problems with the use of the equipment may occur. 5. If a serious error occurs in the equipment, please contact us. 11/95 2023/07/31 Copyright © 2023 by TAEHA CORP. All Rights Reserved... -
Page 12: Features
Operating humidity 10 ~ 85%RH (No condensation) Vibration Less than 0.5G Comm. connector LAN(Modbus TCP), RS485(Modbus RTU) external wiring Follower plate WP(Wiper plate) / DP(Disposal plate) / NP(None plate) 12/95 2023/07/31 Copyright © 2023 by TAEHA CORP. All Rights Reserved... -
Page 13: Appearance
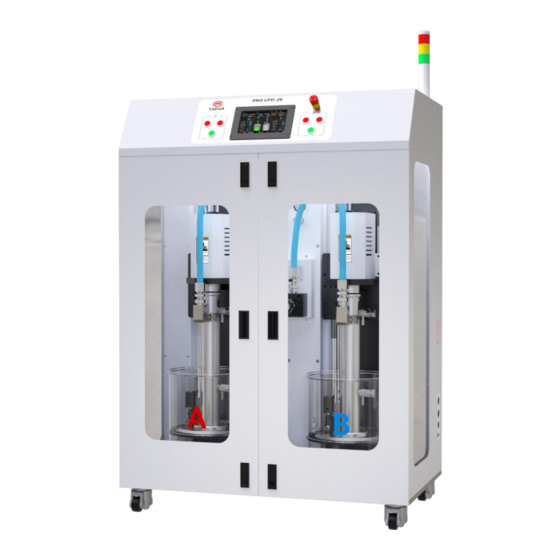
PRO CAN PUMP DUAL (PRO-CPD20) Rev 1.6 3.2 Appearance 13/95 2023/07/31 Copyright © 2023 by TAEHA CORP. All Rights Reserved... -
Page 14: Operation Of Equipment
The signal tower indicates the PRO-CPD20’s operating status, Signal Tower The setting value and operation elements to operate the equipment can be easily operated using the touch screen. Touch Screen 14/95 2023/07/31 Copyright © 2023 by TAEHA CORP. All Rights Reserved... - Page 15 Auto mode : Supply can be started when the replacement complete button is ON. ➔ Manual mode : The supply can be started when the replacement button and INSERT button are ON 15/95 2023/07/31 Copyright © 2023 by TAEHA CORP. All Rights Reserved...
-
Page 16: External Connector
➔ RJ45 connector This is a main air port for material supply. ➔ ∅8 Air hose This is external frame grounding for material supply. Frame Ground 16/95 2023/07/31 Copyright © 2023 by TAEHA CORP. All Rights Reserved... - Page 17 OFF if the feed pressure is lower than the lower limit setting during material supply PRES-HIGH OFF if the supply pressure exceeds the upper limit setting LOW-ALM Off if material is insufficient FAULT Off in case of equipment abnormality 17/95 2023/07/31 Copyright © 2023 by TAEHA CORP. All Rights Reserved...
-
Page 18: How To Check The Replacement Time For Pail
1) There are a photo sensor and rack bar for 20liter height sensction, and these parts could detect the residual quantity with % unit displaying. You can see a level sensor as above. You can check the pail level on HMI. 18/95 2023/07/31 Copyright © 2023 by TAEHA CORP. All Rights Reserved... -
Page 19: Notification Of When To Replace Material
2) Low alarm : The alaram occurs after sensing for Pump head up/down cylinder’s REED S/W. -> Pump stop, Material feeding stop -> the User needs to change the new material 19/95 2023/07/31 Copyright © 2023 by TAEHA CORP. All Rights Reserved... -
Page 20: Safety Device To Prevent The Unlimited Pump Working
(insufficient material feeding inside of hose or blocked or prevenitng unlimited pump working by empty material in container.) (Example: Real disply for feeding setpoint pressure, material feeding pressure and pump operation speed) 20/95 2023/07/31 Copyright © 2023 by TAEHA CORP. All Rights Reserved... -
Page 21: Material Container(Can) Replacement Procedure
There are disposal type and wiper type in Follower plate, and the usage is the same. PUMP Follow Plate Vent Valve Blower Disposal cover Pail VENT TUBE Disposal plate type(standard) Wiper plate type 21/95 2023/07/31 Copyright © 2023 by TAEHA CORP. All Rights Reserved... -
Page 22: Change Procedure
LED ON : 운전 LED ON : RUN LED OFF : 정지 LED OFF : STOP 2) Press the Change button. At this time, select "YES" when the confirm pop-up is displayed. 22/95 2023/07/31 Copyright © 2023 by TAEHA CORP. All Rights Reserved... - Page 23 5) Check the control screen when the LED of the Change button turns off. Vent valve is turned off automatically, and Level is displed as “???” 6) Remove the pail. 23/95 2023/07/31 Copyright © 2023 by TAEHA CORP. All Rights Reserved...
-
Page 24: Insert Procedure
2) After inserting the Pail, make sure that the pail and follower plate are centered on each other. If the center position does not match, use the pail guide to adjust. 24/95 2023/07/31 Copyright © 2023 by TAEHA CORP. All Rights Reserved... - Page 25 PAIL LIQUID DISPLAY LEVEL SET-UP 5) Pail replacement completed. Use the RUN / STOP buttons from the control panel to drive the equipment. For Level settings, see 6-2 Pail Settings. 25/95 2023/07/31 Copyright © 2023 by TAEHA CORP. All Rights Reserved...
-
Page 26: Hmi Screen Operation
5.1.1 Changing screen Touch the icon to move to the screen. If you touch the arrow direction on the screen, you go to the next screen of that item. 26/95 2023/07/31 Copyright © 2023 by TAEHA CORP. All Rights Reserved... -
Page 27: Changing Settings
(However, it cannot be changed while in the control operation.) When changing the setting in the SETTING PAGE, touch YES in the Confirm window. (However, it cannot be changed while in the control operation.) 27/95 2023/07/31 Copyright © 2023 by TAEHA CORP. All Rights Reserved... -
Page 28: Hmi Screen Structure
PRO CAN PUMP DUAL (PRO-CPD20) Rev 1.6 5.2 HMI screen structure 28/95 2023/07/31 Copyright © 2023 by TAEHA CORP. All Rights Reserved... -
Page 29: Page Icon
Page that displays alarm list if alarm occurs during equipment Alarm page operation. Page that shows the ID/IP or external communications, firmware Info page version and pump life cycle. 29/95 2023/07/31 Copyright © 2023 by TAEHA CORP. All Rights Reserved... -
Page 30: Operation Mode
: Check input contact points (switch, sensor pressure value) and analog input of the PRO-CPD20. ➔ Output Test : Check output contact points (button lamp, brush valve, signal tower) and analog output of the PRO-CPD20. 30/95 2023/07/31 Copyright © 2023 by TAEHA CORP. All Rights Reserved... -
Page 31: Operation Method
- Position(=Cylinder position) -> Defined as follower plate position. - Blower High(=Pail high) -> Defined as pail top end. - Pail low -> Defined as pail bottom end. Pail set-up 31/95 2023/07/31 Copyright © 2023 by TAEHA CORP. All Rights Reserved... - Page 32 The position value shows the current position of the cylinder. The position value is 0 when it meets the cylinder top sensor. If the numerical value at the top and bottom of the container is 0, the initial container is not set. 32/95 2023/07/31 Copyright © 2023 by TAEHA CORP. All Rights Reserved...
-
Page 33: Pail High Setting
➔ The cylinder position value increases when the cylinder is lowered, and the bottom of the cylinder is made identical to the top of the container (cylinder lowering operation is required). ➔ Type the position value on the top value of the container. 33/95 2023/07/31 Copyright © 2023 by TAEHA CORP. All Rights Reserved... -
Page 34: Pail Low Setting
➔ At this time, it is possible to proceed without a container, but enter a numerical value of about -5, taking into account the distance between the bottom of the container and the bottom. 34/95 2023/07/31 Copyright © 2023 by TAEHA CORP. All Rights Reserved... -
Page 35: Pail Level 설정
4. Position 값 오차로 LEVEL 표시가 상이할 수 있으며, 100% 이상일 경우 X 로 표시됩니다. LEVEL 산출공식 LEVEL = (PAIL_LOW-POSITION)*100/(PAIL_LOW-PAIL_FULL) Ex) Position 60 / PAIL Full 60 / PAIL LOW 260 LEVEL = (260-60)*100/(260-60) = 100% 35/95 2023/07/31 Copyright © 2023 by TAEHA CORP. All Rights Reserved... -
Page 36: Pail Mounting
① Insert button push -> ② Vent valve, cylinder down ON -> ③ Contact with follow plate liquid -> ④ Liquid rise with vent hose -> ⑤ Vent sensor liquid detection -> ⑥ Vent valve, Cylinder down OFF -> ⑦ Auto change completed 36/95 2023/07/31 Copyright © 2023 by TAEHA CORP. All Rights Reserved... -
Page 37: Manual Mode
-> ④ Confirm vent sensor detection with eyes or through HMI vent sensor -> ⑤ Vent valve, Cylinder down OFF -> ⑥ Pail change button -> ⑦ Confirm -> ⑧ Yes -> ⑨ Manual change complete 37/95 2023/07/31 Copyright © 2023 by TAEHA CORP. All Rights Reserved... -
Page 38: Condition Setting And Material Feeding
Once the material container has been combined, set the liquid transfer conditions as shown above and proceed to the Home screen to prepare for the start of liquid transfer. 38/95 2023/07/31 Copyright © 2023 by TAEHA CORP. All Rights Reserved... -
Page 39: Auto Mode
- If vent sensor led is off, the vent hose must be checked. - If the material supply is operated, the signal tower turns on about 400ms. 39/95 2023/07/31 Copyright © 2023 by TAEHA CORP. All Rights Reserved... -
Page 40: Manual Mode
- For manual operation, the cylinder must be maintained in the down state. - If the material transfer operation is executed, the signal tower will flash with a cycle of about 400 ms. 40/95 2023/07/31 Copyright © 2023 by TAEHA CORP. All Rights Reserved... -
Page 41: Pail Replacement
When you touch the change button, as shown in Act1 on the left, the blower is always on, and the cylinder up repeatedly turns on/off to raise the follow plate. 41/95 2023/07/31 Copyright © 2023 by TAEHA CORP. All Rights Reserved... -
Page 42: Manual Mode
6.5.2 Manual mode During manual replacement of pail, the replacement can proceed to manual mode by referring to the auto mode sequence on pail page. 42/95 2023/07/31 Copyright © 2023 by TAEHA CORP. All Rights Reserved... -
Page 43: Hmi Screen
➔ Left : Pail not replaced. ➔ Right : Pail replacement complete Displays run/stop status of the pump during equipment operation. ➔ Left : Pump run ➔ Right : Pump stop 43/95 2023/07/31 Copyright © 2023 by TAEHA CORP. All Rights Reserved... - Page 44 12018.07.09 10:59 ➔ Needs to be set at the beginning. (Set page -> ETC) 10:59 Turns the alarm sound of the signal tower buzzer on/off by touching this icon. 44/95 2023/07/31 Copyright © 2023 by TAEHA CORP. All Rights Reserved...
-
Page 45: Pail Page
: Number of pail replacement ➔ This is the pail level setting required for the initial set-up. (If set-up is not done properly, auto change, residual check and pump operation will be affected.) 45/95 2023/07/31 Copyright © 2023 by TAEHA CORP. All Rights Reserved... -
Page 46: Menu Page
Go to cal page button ➔ Administrator password is required when switching to cal page Go to pwd page button Go to alarm page button Go to info page button 46/95 2023/07/31 Copyright © 2023 by TAEHA CORP. All Rights Reserved... -
Page 47: Set(Mode) Page
➔ P1 : Set the pressure of plate supply pressure unit. ➔ P2 : Set the pressure of the dispensing unit. ➔ P1+P2 : Set the pressure of the dispensing unit. 47/95 2023/07/31 Copyright © 2023 by TAEHA CORP. All Rights Reserved... - Page 48 ➔ P2 : Detect the top limit of the dispensing unit. Maximum pressure set-up ➔ Set maximum pressure value of P1 materials transfer when reference sensor P1 + P2 is linked. ➔ Activated when P1 + P2 is used. 48/95 2023/07/31 Copyright © 2023 by TAEHA CORP. All Rights Reserved...
-
Page 49: When Using The Reference Sensor P1
If the pressure value in the P1 supply unit drops below the pressure bottom limit, the liquid transfer stops and an alarm is triggered. 49/95 2023/07/31 Copyright © 2023 by TAEHA CORP. All Rights Reserved... -
Page 50: When Using The Reference Sensor P2
If the pressure value in the P2 supply unit drops below the pressure bottom limit, the liquid transfer stops and an alarm is triggered. 50/95 2023/07/31 Copyright © 2023 by TAEHA CORP. All Rights Reserved... -
Page 51: When Using The Reference Sensor P1+P2
If the pressure value in the P1 supply unit drops below the bottom pressure limit, the liquid transfer stops and an alarm is triggered. Set the pressure value of the P1 supply unit. 51/95 2023/07/31 Copyright © 2023 by TAEHA CORP. All Rights Reserved... -
Page 52: Description Of Pump Operation In P1+P2 Interlock Control
1 RPM per second. Control operation type can be set through external communication. ➔ LOCAL : PRO-CPD20 front panel button control ➔ REMOTE : PRO-CPD20 operation control by external signal 52/95 2023/07/31 Copyright © 2023 by TAEHA CORP. All Rights Reserved... -
Page 53: Set(Etc) Page (1)
It is possible to set ID and address value for upper LAN communication (RJ45). PRO-CPD20 HMI time setting is possible. ➔ YY : Year / Month / Day ➔ HH : Hour / Minute / Second 53/95 2023/07/31 Copyright © 2023 by TAEHA CORP. All Rights Reserved... -
Page 54: Set(Etc) Page (2)
7.6 Set(etc) page (2) Release Pressure function (option), Expiration (liquid expiration date Japan-Korea) function, Vent contact setting (setting before factory shipment) screen. 54/95 2023/07/31 Copyright © 2023 by TAEHA CORP. All Rights Reserved... -
Page 55: Test Pump Page
➔ Each setting value can be configured, and all three values must be set for repeating operation. Acceleration time until normal pump operation is achieved. Deceleration time until the pump stops. 55/95 2023/07/31 Copyright © 2023 by TAEHA CORP. All Rights Reserved... -
Page 56: Test Input Page
➔ Connects with the external connector to react with the external contact point. Displays the cylinder and blower sensor input values as decimal numbers. Displays the sensor and internal analog input values applied to the PRO-CPD20 in decimal. 56/95 2023/07/31 Copyright © 2023 by TAEHA CORP. All Rights Reserved... - Page 57 ➔ POSITION : Displays the cylinder position value. When the cylinder-high sensor is on, the position value is 0, and the position value increases as the cylinder comes down. 57/95 2023/07/31 Copyright © 2023 by TAEHA CORP. All Rights Reserved...
-
Page 58: Test Output Page
➔ BUZZ BUTTON → BUZZ ON/OFF PRO-CPD20 front panel BUTTON LED TEST ➔ UP BUTTON → CHANGE LED ON/OFF ➔ DN BUTTON → INSERT LED ON/OFF ➔ START BUTTON → RUN/STOP LED ON/OFF 58/95 2023/07/31 Copyright © 2023 by TAEHA CORP. All Rights Reserved... - Page 59 PRO-CPD20 external output I/O output test ➔ 1 to 6 ON/OFF for each external group #1 and #2 External analog output test. ➔ There are two channels in total: CH1 and CH2. 59/95 2023/07/31 Copyright © 2023 by TAEHA CORP. All Rights Reserved...
-
Page 60: Trend Page
Displays PRO-CPD20 motor rpm and torque. The min/max values can be input for the feeding pressure graph. The min/max values can be input for the motor rpm graph. 60/95 2023/07/31 Copyright © 2023 by TAEHA CORP. All Rights Reserved... -
Page 61: Cal Page(Cylinder, Blower)
➔ SET-2 : Maximum calibration pressure value ➔ SV.kpa[kPa] : Input pressure value to calibrate ➔ S.Vraw[DEC] : Input the current value by giving the pressure value to calibrate 61/95 2023/07/31 Copyright © 2023 by TAEHA CORP. All Rights Reserved... -
Page 62: Cal Page(Resin)
➔ SET-2 : Maximum calibration pressure value ➔ SV.kpa[kPa] : Input pressure value to calibrate ➔ S.Vraw[DEC] : Input the current value by giving the pressure value to calibrate 62/95 2023/07/31 Copyright © 2023 by TAEHA CORP. All Rights Reserved... -
Page 63: Cal Page(Hardner)
➔ SET-2 : Maximum calibration pressure value ➔ SV.kpa[kPa] : Input pressure value to calibrate ➔ S.Vraw[DEC] : Input the current value by giving the pressure value to calibrate 63/95 2023/07/31 Copyright © 2023 by TAEHA CORP. All Rights Reserved... -
Page 64: Calibration 상세 설명
Set the minimum kPa to 0 kPa. For maximum kPa, apply the maximum pressure that can be set or apply a high pressure. DEC is a digital conversion value, ranging from 0~65535(16bits). 64/95 2023/07/31 Copyright © 2023 by TAEHA CORP. All Rights Reserved... -
Page 65: Calibration
PRO CAN PUMP DUAL (PRO-CPD20) Rev 1.6 7.13.2 Calibration 그림 1. SET-min calibration 그림 2. SET-max calibration 65/95 2023/07/31 Copyright © 2023 by TAEHA CORP. All Rights Reserved... -
Page 66: Cal-Initialize Page
Initializes the record. Initializes the equipment operation time. Initializes the material container usage time. Initializes the container change count. Initializes the pump cumulative revolution count. Initializes all parameters. (Not recommended.) 66/95 2023/07/31 Copyright © 2023 by TAEHA CORP. All Rights Reserved... -
Page 67: Pwd Page
➔ Wrong Pascode : Incorrect password entered ➔ Enter New Passcode : Enter new password ➔ Confirm New Passcode : Retype the new password ➔ Changed Your Passcode!! : Password change complete 67/95 2023/07/31 Copyright © 2023 by TAEHA CORP. All Rights Reserved... -
Page 68: Alarm Page
When feeding operation is run, if When status is 6. Low Pressure measured value is kept below 80% of detected for about five the configured pressure value consecutive seconds 68/95 2023/07/31 Copyright © 2023 by TAEHA CORP. All Rights Reserved... - Page 69 6 – Check motor, sensor, board 7- Replace pail 8 – Replace the vent tube 9 – Check vent sensor/tube, cylinder sensor 11, 12, 13, 14 – Check motor driver-related parts 69/95 2023/07/31 Copyright © 2023 by TAEHA CORP. All Rights Reserved...
-
Page 70: Info Page
Displays the firmware version for the board. Displays the number of pump cycles. Displays the number of pail change count. Displays the usage time of the equipment. 70/95 2023/07/31 Copyright © 2023 by TAEHA CORP. All Rights Reserved... -
Page 71: Maintenance
To restart the operation, remove the cause of the alarm and release it. Caution For some alarms, the alarm is not released after reset. In this case, you must reboot (Power ON/OFF) after completing action for the error. 71/95 2023/07/31 Copyright © 2023 by TAEHA CORP. All Rights Reserved... -
Page 72: Check And Actions
- Fastening condition of fasteners and fasteners in equipment Other checks Routine - Wiring fastening and fastening state - Arrangement and arrangement around equipment 72/95 2023/07/31 Copyright © 2023 by TAEHA CORP. All Rights Reserved... -
Page 73: Disassembly Of Pro-Cpd20
8.3 Disassembly of PRO-CPD20 This explains the disassembly method for maintenance of PRO-CP20. Use the spanner to disassemble the right high-pressure hose, then disassemble the upper sensor and air hose. 73/95 2023/07/31 Copyright © 2023 by TAEHA CORP. All Rights Reserved... - Page 74 PRO CAN PUMP DUAL (PRO-CPD20) Rev 1.6 2) After disassembling the upper clamp, disassemble the material chamber by turning it to the left or right. 74/95 2023/07/31 Copyright © 2023 by TAEHA CORP. All Rights Reserved...
- Page 75 PRO CAN PUMP DUAL (PRO-CPD20) Rev 1.6 3) After disassembling the lower clamp, remove the bolt fastened to the hub and disassemble the hub and the follow plate. 75/95 2023/07/31 Copyright © 2023 by TAEHA CORP. All Rights Reserved...
- Page 76 PRO CAN PUMP DUAL (PRO-CPD20) Rev 1.6 4) Disassemble outlet port and pressure gauge on the front of material chamber. 76/95 2023/07/31 Copyright © 2023 by TAEHA CORP. All Rights Reserved...
- Page 77 PRO CAN PUMP DUAL (PRO-CPD20) Rev 1.6 Remove the drain valve to remove the air bubbles on the right side of the material chamber. 77/95 2023/07/31 Copyright © 2023 by TAEHA CORP. All Rights Reserved...
- Page 78 PRO CAN PUMP DUAL (PRO-CPD20) Rev 1.6 6) Disassemble hub and chamber. 7) Fix the repair tool on the rear side and turn the front stator counterclockwise to disassemble. 78/95 2023/07/31 Copyright © 2023 by TAEHA CORP. All Rights Reserved...
- Page 79 PRO CAN PUMP DUAL (PRO-CPD20) Rev 1.6 8) Fix the material chamber and disassemble the rotor and chamber cap. 79/95 2023/07/31 Copyright © 2023 by TAEHA CORP. All Rights Reserved...
-
Page 80: Trouble Shooting
When the power is not turned off, the sensor may be activated by any object or inspectors inside the equipment. It may also cause electric shock. 80/95 2023/07/31 Copyright © 2023 by TAEHA CORP. All Rights Reserved... - Page 81 When the actual remaining amount inside the pail is more Pail level set-up does not work Pail level set-up needs re-progress than the remaining amount on properly the screen 81/95 2023/07/31 Copyright © 2023 by TAEHA CORP. All Rights Reserved...
- Page 82 1. Liquid removal from Vent sensor When an alarm occurs during Change vent tube alarm 2. Check the setting of HMI ETC Page vent contact automatic coupling generated "NC" 82/95 2023/07/31 Copyright © 2023 by TAEHA CORP. All Rights Reserved...
-
Page 83: Appearance
PRO CAN PUMP DUAL (PRO-CPD20) Rev 1.6 Appearance 9.1 Front view 83/95 2023/07/31 Copyright © 2023 by TAEHA CORP. All Rights Reserved... -
Page 84: Right Side View
PRO CAN PUMP DUAL (PRO-CPD20) Rev 1.6 9.2 Right side view 84/95 2023/07/31 Copyright © 2023 by TAEHA CORP. All Rights Reserved... -
Page 85: Top View
PRO CAN PUMP DUAL (PRO-CPD20) Rev 1.6 9.3 Top view 그림 1. 평면도 9.4 Control Panel 85/95 2023/07/31 Copyright © 2023 by TAEHA CORP. All Rights Reserved... -
Page 86: Part List
PRO CAN PUMP DUAL (PRO-CPD20) Rev 1.6 10 Part List 10.1 Pump part 10.1.1 PRO-CPD20-WP 86/95 2023/07/31 Copyright © 2023 by TAEHA CORP. All Rights Reserved... - Page 87 T022001-A20A Air vent end cap AL6061 SCP-20WP-A4-11 Air vent spring SWP 2.0 T022001-A21A Air vent piston SUS303 T022001-A21A Air vent piston rod SUS303 T022001-A17A Air vent hinge cap SUS303 87/95 2023/07/31 Copyright © 2023 by TAEHA CORP. All Rights Reserved...
- Page 88 Wrench bolt(M4x10) STEEL ALLOY Nut(M5x5) STEEL ALLOY Wrench bolt(M3x6) STEEL ALLOY Wrench bolt(M3x5) STEEL ALLOY Nut(M12x1, SW17) STEEL ALLOY Sensor KCR E411 Wrench bolt(M5x13) STEEL ALLOY Wrench bolt(M5x15) STEEL ALLOY 88/95 2023/07/31 Copyright © 2023 by TAEHA CORP. All Rights Reserved...
-
Page 89: Pro-Cpd20-Dp
PRO CAN PUMP DUAL (PRO-CPD20) Rev 1.6 10.1.2 PRO-CPD20-DP 89/95 2023/07/31 Copyright © 2023 by TAEHA CORP. All Rights Reserved... - Page 90 Drain nozzle cap SUS303 101010-A2-04 Ceramic sleeve cap SUS303 101010-A2-03-B Ceramic sleeve Zirconia(Zr0 101010-A2-13 Stop ring(l) SUS304 101010-A2-10 Joint sleeve(l) SUS303 101010-A2-03-A Driving shaft SUS303 101010-A2-15 Joint tube FFKM 90/95 2023/07/31 Copyright © 2023 by TAEHA CORP. All Rights Reserved...
- Page 91 STEEL ALLOY Wrench bolt(M4x10) STEEL ALLOY Wrench bolt(M3x6) STEEL ALLOY Wrench bolt(M3x5) STEEL ALLOY Nut(M12x1, SW17) STEEL ALLOY Sensor KCR E411 Wrench bolt(M5x15) STEEL ALLOY Wrench bolt(M4x24) STEEL ALLOY 91/95 2023/07/31 Copyright © 2023 by TAEHA CORP. All Rights Reserved...
-
Page 92: Pro-Cpd20-Np
PRO CAN PUMP DUAL (PRO-CPD20) Rev 1.6 10.1.3 PRO-CPD20-NP 92/95 2023/07/31 Copyright © 2023 by TAEHA CORP. All Rights Reserved... - Page 93 T022003-A18A Drain nozzle cap SUS303 PRO-CP20-P5 Motor ass’y APMC-FBL04AMK-TH02 SCP-20WP-B Reducer B3110103C14 Ferrule clamp 2.5S Wrench bolt(M2.5x4) STEEL ALLOY Wrench bolt(M3x8) STEEL ALLOY Wrench bolt(M5x20) STEEL ALLOY Clamp LNP6-20 93/95 2023/07/31 Copyright © 2023 by TAEHA CORP. All Rights Reserved...
- Page 94 PRO CAN PUMP DUAL (PRO-CPD20) Rev 1.6 Wrench bolt(M5x12) STEEL ALLOY Wrench bolt(M4x12) STEEL ALLOY Wrench bolt(M5x13) STEEL ALLOY Wrench bolt(M5x15) STEEL ALLOY 94/95 2023/07/31 Copyright © 2023 by TAEHA CORP. All Rights Reserved...
-
Page 95: Equipment Part
- Transmissive type(photo-IC output type) PRO-CP20-E4 Photo sensor - Gap width : 5.0mm - Input power : AC 200~230V PRO-CP20-E5 Servo driver - Rated current : 3A - Capacity : 400W 95/95 2023/07/31 Copyright © 2023 by TAEHA CORP. All Rights Reserved...
Need help?
Do you have a question about the PRO CAN PUMP DUAL and is the answer not in the manual?
Questions and answers