
Related Manuals for Baum VISIO 19

Summary of Contents for Baum VISIO 19
- Page 1 Users manual VISIO 19 Version 2.3 - June 2012 For Sales & Service contact: Pamtrad Customs Ltd. 22 Ruddington Lane Wilford Nottingham. NG11 7BH Tel: 0115 981 6636 Email: info@pamtrad.co.uk...
- Page 2 BAUM Retec AG. All efforts have been made to ensure that information contained in this document is correct at the time of issue. Neither BAUM Retec AG nor its representatives assume any responsibility for errors or omissions. Nor is any liability assumed for damages resulting from the use of information contained herein.
-
Page 3: About This Manual
About VISIO Handy design, simple to use, yet powerful – that is what VISIO stands for. Though being one of the smallest lightweight and best designed devices, VISIO provides all the functionality you expect from an excellent CCTV reader. Visio features full colour auto focus and a variety of false colours. Reverse foreground and background colour is is also available. -
Page 4: Table Of Contents
Table of contents ABOUT THIS MANUAL ............................3 TABLE OF CONTENTS ............................4 BEFORE YOU START ............................5 HOW TO POSITION VISIO ON YOUR DESK ....................5 VERY FIRST TIME POWER ON AFTER INSTALLATION ................6 VISIO CONTROL PANEL ........................... 7 VISIO CONTROL PANEL BUTTONS - QUICK REFERENCE .............. -
Page 5: Before You Start
Before you start Please read the safety instructions at the end of this manual and check the contents of the packaging. What’s in the box: • 1 VISIO CCTV Reader device • 1 Power cable to mains • 1 users guide How to position VISIO on your desk Place VISIO on your desk and set it so far back that when pulled out to the maximum position (nearest to your belly) the front edge of the XY-table is... -
Page 6: Very First Time Power On After Installation
“AUTO“ button left of power button of Display. The above steps only have to be performed once directly after assembly. In your daily use from then on, you only have to press the power button on VISIO 19+ control panel. -
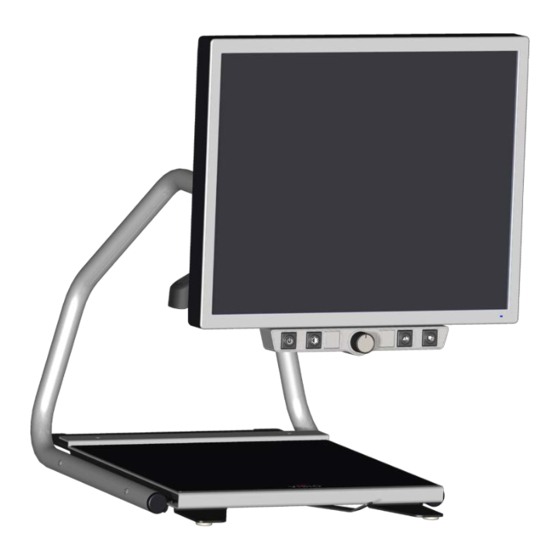
Page 7: Visio Control Panel
VISIO Control Panel VISIO Control Panel Buttons - Quick Reference Power Short press will power up device (lights on) Long press will switch off Image optimizer Selects one of five image quality optimizer settings for viewing critical documents with low contrast or bad print. Zoom Turn knob left to decrease magnification, turn knob right to increase magnification. -
Page 8: Getting Familiar With Your New Visio
Getting familiar with your new VISIO You have already learned how to position VISIO on your desk and you have connected VISIO to the power supply. You can slightly tilt the display so that you can comfortably view the screen. Do not tilt too much;... - Page 9 Turn the zoom knob counter clockwise to the end position to obtain minimum magnification. The minimum zoom level not intended for reading, however it gives you a better overview on the document structure. Thus you can easily find the position you want to view at higher magnifications. Now, press the picture button.
- Page 10 Select the colours you prefer with the text button and press the text button again for reversing foreground and background until you find the option you prefer. NB: VISIO remembers the colour settings you made. So if you switch between text mode and picture mode and come back to text mode, you find the previous colours there.
-
Page 11: Vertical Display Adjustment
Vertical Display adjustment The vertical display adjustment is an optional accessory which is not included in the standard packaging. Adjusting range is 80mm in 9 steps. To adjust, hold display and pull out both knobs (on left and right side of display support behind display) simultaneously. - Page 12 If the device appears to be operating abnormally, or to be damaged in any way, please contact your BAUM dealer as soon as possible. If you smell smoke or an odour coming out of the device, turn off the power immediately.
- Page 13 Do not pull the plug out by the lead when removing the power plug. Avoid shock. Do not throw or let fall. Repairs may only be carried out by BAUM service personnel or by service technicians authorized by BAUM Retec AG.
-
Page 14: Common Problems And Solutions
Use only a clean, dry cloth to clean the housing. Do not use any cleaning fluids or solvents. Protect the device from extreme heat, e.g. from the sun, heating units, hot cars etc. With extreme cold and frost the device becomes inoperable and must be brought slowly back to room temperature. -
Page 15: Document Cannot Be Read
Move lever to leftmost position Letters are fluttering Increase zoom by turning zoom knob clockwise. Please contact our Service Department if you encounter any problems or have any questions: BAUM Retec AG, Service, In der Au 22, D-69257 Wiesenbach Germany. -
Page 16: Warranty
Warranty BAUM Retec AG warrants the device, effective from the date of delivery, to be free of any defects in material and workmanship. Warranty is not tranferable and does not apply to groups, multi users or agencies. This device has been designed for the individual purchaser to be used in home or office environments. -
Page 17: Service Box
Service box For shipping VISIO in the service box, proceed as follows: • Switch off VISIO • Unplug from mains • Put Display in upright position, fasten brake of XY-table • Remove white foam parts and corrugated card board cover from box. •... - Page 20 Tel: 0115 981 6636 Email: info@pamtrad.co.uk Manufactured by: BAUM Retec AG In der Au 22 D-69257 Wiesenbach Germany Phone: +49 (0) 62 23 / 4909-0 Fax: +49 (0) 62 23 / 4909-399 E-Mail: info@baum.de Web: www.baum.de © 2010 Copyright by BAUM Retec AG...
Need help?
Do you have a question about the VISIO 19 and is the answer not in the manual?
Questions and answers