Advertisement
Quick Links
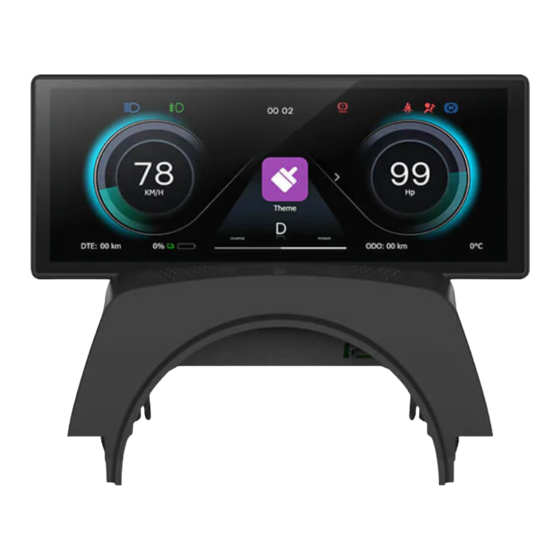
Parts List
parts list diagram
①
http://loc.dingtalk.com/8aa52d05f50bc1878b69043bf5d82d
facd14cfa124dbd41http://loc.dingtalk.com/8aa52d05f50bc1
878b69043bf5d82dfacd14cfa124dbd4187c536c2e56ce696f
QzpcVXNlcnNcQWRtaW5pc3RyYXRvclxBcHBEYXRhXFJvYW1p
bmdcRGluZ1RhbGtcMTkxNDY0ODA2M192MlxJbWFnZUZpb
GVzXDE2OTMxODcyMjQxNzhfMi4xLnBuZw==?renderHeight
=1920&renderOrientation=1
&renderWidth=128087c536c2e56ce696fQzpcVXNlcnNcQWR
taW5pc3RyYXRvclxBcHBEYXRhXFJvYW1pbmdcRGluZ1RhbGtc
②
MTkxNDY0ODA2M192MlxJbWFnZUZpbGVzXDE2OTMxODcy
Mi4xLnBuZw==?renderHeight=1920&renderOrientation=1&r
1
MjQxNzhf
enderWidth=1280
①
③
③
1. Tools required for installation
Screen installation tools: Gloves, Plastic bar, Threading
tape, Tape
Camera installation tools: No.10 socket, Post, Ratchet
④
wrench, Threading tape, Tape, Diagonal pliers
2. Installation Precautions
Note: Please ensure that the screen is powered off
to prevent malfunctions.
Tip : For faster installation, be sure to read these
instructions carefully.
6.8 inch screen
②
Camera
④
Main harness
Camera extension
harness
Advertisement

Summary of Contents for Hansshow F68 Plus
- Page 1 Parts List parts list diagram ① 6.8 inch screen Main harness ② ③ ① http://loc.dingtalk.com/8aa52d05f50bc1878b69043bf5d82d Camera extension Camera ③ ④ harness facd14cfa124dbd41http://loc.dingtalk.com/8aa52d05f50bc1 878b69043bf5d82dfacd14cfa124dbd4187c536c2e56ce696f QzpcVXNlcnNcQWRtaW5pc3RyYXRvclxBcHBEYXRhXFJvYW1p bmdcRGluZ1RhbGtcMTkxNDY0ODA2M192MlxJbWFnZUZpb GVzXDE2OTMxODcyMjQxNzhfMi4xLnBuZw==?renderHeight 1. Tools required for installation =1920&renderOrientation=1 Screen installation tools: Gloves, Plastic bar, Threading &renderWidth=128087c536c2e56ce696fQzpcVXNlcnNcQWR tape, Tape taW5pc3RyYXRvclxBcHBEYXRhXFJvYW1pbmdcRGluZ1RhbGtc ②...
-
Page 2: Precautions For Use
Model 3 Highland F68 plus smart instrument screen — Disclaimer and Precautions Warnings and Disclaimers Important notice: Welcome to purchase our company's products. In order to protect the legitimate rights and interests of users, we hereby remind users that you must carefully read and fully understand the terms of this statement before using this product. - Page 3 F68 Plus smart instrument screen - product highlights Year: Model 3 Highland Name: F68-C Plus Carplay smart instrument screen (with camera) Features 1. Installation: Dedicated to special vehicles, non-destructive installation, does not affect the functions of the original vehicle 2. Experience:...
- Page 4 F68 Plus smart instrument screen Carplay/Auto usage instructions Carplay/Auto Connection interface Connecting Carplay, Android Auto 1. When in Carplay, press the right scroll wheel to the right to enter the Carplay connection interface. 2. Turn on Bluetooth in the phone settings and find the corresponding Bluetooth name on the machine, for example: CarKit- **** 3.
- Page 5 F68 Plus smart instrument screen — function introduction Setting method 1. In P mode, push the left and right scroll wheel for 3 seconds to enter the Set interface setting interface. UI theme, time zone switching, temperature switching, hour 2. In P mode, adjust the UI to the Theme item and push the right scroll wheel...
- Page 6 F68 Plus smart instrument screen — function introduction Carplay version shortcut function 1. Click the Carplay icon to enter Carplay in P file. 2. Click here to enter Android Auto connection 3. Click here to enter the setting interface Volume...
- Page 7 F68 Plus smart instrument screen — function introduction Charging tips Left and right blind zone prompts Auto-assisted driving mode reminder When you open the charger cover, the When you turn on the left and right turn signals " Please turn the steering wheel lightly "...
- Page 8 F68 Plus smart instrument screen — function introduction PIaid mode Theme UI interface interface door status Open the car doors ( 4 doors), front cover, and trunk, and there will be corresponding status prompts. Note: All doors need to be closed to enter the...
- Page 9 F68 Plus smart instrument screen — effect display simple design Product design style is simple and adopts touch operation Narrow design The edge is designed according to the large screen style of the original car, so that the product can be integrated with the original car after installation.
- Page 10 F68 Plus smart instrument screen installation instructions 1. Remove the passenger door seal strip...
- Page 11 F68 Plus smart instrument screen installation instructions plastic panel. 2. Use a to remove the lower side trim...
- Page 12 F68 Plus smart instrument screen installation instructions 3. take out the clips...
- Page 13 F68 Plus smart instrument screen installation instructions 4. Pull off the lower trim strip on the passenger side door...
- Page 14 F68 Plus smart instrument screen installation instructions 5. Remove the passenger under panel with your hands...
- Page 15 F68 Plus smart instrument screen installation instructions 6. Unplug the speakers and footrest lamps in the trim panel...
- Page 16 F68 Plus smart instrument screen installation instructions 7. Remove the saddle side trim panel...
- Page 17 F68 Plus smart instrument screen installation instructions 8. Remove the lower trim panel of the main driver's seat (you can watch the video to learn the disassembly method, there are no screws)
- Page 18 F68 Plus smart instrument screen installation instructions 9. Remove the saddle side trim panel on the driver's side.
- Page 19 F68 Plus smart instrument screen installation instructions 10. The plug in the red circle needs to be connected. It is the power plug of the product. The plug in the square is for the signal. You only need to insert it and leave the other end out.
- Page 20 F68 Plus smart instrument screen installation instructions Fixed together with the original wiring harness Butt plug Go to the driver's seat 12. Wiring diagram...
- Page 21 F68 Plus smart instrument screen installation instructions 13. Remove the upper trim panel of the steering column...
- Page 22 F68 Plus smart instrument screen installation instructions 14. After remove it, pull the buckle of the rear trim panel apart.
- Page 23 F68 Plus smart instrument screen installation instructions 15. Thread the threading tape from the steering column to the lower trim panel (if you don’t understand, you can watch the installation video or contact us)
- Page 24 F68 Plus smart instrument screen installation instructions 16. Tie the wiring harness screen plug to the threading tape...
- Page 25 F68 Plus smart instrument screen installation instructions 17. Pull out the threading tape from the top of the steering column, and then tear off the fixing tape.
- Page 26 F68 Plus smart instrument screen installation instructions 18. Connect the screen plug...
- Page 27 F68 Plus smart instrument screen installation instructions 19. Test whether the screen turns on normally and functions (you can watch the installation video)
- Page 28 F68 Plus smart instrument screen installation instructions 20. Align the buckle position and snap the screen up.
- Page 29 F68 Plus smart instrument screen front camera installation instructions 1. Click the screen to open the front trunk...
- Page 30 F68 Plus smart instrument screen front camera installation instructions 2. Lift the front trunk...
- Page 31 F68 Plus smart instrument screen front camera installation instructions 3. Remove the air intake trim panel...
- Page 32 F68 Plus smart instrument screen front camera installation instructions 4. Remove the air inlet...
- Page 33 F68 Plus smart instrument screen front camera installation instructions 5. Remove the fixed trailer hook trim panel...
- Page 34 F68 Plus smart instrument screen front camera installation instructions 6. Unplug the front trunk lighting lamp...
- Page 35 F68 P lus smart instrument screen front camera installation instructions 7. Twist off the four fixing screws in the pocket...
- Page 36 F68 Plus smart instrument screen front camera installation instructions 8. Use the threading tape to pass through the lower grille into the cabin.
- Page 37 F68 Plus smart instrument screen front camera installation instructions 9. Tie one end of the camera extension harness to the threading tape...
- Page 38 F68 Plus smart instrument screen front camera installation instructions 10. Pull out the threading strap...
- Page 39 F68 Plus smart instrument screen front camera installation instructions 12. Fix the camera in the center of the front bumper (the pasted position needs to be wiped clean)
- Page 40 F68 Plus smart instrument screen front camera installation instructions 13. Plug in the camera and extension harness, and pull the excess wire harness from the cabin.
- Page 41 F68 Plus smart instrument screen front camera installation instructions 14. Find the original car wiring harness rubber plug and cut off the raised points on it (if you don’t understand, you can watch the installation video or contact us)
- Page 42 F68 Plus smart instrument screen front camera installation instructions 15. Thread the threading strap through this hole into the interior.
- Page 43 F68 Plus smart instrument screen front camera installation instructions 16. Tie the other end of the extension harness to the threading tape...
- Page 44 68 Plus smart instrument screen front camera installation instructions 17. Pull it out from the passenger side and tear off the tape.
- Page 45 F68 Plus smart instrument screen front camera installation instructions Fixed together with the original wiring harness Butt plug 18. Follow the original car wiring harness to the driver's seat (the same way as the screen wiring harness, see the installation video for details)
- Page 46 F68 Plus smart instrument screen front camera installation instructions 19. Connect the camera harness plug to the screen plug...
- Page 47 F68 Plus smart instrument screen front camera installation instructions 20. After everything is connected, open the front view and check whether there is a picture.
- Page 48 F68 Plus smart instrument screen — display effect Getting on the car display picture...
- Page 49 F68 Plus Smart Instrument Screen-FAQ Troubleshooting Guide Fault Reason Solution Other factors cause the microprocessor to work Restart key abnormally After the host plug was unplugged, it was not Connect the wiring harness, lock the car for 2 hours, keep the mobile phone and remote control key Black screen (the screen does not plugged back within 5 minutes.
-
Page 50: Warranty And Support
Warranty and Support hansshow provides 1 - year extended warranty service. Send us your customer number to get 1 - year full warranty. Email: support@hansshow.com...
Need help?
Do you have a question about the F68 Plus and is the answer not in the manual?
Questions and answers