Table of Contents
Advertisement
Quick Links
USER GUIDE
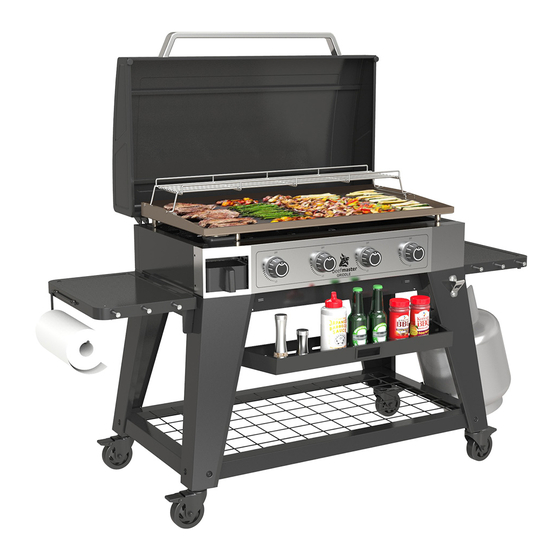
4 BURNER BEEFMASTER GRIDDLE
These instructions contain important information that needs to be followed for the safe assembly
and use of your new barbeque. Please read through carefully and completely prior to assembly.
Take care to remove all packaging materials from the barbeque during assembly and before first use.
When unpacking the barbeque, keep it resting on carton padding until ready to install onto the
cart or build-in. This will avoid any damage to parts while the unit is not fixed into place.
Follow all warnings and instructions when using this barbeque. These instructions contain important
information necessary its proper assembly and safe use and should be retained for future reference.
For Barbeque Model:
G4BEEFG
Tools required: 1 x #2 size Phillips head screwdriver
Special tools required as well for NG conversion. See inside for details.
Advertisement
Table of Contents

Related Manuals for Barbeques Galore beefmaster G4BEEFG


Summary of Contents for Barbeques Galore beefmaster G4BEEFG
- Page 1 USER GUIDE 4 BURNER BEEFMASTER GRIDDLE These instructions contain important information that needs to be followed for the safe assembly and use of your new barbeque. Please read through carefully and completely prior to assembly. Take care to remove all packaging materials from the barbeque during assembly and before first use. When unpacking the barbeque, keep it resting on carton padding until ready to install onto the cart or build-in.
-
Page 2: Safety First
IMPORTANT INFORMATION - READ BEFORE ASSEMBLING Safety First Australia has an excellent safety record when it comes to gas appliances. This reflects both the high quality of appliances sold, as well as growing consumer awareness about safety. We urge you to follow the guidelines below, together with these instructions, for safe use, to prevent overheating and to produce great cooking results. - Page 3 IMPORTANT INFORMATION - READ BEFORE ASSEMBLING Safety First (continued) - USE CAUTION when touching a hot barbeque, especially on surfaces close to the griddle, firebox and hood. - The hood must be in the OPEN position before lighting. - It is fine to pre-heat with all burners on HI, but the hood must be open when doing so. - When cooking with the hood closed, turn each burner to either LO or OFF to prevent the barbeque from getting too hot.
- Page 4 IMPORTANT INFORMATION - READ BEFORE ASSEMBLING Safety First (continued) - Improper installation, use, alteration, service or maintenance, or failure to follow these instructions could result in fire or explosion and lead to serious injury, death and/or significant damage to property. - Do not start the barbeque if there is any doubt over the correct assembly, ignition, gas control or proper use of the barbeque.
- Page 5 IMPORTANT INFORMATION - READ BEFORE ASSEMBLING Where to put your barbeque - For Outdoor Use Only! This appliance must only be used in an above ground, open air situation with natural ventilation, without stagnant areas, where gas leakage and products of combustion are rapidly dispersed by wind and natural convection.
- Page 6 IMPORTANT INFORMATION - READ BEFORE ASSEMBLING For build-in units only (also see diagrams on next page) - The feet provided must remain assembled to the firebox for build-in applications. - The support structure must be only non-combustible material. Clearances of the barbeque from combustible materials (e.g.
- Page 7 IMPORTANT INFORMATION - READ BEFORE ASSEMBLING For build-in units only (continued) CAVITY REQUIRED WIDTH AND DEPTH Min 1400mm (6B) Min 970mm (4B) Min 640mm (2B) Non-combustible material Min 50mm gap behind the BBQ for ventilation! Min 777mm 502mm (front edge of mou to back of fi Min 1400mm (6B) Min 970mm (4B)
- Page 8 If connecting to a standard Natural Gas bayonet outlet, the correct hose and governor assembly must be used (code: NGCK250VJQ) available at your nearest Barbeques Galore store. If connecting direct to the Natural Gas supply, the gas fitter will need to use a Natural Gas governor (code: RCV250Q) and appropriate pipes and fittings for your particular installation.
- Page 9 IMPORTANT INFORMATION - READ BEFORE ASSEMBLING Installing to a fixed gas supply There are two types of fixed supply installations: (1) Direct Permanent Piped Connection: Your barbeque may be permanently connected to the Natural Gas main gas lines or LPG cylinder via copper pipe. This must be done entirely by the gas fitter, in accordance with requirements of AS/NZS 5601, and local gas authority requirements.
- Page 10 ASSEMBLY INSTRUCTIONS Parts list. Carefully unpack the carton and check all parts are included: STEP 2 - Unpack and check fastenings and hardware Check that you have all fastenings and hardware shown below. Hardware Parts If any fastenings or hardware are missing contact our Customer Service team (refer to your included warranty card or the back of this guide for contact details) Part Code Description...
- Page 11 ASSEMBLY INSTRUCTIONS Parts list. Carefully unpack the carton and check all parts are included: STEP 1 - Unpack and check carton contents Prior to assembly, check you have all the parts shown below. Remove all parts from packaging. Also remove packaging materials from firebox and hood assembly. Discard all packaging materials once parts are identified.
- Page 12 ASSEMBLY INSTRUCTIONS Parts list. Carefully unpack the carton and check all parts are included: STEP 3 - NOTE: If building in, skip directly to STEP 20 Attach Wheels to Legs: a) Fix one Wheel (10) into the bottom of each Leg (8, 9, 19, 20) by screwing the wheel shaft the leg plate.
- Page 13 ASSEMBLY INSTRUCTIONS Parts list. Carefully unpack the carton and check all parts are included: STEP 5 Attach Cart Rail - back (11) to the back legs. (Cart back rail does not have magnets.) Fasten each end of cart rail as shown: thread Spring Washers (F) then Flat Washers (G) onto the Bolts (A);...
- Page 14 ASSEMBLY INSTRUCTIONS Parts list. Carefully unpack the carton and check all parts are included: STEP 7 Attach Cart Rail - left side (18) to the left side front and back legs. Fasten each end of cart rail as shown: thread Spring Washers (F) then Flat Washers (G) onto the Bolts (A);...
- Page 15 ASSEMBLY INSTRUCTIONS Parts list. Carefully unpack the carton and check all parts are included: STEP 9 Attach Condiment Shelf (16) to the front legs. Insert one Shoulder Bolt (D) through the hole on each side of the condiment shelf and screw the bolt into the bracket on each leg.
- Page 16 ASSEMBLY INSTRUCTIONS Parts list. Carefully unpack the carton and check all parts are included: STEP 11 a) Close condiment shelf and check that inside top edge of shelf closes firmly onto both magnets on cart rail. Condiment shelf must close onto both magnets or it could fall open. b) If condiment shelf does not close firmly onto both magnets, jiggle the cart rail until it does (if necessary you may need to loosen the bolts you inserted in Step 6).
- Page 17 ASSEMBLY INSTRUCTIONS Parts list. Carefully unpack the carton and check all parts are included: STEP 13 Attach Bottle Opener (14) to front right leg with 2 Bolts (A) as shown. Tighten all bolts firmly. Hardware needed for this step: Bolt - M6 x 15mm STEP 14 Attach 3 Tool Hooks (7) to a front edge of each Side Shelf (6, 24).
- Page 18 ASSEMBLY INSTRUCTIONS Parts list. Carefully unpack the carton and check all parts are included: STEP 15 Attach Side Shelf Brackets (4, 5) to cart assembly. a) Fasten Side Shelf brackets to cart assembly as shown: thread Spring Washers (F) then Flat Washers (G) onto the Bolts (A);...
- Page 19 ASSEMBLY INSTRUCTIONS Parts list. Carefully unpack the carton and check all parts are included: STEP 16 (continued) c) Repeat assembly step b) on shelf bracket attached to front leg (shown below): hold side shelf level, then reach under the shelf and insert a Shoulder Bolt (B) through the hole in the side shelf and screw the bolt firmly into the side shelf bracket attached to the front leg.
- Page 20 ASSEMBLY INSTRUCTIONS Parts list. Carefully unpack the carton and check all parts are included: STEP 18 Place Firebox and Hood (3) on cart. Ensure all packaging materials are removed from Firebox and Hood assembly (including on and around the regulator and hose fitting). With help from another person, lift the firebox and place it carefully on the cart.
- Page 21 ASSEMBLY INSTRUCTIONS Parts list. Carefully unpack the carton and check all parts are included: STEP 20 - NOTE: If building in, refer to pages 5 - 7 first Close the hood, making sure both front corner stoppers are attached to the corners of the hood.
- Page 22 ASSEMBLY INSTRUCTIONS Parts list. Carefully unpack the carton and check all parts are included: STEP 22 Attach Hood Handle (1) and Hood Handle Insulation Pads (2) to Hood. a) Fasten each end of handle as shown: thread Spring Washer (F) and Flat Washer (G) onto the Bolt (E);...
- Page 23 ASSEMBLY INSTRUCTIONS Parts list. Carefully unpack the carton and check all parts are included: STEP 24 Place Warming Rack (26) on back of griddle using the notches on the griddle as a location guide. Notches for warming rack NOTE: Warming rack can be stored on the back of the barbeque, or in the hood. See “Setting up and using your griddle”...
- Page 24 SETTING UP AND USING YOUR GRIDDLE Parts list. Carefully unpack the carton and check all parts are included: Storing the warming rack The warming rack can be stored 2 ways: 1) on the back of the barbeque, or 2) in the hood. 1) If not using the warming rack during your cook, it can be stored on the back of the barbeque as shown below.
-
Page 25: Connecting And Disconnecting The Gas Cylinder
SETTING UP AND USING YOUR GRIDDLE Parts list. Carefully unpack the carton and check all parts are included: Connecting and disconnecting the gas cylinder GAS REGULATOR AND TYPE - If you are using Natural Gas or connecting to a reticulated supply, refer to details at the start of this manual under “Checking the gas type and supply”... -
Page 26: Connecting The Gas Cylinder
SETTING UP AND USING YOUR GRIDDLE Parts list. Carefully unpack the carton and check all parts are included: Connecting and disconnecting the gas cylinder (continued) Connecting the gas cylinder SECURING THE GAS CYLINDER (for cart and tabletop locations) - TABLETOP: If you are - IF YOU ARE USING THE CART: installing the barbeque on When you have positioned the... - Page 27 OPERATING INSTRUCTIONS Parts list. Carefully unpack the carton and check all parts are included: Checking the burner connections Connecting the gas cylinder Gas Hose Connection 1. SEE FIGURE 1 at right (You will need to look under the barbeque firebox to see Burner/ these parts).
- Page 28 OPERATING INSTRUCTIONS OPERATING INSTRUCTIONS Parts list. Carefully unpack the carton and check all parts are included: Parts list. Carefully unpack the carton and check all parts are included: Connecting the gas cylinder Lighting instructions Connecting the gas cylinder Lighting instructions CAUTION! CAUTION! HOOD MUST REMAIN OPEN WHEN LIGHTING...
- Page 29 OPERATING INSTRUCTIONS Parts list. Carefully unpack the carton and check all parts are included: Lighting instructions (continued) Connecting the gas cylinder After lighting, observe the burner flame. Make sure all burner ports are lit and flame height and appearance matches correct flame appearance below: A.
-
Page 30: Seasoning The Griddle
OPERATING INSTRUCTIONS Parts list. Carefully unpack the carton and check all parts are included: Connecting the gas cylinder First time use and seasoning the griddle FIRST TIME USE - GRIDDLE BURN-OFF Before cooking food on your griddle for the first time, it is important to complete a burn-off. Light the griddle, set the burners to ‘HI’... -
Page 31: Food Safety
OPERATING INSTRUCTIONS OPERATING INSTRUCTIONS Parts list. Carefully unpack the carton and check all parts are included: Parts list. Carefully unpack the carton and check all parts are included: Connecting the gas cylinder Tips and techniques Connecting the gas cylinder Tips and techniques When cooking, follow the below helpful tips and techniques to make the most of your cook: When cooking, follow the below helpful tips and techniques to make the most of your cook: GREASE MANAGEMENT SYSTEM... -
Page 32: What You Need
CONVERSION FROM LPG TO NATURAL GAS (NG) Parts list. Carefully unpack the carton and check all parts are included: Conversion can only be performed by an authorised person. Connecting the gas cylinder Installation can only be performed by a licensed gas fitter. Follow these conversion instructions. - Page 33 CONVERSION FROM LPG TO NATURAL GAS (NG) Parts list. Carefully unpack the carton and check all parts are included: Conversion steps (continued) Connecting the gas cylinder 4. Reinstall all burners making sure that each burner is properly engaged onto the valve. 5.
-
Page 34: Care And Maintenance
CARE AND MAINTENANCE Parts list. Carefully unpack the carton and check all parts are included: Cleaning your barbeque after each cook Connecting the gas cylinder Your barbeque will look better and last longer if you keep it clean. Follow these simple steps. 1. - Page 35 Do not use scouring pads on printed fascia markings. - Use 3M stainless steel cleaner available for your local Barbeques Galore store to polish and protect all stainless steel surfaces. Follow the manufacturer’s instructions on the can. Do not use while the barbeque is on or still hot! This cleaning spray will provide a temporary protective film on the stainless steel.
- Page 36 If required, only use correct replacement parts available from your local Barbeques Galore store. See Spare Parts (page 38). To replace burners, place the open end of the burner over the gas jet at the front of the barbeque.
-
Page 37: Troubleshooting Guide
TROUBLESHOOTING GUIDE Problem Possible Cause Prevention/Fix Make sure regulator is securely attached to the ULPG cylinder per ‘Connecting ULPG ULPG cylinder valve is closed Cylinder,’ then turn gas cylinder valve to ‘OPEN’ ULPG cylinder is low or empty Exchange or re ll ULPG cylinder 1. - Page 38 SPARE PARTS DIAGRAM AND PART CODES Parts list. Carefully unpack the carton and check all parts are included: Tel. 1300 139 867 (AUS) or 0800 449 422 (NZ), or email: CSR1@bbqgalore.com.au Connecting the gas cylinder Beefmaster 4 Burner Griddle G4BEEFG Spare Part List G4BEEFG Spare Parts Part Name GLG Code...
-
Page 39: Specifications
SPECIFICATIONS Parts list. Carefully unpack the carton and check all parts are included: Connecting the gas cylinder Drawings and dimensions (all dimensions shown in millimetres) - Page 40 SPECIFICATIONS Parts list. Carefully unpack the carton and check all parts are included: Connecting the gas cylinder Drawings and dimensions (all dimensions shown in millimetres)
- Page 41 SPECIFICATIONS Parts list. Carefully unpack the carton and check all parts are included: Connecting the gas cylinder Drawings and dimensions (all dimensions shown in millimetres)
-
Page 42: Need More Information
Need More Information? In Australia You can call your local Barbeques Galore store where barbeque experts will be happy to help you. You can call your local Barbeques Galore store where barbeque experts will be happy to help you. Phone 1 800 978 555 Phone 1 800 978 555 Or visit us online at: www.barbequesgalore.com.au...
Need help?
Do you have a question about the beefmaster G4BEEFG and is the answer not in the manual?
Questions and answers