Table of Contents
Advertisement
Quick Links
Advertisement
Table of Contents

Related Manuals for Spartan Mowers VersaGuard Advance


Summary of Contents for Spartan Mowers VersaGuard Advance
- Page 1 User’s Manual. VersaGuard Advance Original Instructions (EN)
-
Page 2: Table Of Contents
Alarms……………………………………………………………………………………... 2–6 Console Diagnostics……………………………………………………………………... 2–7 Console Installation and Removal……………………………………………………… 2–8 Chapter 3: Diagrams……………………………………………………………………………. 3–1 CARB and EFI Wiring Diagram…………………………………………………………. 3–1 © 2024 – Spartan Mowers Contact Us at www.spartanmowers.com 1525 White Drive Printed in the USA Batesville, AR 72501 All Rights Reserved... -
Page 3: Chapter 1: Function Overview
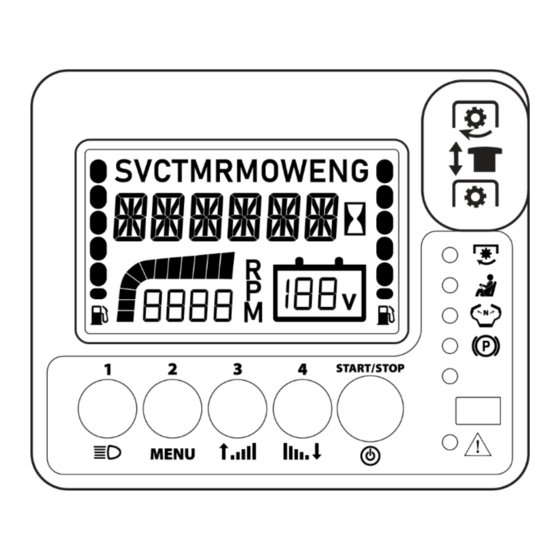
Chapter 1 Function Overview IMPORTANT This manual contains information and instructions for all VersaGuard Advance console functions and features. 14 – LCD 13 – PTO KNOB 8 – OK TO START LED FUNCTION BUTTONS 6 – KEY FOB LED INDICATORS... -
Page 4: Function Buttons/Pto Knob/Key Fob
Function Buttons/PTO Knob/Key Fob DESIGNATION DESCRIPTION FUNCTION/OPERATION Button 1 Press and release to toggle the headlight on/off. Press and release to toggle between Clock, SVC, TMR, MOW, and ENG. Button 2 In SVC or TMR, press and hold for 6 seconds to clear/reset. (The LCD (14) displays “000000”... -
Page 5: Unlocking/Powering Up The Console - Key Fob Only
Chapter 2 Operation Overview Unlocking/Powering Up the Console – Key Fob Only Insert the key fob (6) all the way down into the console to unlock/power up the console and allow access to the buttons’ functionalities and the mower’s operations. If the key fob (6) is already inserted, press any button (1-5) to produce the same response. -
Page 6: Unlocking/Powering Up The Console - Key Code Only
Unlocking/Powering Up the Console – Key Code Only Enter the key code using the buttons (1-4). As you enter the key code, the LCD (14) displays it, always showing the 6 most recently entered digits. If the correct key code is entered, the console unlocks/powers up and allows access to the buttons’... -
Page 7: Programming The Console Unlocking Method And/Or Adding A Personalized Key Code
Programming the Console Unlocking Method and/or Adding a Personalized Key Code The following methods unlock/power up the console and allow access to the buttons’ functionalities and the mower’s operations: 1. Key Fob Only (This unlocking method is the factory default.) 2. -
Page 8: Mechanics Mode
Mechanics Mode Mechanics mode allows dealerships to unlock/power up the console and operate the mower without the owner’s key code. Enter the mechanic’s key code using the buttons (1-4). As you enter the key code, the LCD (14) displays it, always showing the 6 most recently entered digits. If the correct mechanic’s key code is entered, the console unlocks/powers up and allows access to the buttons’... -
Page 9: Interlock Safety Logic
Interlock Safety Logic The Engine Is Not Running Starting the Engine 1. The operator must be in the seat. 2. The parking brake must be engaged. 3. The motion-control levers must be in the position. NEUTRAL-LOCK 4. The PTO knob (13) must be disengaged. The Engine Is Running Putting the Mower into Drive 1. -
Page 10: Alarms
Alarms The console contains multiple alarms for specific applications. Note: The OEM can elect to change the alarms. Low Oil Alarm If the engine is running and the oil pressure switch closes for 10 seconds, the console turns off the engine, the LCD (14) displays “OIL PSI”, and the warning indicator LED (7) illuminates flashing red. -
Page 11: Console Diagnostics
Console Diagnostics ERROR CODE DESCRIPTION RECCOMENDATION The continuous PTO clutch Check the PTO clutch coil resistance. current is too high. A system overcurrent occurred Check the battery condition and connections. when turning on the starter. Check the starter solenoid wiring for short circuits. A system overcurrent occurred Check the battery condition and connections. -
Page 12: Console Installation And Removal
Console Installation and Removal Installing the Console The console comes with a quick clip bracket. To install the bracket, place the console in the dash panel and place the bracket behind the panel. Align the 4 catch arms of the quick clip bracket with the 4 ratchet steps in the console’s housing. -
Page 13: Carb And Efi Wiring Diagram
Chapter 3 Diagrams CARB and EFI Wiring Diagram Diagrams Page 3–1... - Page 14 Notes...
- Page 15 Notes...
Need help?
Do you have a question about the VersaGuard Advance and is the answer not in the manual?
Questions and answers