Table of Contents
Advertisement
Quick Links
Advertisement
Table of Contents

Related Manuals for spiralAIR SPR 2

Summary of Contents for spiralAIR SPR 2
- Page 1 SpiralAir Oil-free scroll compressors SPR 2, SPR 3, SPR 5, SPR 8 Instruction book...
- Page 3 SpiralAir Oil-free scroll compressors SPR 2, SPR 3, SPR 5, SPR 8 Instruction book Original instructions Copyright notice Any unauthorized use or copying of the contents or any part thereof is prohibited. This applies in particular to trademarks, model denominations, part numbers and drawings.
-
Page 4: Table Of Contents
Instruction book Table of contents Safety precautions......................5 ........................... 5 AFETY ICONS ......................5 AFETY PRECAUTIONS GENERAL ................... 6 AFETY PRECAUTIONS DURING INSTALLATION ....................7 AFETY PRECAUTIONS DURING OPERATION ................8 AFETY PRECAUTIONS DURING MAINTENANCE OR REPAIR .......................10 ISMANTLING AND DISPOSAL General description...................... 11 ..........................11 NTRODUCTION ..........................16... - Page 5 Instruction book 3.15 ........................48 ENERAL SETTINGS MENU 3.16 ............................50 NFO MENU 3.17 ...........................50 EEK TIMER MENU 3.18 ............................. 58 EST MENU 3.19 ........................59 SER PASSWORD MENU 3.20 ..........................60 EB SERVER 3.21 .........................68 ROGRAMMABLE SETTINGS Installation........................71 ........................71 IMENSION DRAWINGS ........................72 NSTALLATION PROPOSAL .........................74 LECTRICAL CONNECTIONS...
- Page 6 Instruction book ..........................85 ELT REPLACEMENT ....................... 87 EMPERATURE PROTECTION ....................87 LEANING THE COMPRESSOR ELEMENT .....................88 EPLACEMENT OF THE OUTLET PIPE .....................89 EFRIGERANT DRYER MAINTENANCE Problem solving......................91 Technical data.......................92 ......................92 EADINGS ON CONTROL PANEL ........................92 LECTRIC CABLE SIZE ..................93 ETTINGS FOR OVERLOAD RELAY AND FUSES ...............
-
Page 7: Safety Precautions
Instruction book Safety precautions Safety icons Explanation Danger to life Warning Important note Safety precautions, general General precautions 1. The operator must employ safe working practices and observe all related work safety requirements and regulations. 2. If any of the following statements does not comply with the applicable legislation, the stricter of the two shall apply. -
Page 8: Safety Precautions During Installation
Instruction book Safety precautions during installation All responsibility for any damage or injury resulting from neglecting these precautions, or non observance of the normal caution and care required for installation, operation, maintenance and repair, even if not expressly stated, will be disclaimed by the manufacturer. -
Page 9: Safety Precautions During Operation
Instruction book 13. In multiple compressor systems, manual valves must be installed to isolate each compressor. Non-return valves (check valves) must not be relied upon for isolating pressure systems. 14. Never remove or tamper with the safety devices, guards or insulation fitted on the machine. Every pressure vessel or auxiliary installed outside the machine to contain air above atmospheric pressure must be protected by a pressure relieving device or devices as required. -
Page 10: Safety Precautions During Maintenance Or Repair
Instruction book • All hoses and/or pipes inside the machine are in good condition, secure and not rubbing • There are no leaks • All fasteners are tight • All electrical leads are secure and in good order • Safety valves and other pressure relief devices are not obstructed by dirt or paint •... - Page 11 Instruction book 7. Close the compressor air outlet valve before connecting or disconnecting a pipe. 8. Before removing any pressurized component, effectively isolate the machine from all sources of pressure and relieve the entire system of pressure. 9. Never use flammable solvents or carbon tetrachloride for cleaning parts. Take safety precautions against toxic vapours of cleaning liquids.
-
Page 12: Dismantling And Disposal
Instruction book Dismantling and disposal Dismantling Once the end of life of the machine is reached, please follow next steps: 1. Stop the machine. 2. Check all safety precautions mentioned in the previous chapters to secure safe handling (e.g. LOTO, cool-down, depressurize, discharge, ...). 3. -
Page 13: General Description
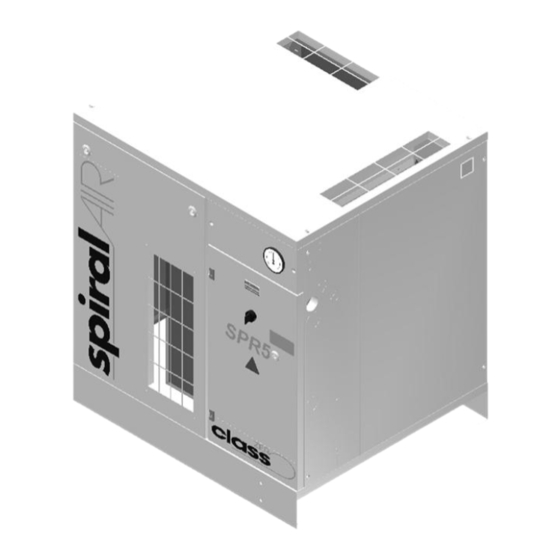
General description Introduction General SPR 2, SPR 3, SPR 5 and SPR 8 are stationary, single stage, oil-free compressors, driven by an electric motor. The compressors are controlled by a pressure switch. The compressors are enclosed in a sound dampening enclosure and are air-cooled. - Page 14 Instruction book SPR 5 floor-mounted - general view SPR 5 with integrated air receivers (3 x 10 l)- general view 2920 7110 53...
- Page 15 Instruction book Pressure gauge Q1/H1 On/off switch with lamp Hour meter Air outlet valve Air receivers (3 x 10 l) Manual drain valve Automatic drain outlet SPR 5 floor-mounted - details Inlet air filter Air outlet valve Air cooler Compressor element Motor Pressure switch Safety valve...
- Page 16 Instruction book SPR 5 T on a 270 l receiver - general view Pressure gauge Q1/H1 On/off switch with lamp Hour meter Air outlet valve Manual drain valve Automatic drain outlet Dew point gauge Refrigerant dryer 2920 7110 53...
- Page 17 Instruction book SPR 8 T - details Inlet air filter Air outlet valve Air cooler Compressor element Motor Check valve Safety valve Manual drain valve Refrigerant dryer TSHH Temperature switch 2920 7110 53...
-
Page 18: Flow Diagram
Instruction book Flow diagram Flow diagram Compressor module Units with dryer on air receiver Units without dryer and air receiver Refrigerant dryer Units with dryer, without receiver To cubicle Units without dryer on air receiver Compressed air outlet 2920 7110 53... - Page 19 Instruction book Air flow Air is drawn through air filter (100) and is compressed by the compressor element (101). Next, the compressed air flows through the check valve (105) and the air cooler (106). Single phase units are equipped with a solenoid valve (109) and a silencer (110) for easy starting at low voltage.
-
Page 20: Refrigerant Dryer
Instruction book Regulating system and protection An Airlogic controller is available as an option. A safety valve (108) protects the compressor element against too high pressure. Refrigerant dryer Operation The refrigerant dryer removes moisture from the compressed air by cooling it down to near freezing temperature. - Page 21 Instruction book Next, the liquid refrigerant flows through dryer/filter (7) to capillary tube (8). The refrigerant leaves the capillary tube at evaporating pressure. The refrigerant enters the evaporator (2) where it withdraws heat from the compressed air by further evaporation at constant pressure. The heated refrigerant leaves the evaporator and is sucked in again by the compressor.
-
Page 22: Airlogic Controller
Instruction book Airlogic controller General Control panel Introduction The controller has following functions: • Controlling the compressor • Protecting the compressor • Monitoring components subject to service • Automatic restart after voltage failure (made inactive) Automatic control of the compressor operation The controller maintains the net pressure between programmable limits by automatically starting and stopping one or more compressor modules. -
Page 23: Control Panel
Instruction book Before remedying, consult the applicable safety precautions. Shutdown warning / shutdown If the compressor element temperature exceeds the factory set warning level, the compressor element will be stopped for a short time and a warning will appear on the controller display (1) and the general alarm LED (2) will light up. -
Page 24: Icons Used
Instruction book Parts and functions Reference Designation Function Display Shows the compressor operating condition and a number of icons to navigate through the menu. Pictograph Automatic operation Pictograph General alarm Alarm LED Flashes in case of a shutdown, is lit in case of a warning condition. - Page 25 Instruction book Name Icon Description Machine control mode Local start / stop Remote start / stop Network control Automatic restart after voltage Automatic restart after voltage failure is active failure Week timer Week timer is active Active protection functions Emergency stop Shutdown Warning Service...
- Page 26 Instruction book Name Icon Description Not valid Input icons Icon Description Pressure Temperature Digital input Special protection System icons Icon Description Compressor element (LP, HP, ...) Dryer Drain Filter Motor Failure expansion module Network problem General alarm 2920 7110 53...
- Page 27 Instruction book Icon Description The compressor module is running and can be stopped The compressor module is stopped and is ready to start The compressor module is awaiting the minimum stop time to expire Menu icons Icon Description Inputs Outputs Alarms (Warnings, shutdowns) Counters Test...
-
Page 28: Main Screen
Instruction book Icon Description Info Navigation arrows Icon Description Down Main screen Control panel Scroll keys Enter key Escape key Function The Main screen is the screen that is shown automatically when the voltage is switched on and one of the keys is pushed. It is switched off automatically after a few minutes when no keys are pushed. - Page 29 Instruction book Two and four value lines screens This type of Main screen shows the value of 2 or 4 parameters (see section Inputs menu). Typical Main screen (2 value lines) Text on image Compressor Outlet Ambient Air Load, Shutdown, etc. (text varies based on the compressor's actual condition) Menu Typical Main screen (4 value lines), fixed speed compressors Text on image...
- Page 30 Instruction book • Optional icons These icons are only shown if their corresponding function is activated (e.g. week timer, automatic restart after voltage failure , etc.) • Pop up icons These icons pop up if an abnormal condition occurs (warnings, shutdowns, service,...) To call up more information about the icons shown, select the icon concerned using the scroll keys and press the enter key.
- Page 31 Instruction book When the Chart (Medium Resolution) is selected, the chart shows the variation of the selected input per hour. The screen shows the last 4 hours. When the Chart (Low Resolution) is selected, the chart shows the variation of the selected input per day.
-
Page 32: Calling Up Menus
Instruction book Calling up menus Control panel Scroll keys Enter key Escape key Procedure When the voltage is switched on, the Main screen is switched on automatically: Typical Main screen (2 value lines) • To go to the Menu screen, select action button Menu (1) by means of the Scroll keys and press the Enter key. -
Page 33: Shutdown Warning
Instruction book Text on image Menu Regulation • The menu screen shows a number of icons. Each icon indicates a menu item. By default, the Regulation icon is selected. The status bar shows the name of the menu that corresponds with the selected icon. •... - Page 34 Instruction book Element 2 is shutdown due to repeatedly high element temperature warnings If this occurs: 1. Switch off the voltage and remedy the problem cause. 2. Switch on the voltage and reset the element manually by selecting the warning icon (or go to warning menu - elements) and press Reset: Warning element screen (element 2 is triggered) Text on image...
- Page 35 Instruction book Counter screen where one element was reset manually Text on image Information Element Warnings Trigger level Element Problem Resets High Temperature Warnings Modify High ambient temperature If the ambient temperature is above the factory setting (40 °C - 104 °F), a warning is triggered and a warning icon (1) is shown on the main screen: Main screen with high ambient temperature warning Text on image...
- Page 36 Instruction book Description of high ambient alarm in the protection menu Text on image General Shutd. Warn. Ambient air Shutdown High temperature warning Dew point temperature On compressors with integrated dryer, alarm LED (4) will be lit and the related alarm icon will be flashing if the dew poin temperature exceeds the warning level: Main screen with dew point exceeding the limit Text on image...
-
Page 37: Shutdown
Instruction book Shutdown Description The compressor will shut down in case of: • Too high ambient temperature • Motor overload • Outlet pressure sensor error High ambient temperature If the ambient temperature is above the factory set shutdown temperature (45 °C - 113 °F), the compressor will be stopped and a stop icon will be shown on the main screen of the controller: Main screen - shutdown by too high ambient temperature Text on image... - Page 38 Instruction book Procedure Starting from the Main screen, • Move the cursor to the action button Menu and press the Enter key. Following screen appears: Text on image Menu Regulation • Using the Scroll keys, move the cursor to the Inputs icon (see above, section Menu icon). •...
- Page 39 Instruction book The first item in the list is highlighted. In this example, the Net Pressure is selected (chart icon). To change, press the Enter button again. A pop up window opens: Press Enter again to remove this input from the chart. Another confirmation pop up opens: Select Yes to remove or No to quit the current action.
-
Page 40: Outputs Menu
Instruction book Text on image Set As Main Chart Signal Outputs menu Menu icon, Outputs Function To call up information regarding the actual status of some outputs such as the condition of the Fan motor overload contact, the general warning contact, etc. Procedure Starting from the Main... -
Page 41: Counters
Instruction book Text on image General General warning General shutdown Cabinet fan Fan motor • The screen shows a list of all outputs with their corresponding icons and readings. If an output is in warning or shutdown, the original icon is replaced by the warning or shutdown icon respectively. -
Page 42: Control Mode Selection
Instruction book Text on image Counters Fan starts Shutdowns element 2 Module hours Load relay The screen shows a list of all counters with their actual readings. 3.11 Control mode selection Function To select the control mode, i.e. whether the compressor is in local control, remote control or controlled via a local area network (LAN). -
Page 43: Service Menu
Instruction book • There are 3 possibilities: • Local control (1) • Remote control (2) • LAN control (3) After selecting the required control mode, press the Enter key on the controller to confirm your selection. The new control mode selection is now visible on the main screen. 3.12 Service menu Menu icon, Service Function... - Page 44 Instruction book Procedure Starting from the Main screen, • Move the cursor to the action button Menu and press the Enter key. Following screen appears: Text on image Menu Regulation • Using the Scroll keys, move the cursor to the Service icon (see above, section Menu icon). •...
- Page 45 Instruction book Overview Text on image Overview Real Time (hours) Running Hours Reset Example for service level (A): The figures at the left are the programmed service intervals. For Service interval A, the programmed number of running hours is 2500 hours (upper row) and the programmed number of real time hours is 8760 hours, which corresponds to one year (second row).
- Page 46 Instruction book Text on image Service plan Real time hours Level Modify Running hours Modifying a service plan Dependant on the operating conditions, it can be necessary to modify the service intervals. To do so, use the Scroll keys to select the value to be modified. A screen similar to the one below appears: Press the Enter key.
-
Page 47: Setpoint Menu
Instruction book Next Service Text on image Next service Running hours Level Actual In the example above, the A Service level is programmed at 500 running hours, of which 0 hours have passed. History The History screen shows a list of all service actions done in the past, sorted by date. The date at the top is the most recent service action. - Page 48 Instruction book Text on image Menu Regulation • Using the Scroll keys, move the cursor to the Setpoint icon (see above, section Menu icon) • Press the Enter key. Following screen appears: Text on image Regulation Pressure band 2 High Pressure band 1 High Pressure band 2 Low Pressure band 1 Low...
-
Page 49: Event History Menu
Instruction book Text on image Regulation Stopping pressure • The upper and lower limit of the setting is shown in grey, the actual setting is shown in black. Use the ↑ or ↓ key of the Scroll keys to modify the settings as required and press the Enter key to accept. -
Page 50: General Settings Menu
Instruction book Example of Event History screen • Scroll through the items to select the desired shutdown or emergency stop event. • Press the Enter key to find the date, time and other data reflecting the status of the compressor when that shutdown or emergency stop occurred. 3.15 General settings menu Menu icon, Settings Function... - Page 51 Instruction book This screen shows again a number of icons. By default, the User Password icon is selected. The status bar shows the description that corresponds with the selected icon. Each icon covers one or more items , such as •...
-
Page 52: Info Menu
Instruction book 3.16 Info menu Menu icon, Info Function Shows the SPIRALAIR internet address. Procedure Starting from the Main screen, • Move the cursor to the action button Menu and press the Enter key. Following screen appears: Text on image... - Page 53 Instruction book Important remark: You can select different timers on one day.(up to 8 actions). It is however not possible to program 2 actions at the same time. The solution: leave at least 1 minute in between 2 actions. Example: Start Compressor: 5.00 AM, Pressure Setpoint 2: 5.01 AM (or later). Procedure Starting from the Main...
- Page 54 Instruction book Text on image Week Action Schemes Week Action Scheme 3 Week Action Scheme 1 Week Action Scheme 4 Week Action Scheme 2 • A weekly list is shown. Monday is automatically selected and highlighted in red. Press the Enter key on the controller to set an action for this day.
- Page 55 Instruction book Text on image Monday Modify • A new popup window opens. Select an action from this list by using the Scroll keys on the controller. When ready press the Enter key to confirm. Text on image Monday Stop Actions Pressure Setpoint 1 Remove...
- Page 56 Instruction book • A new pop up window opens. Use the ↑ or ↓ key of Scroll keys to modify the values of the hours. Use the ← or → Scroll keys to go to the minutes. Text on image Monday Save Time...
- Page 57 Instruction book Text on image Monday Are you sure? Save Modify Press the Escape key to leave this window. • The action is shown below the day the action is planned. Text on image Week Action Scheme 1 Thursday Monday - Start Friday Tuesday Saturday...
- Page 58 Instruction book Text on image Week Cycle Week 3 Week 1 Week 4 Week 2 Modify Press the Enter key twice to modify the first week. • A new window opens. Select the action, example: Week Action Scheme 1 Text on image Week Cycle Week Action Scheme 2 Week 1...
- Page 59 Instruction book Text on image Week Timer Status Week Action Schemes Week Timer Inactive Week Cycle Remaining Running Time • A new window opens. Select Week 1 to set the Week Timer active. Text on image Week Timer Week Timer Inactive Week Week 1 •...
-
Page 60: Test Menu
Instruction book • This timer is used when the week timer is set and for certain reasons the compressor must continue working, for example, 1 hour, it can be set in this screen. This timer is prior to the Week Timer action. Text on image Week Timer Remaining Running Time... -
Page 61: User Password Menu
Instruction book • Move the cursor to the action button Menu and press the Enter key (2). Following screen appears: • Using the scroll keys, move the cursor to the test icon (see above) • Press the Enter key, following screen appears: Text on image Test Not allowed... -
Page 62: Web Server
Instruction book Text on image Menu Regulation • Using the Scroll keys, select the Settings icon (see section General settings menu). • Press the Enter key. Following screen appears: • Move the cursor to the Password icon (see above, section Menu icon) •... - Page 63 Instruction book Configuration of the network card (in Windows) • Go to My Network places (1). • Click on View Network connections (1). • Select the Local Area connection (1), which is connected to the controller. 2920 7110 53...
- Page 64 Instruction book • Click with the right button and select properties (1). • Use the check box Internet Protocol (TCP/IP) (1) (see picture). To avoid conflicts, uncheck other properties if they are checked. After selecting TCP/IP, click on the Properties button (2) to change the settings.
- Page 65 Instruction book • Click on the Connections tab (1) and then click on the LAN settings button (2). • In the Proxy server Group box, click on the Advanced button (1). 2920 7110 53...
- Page 66 Instruction book • In the Exceptions Group box, enter the IP address of your controller. Multiple IP addresses can be given but they must be separated with semicolons (;). Example: Suppose that you already added two IP addresses (192.168.100.1 and 192.168.100.2).
- Page 67 Instruction book • Open your browser and type the IP address of the controller you want to view in your browser (in this example http://192.168.100.100). The interface opens: Screen shot (typical) Navigation and options • The banner shows the compressor type and the language selector. In this example, three languages are available on the controller.
- Page 68 Instruction book Counters Lists all current counter values from controller and compressor. Info status Machine status is always shown on the web interface. Digital inputs Lists all Digital inputs and their status. 2920 7110 53...
- Page 69 Instruction book Digital outputs Lists all Digital outputs and their status. Special protections Lists all special protections of the compressor. Service plan Displays all levels of the service plan and their status. This screen shot underneath only shows the running hours. It is also possible to show the current status of the service interval. 2920 7110 53...
-
Page 70: Programmable Settings
Instruction book 3.21 Programmable settings Compressors without built-in refrigeration dryer Minimum Factory Maximum setting setting setting Starting pressure Starting pressure (8 bar compressors) bar(e) Starting pressure (8 bar compressors) psig 101.5 Starting pressure (10 bar compressors) bar(e) Starting pressure (10 bar compressors) psig 130.5 Minimum... - Page 71 Instruction book Compressors with built-in refrigeration dryer Minimum Factory Maximum setting setting setting Starting pressure Starting pressure (8 bar compressors) bar(e) Starting pressure (8 bar compressors) psig 98.6 113.1 Starting pressure (10 bar compressors) bar(e) Starting pressure (10 bar compressors) psig 127.6 142.1...
- Page 72 Instruction book Terminology Term Explanation ARAVF Automatic Restart After Voltage Failure. See section General. Power recovery Is the period within which the voltage must be restored to have an automatic restart. Is time accessible if the automatic restart is activated. To activate the automatic restart function, consult your supplier.
-
Page 73: Installation
9820 6376 04-03 SPR 2-8 TM EP imperial 9820 6376 04-06 SPR 2-8 T TM EP metric 9820 6376 05-03 SPR 2-8 _T 30 l EP metric 9820 6376 06-03 SPR 2-8 _T 30 l EP imperial 9820 6376 06-06 Legend... -
Page 74: Installation Proposal
Instruction book Installation proposal Dryer service panel Condensate drain Service panel Manual drain Supply cable Automatic drain Minimum area to be reserved for servicing purposes Recommendations 1. Install the compressor on a level horizontal industrial floor, suitable for taking the weight of the compressor. - Page 75 Instruction book 2. Delivery pipe. The pressure drop in the delivery pipe can be calculated from: 1.85 Δp = (L x 450 x Q ) / (d x P), with d = inner diameter of the pipe in mm Δp = pressure drop in bar (recommended maximum: 0.1 bar (1.5 psi)) L = length of the pipe in m P = absolute pressure at the compressor outlet in bar = free air delivery of the compressor in l/s...
-
Page 76: Electrical Connections
Instruction book Electrical connections Attention The electrical installation must correspond to the applicable codes. The mains supply and earthing lines must be of suitable size. The installation must be earthed and protected by fuses in each phase. Install an isolating switch near the compressor. Make sure that this switch is open to isolate the compressor from the mains before carrying out any connection. -
Page 77: Pictographs
Instruction book Pictographs Pictographs Reference Explanation Warning: the compressor starts and stops automatically. Do not perform service when pressurized and when the voltage is on. Read the instruction book, switch off the power and depressurize the compressor before maintenance or repair. After power failure during automatic operation, the unit restarts automatically. - Page 78 Instruction book Reference Explanation Do not work on the compressor when the unit is running, under pressure or in automatic operation. Always read the instruction book first. Switch off the voltage, release the pressure and prevent the unit is switched on inadvertently (Lock out/Tag out) before working on the equipment.
-
Page 79: Operation
Instruction book Operation Initial start-up Safety The operator must apply all relevant Safety precautions during operation. The maximum recommended motor starting frequency is starts is 20 starts per hour. In order to keep the number of starts at an acceptable level, the compressor must be connected to an air receiver with a suitable size. -
Page 80: Starting
Instruction book Rotation control check Electropneumatic controlled compressors A compressor equipped with a phase sequence relay will not start if the phase sequence is wrong. In that case, reverse two incoming electric lines to solve the issue. Starting Control panel Pressure gauge Q1/H1 On/off switch with lamp... -
Page 81: During Operation
Instruction book 5. The motor starts and stops automatically depending on the air pressure. 6. On compressors equipped with a refrigerant dryer, the dew point of the refrigerant dryer will be reached after a few minutes. During operation Procedure 1. Check the pressure gauge (Gp) on the control panel to check the pressure setting. On compressors equipped with an optional controller, check pressure setting on the controller display. -
Page 82: Taking Out Of Operation
Instruction book The refrigerant air dryer and the air receiver remain under pressure. If it is necessary to depressurize, open the manual drain valve(s). Taking out of operation Procedure 1. Stop the compressor and close the air outlet valve. 2. Switch off the voltage and disconnect the compressor from the mains. 3. -
Page 83: Preventive Maintenance
Instruction book Preventive maintenance Preventive maintenance schedule Before carrying out any maintenance, repair work or adjustments, proceed as follows: • Stop the compressor. • Switch off the voltage and open the isolating switch. • Close the air outlet valve. • Depressurize the compressor by opening the manual drain valve(s). The operator must apply all relevant Safety precautions during maintenance or repair. - Page 84 Every 2 5000 10 bar and 145 psi compressors: years • Replace the element outlet pipe and the plastic insert (only on SPR 2, SPR 3 and SPR 5). See section Outlet pipe replacement. Note: From S/N API 744 000 onwards, a new version of compressor element is used on SPR 5.
-
Page 85: Service Kits
Instruction book In high ambient conditions, the bearings must be greased more frequently: for every 5 °C (9 °F) increase above 30 °C (86 °F), the maintenance interval should be reduced with 30 %. Contact your supplier for details. 4. In extremely dry conditions (relative humidity below 15 %), the tip seals and dust seals need to be replaced more frequently. -
Page 86: Adjustments And Servicing Procedures
Instruction book Adjustments and servicing procedures Air filter Location of the air filter (AF) Procedure 1. Stop the compressor, close the air outlet valve and switch off the voltage. 2. Remove the filter cover and the filter element. Discard damaged or clogged elements. Clean the cover. -
Page 87: Safety Valve
Instruction book Safety valve Testing Testing shall only be carried out by competent personnel 1. Stop the compressor, close the air outlet valve and switch off the voltage. 2. Depressurize the compressor. 3. Remove the safety valve. See section Introduction for the location of the safety valve (SV). - Page 88 Instruction book 3. Remove the front panel. 4. Remove the inlet baffle (I) 5. Loosen screws (B). 6. Loosen screw (C). 7. Use slot (D) to lift the motor plate. 8. Install the new belt(s) in the pulley grooves. 9. Set the tension of the belt(s) by screwing bolt (C) out. Refer to the label on the motor plate for tensioning data: 10.
-
Page 89: Temperature Protection
Instruction book Temperature protection On compressors with an optional controller, the compressor element is protected by a sensor in the element outlet. The sensor is connected to the controller. When the maximum temperature is exceeded, the compressor is stopped. It will restart automatically if the temperature drops again and if pressure is required. -
Page 90: Replacement Of The Outlet Pipe
Replacement of the outlet pipe Description The outlet pipe (1) of the 2.2 kW compressor element (used on SPR 2 and SPR 3) and of the 3.7 kW element (used on SPR 5 up to S/N API 744 000) contains a plastic insert (3). -
Page 91: Refrigerant Dryer Maintenance
Instruction book 3. Remove the outlet pipe together with the nipple. 4. Fit the nipple to the new outlet pipe and tighten. Use only PTFE tape. 5. Fit the plastic insert in place as indicated on the drawing and assemble the outlet pipe with a maximum torque of 5 Nm (3.7 lbf.ft). - Page 92 Instruction book Be aware that internal components of the dryer such as the pipes can reach a temperature of up to 110˚C (230˚F). Therefore, wait until the dryer has cooled down before removing the side panels. Before starting any maintenance or repair work, switch off the voltage and close the air outlet valve.
-
Page 93: Problem Solving
Instruction book Problem solving Before carrying out any maintenance or repair, perform the following steps: • Stop the compressor and switch off the voltage. • Open and lock the isolating switch to prevent an accidental start. • Isolate the compressor by closing the outlet valve. •... -
Page 94: Technical Data
The voltage drop must not exceed 5% of the nominal voltage. It may be necessary to use cables of a larger size than those stated to comply with this requirement. Cable size SPR 2 SPR 3 SPR 5 SPR 8... -
Page 95: Settings For Overload Relay And Fuses
Instruction book SPR 2 SPR 3 SPR 5 SPR 8 Frequency Voltage Cable size Cable size Cable size Cable size 60 Hz 460 V 3~ AWG 12 AWG 10 AWG 8 Settings for overload relay and fuses Attention The indicated fuse value is the maximum value with regard to the short circuit protection of the starter. -
Page 96: Temperature Protection And Safety Valve Settings
Instruction book SPR 5 SPR 5 SPR 8 SPR 8 Frequency Voltage Overload relay Maximum fuse Overload relay Maximum fuse 60 Hz 460 V 3~ 12 A 10 A 15 A : Maximum fuses according to HRCII-C, according to Class K5 for units without refrigerant dryer, and according to Class K5 for units with refrigerant dryer, respectively. -
Page 97: Compressor Data
Instruction book Compressor data All data specified below apply under reference conditions, see section Reference conditions and limitations. Compressor type SPR 2 SPR 2 SPR 3 SPR 3 8 bar 10 bar 8 bar 10 bar 116 psi 145 psi... - Page 98 Instruction book Compressor type SPR 5 SPR 5 SPR 8 SPR 8 8 bar 10 bar 8 bar 10 bar 116 psi 145 psi 116 psi 145 psi Nominal motor power Sound pressure level dB(A) Refrigerant type (Full-Feature) R513a R513a R513a R513a Dew point (refrigerant dryer)
-
Page 99: Instructions For Use
Instruction book Instructions for use Air receiver This section applies to compressors including air receiver(s). The vessel can contain pressurized air; this can be potentially dangerous if the equipment is misused. The vessel shall only be used to store compressed air and shall not be subject to rapid fluctuation of pressure. -
Page 100: Guidelines For Inspection
Instruction book Guidelines for inspection Guidelines On the Declaration of Conformity / Declaration by the Manufacturer, the harmonised and/or other standards that have been used for the design are shown and/or referred to. The Declaration of Conformity / Declaration by the Manufacturer is part of the documentation that is supplied with this compressor. -
Page 101: Pressure Equipment Directives
Instruction book Pressure equipment directives Components subject to Pressure Equipment Directive 2014/68/EU Components subject to 2014/68/EU Pressure Equipment Directive greater than or equal to category II Pressure version Part number Description PED Class 8 bar 0830 1008 54 Safety valve 116 psi 0830 1008 49 Safety valve... -
Page 102: Declaration Of Conformity
Instruction book Declaration of conformity Typical example of a Declaration of Conformity document (1): Contact address: International Compressor Distribution NV Boomsesteenweg 957 B-2610 Wilrijk (Antwerp) Belgium (2): Applicable directives (3): Standards used On the Declaration of Conformity / Declaration by the Manufacturer, the harmonized and/or other standards that have been used for the design are shown and/or referred to. - Page 104 www.oilfreecompressors.eu...
Need help?
Do you have a question about the SPR 2 and is the answer not in the manual?
Questions and answers